Valve Adjustment Nightmare!
- Thread starter jaeger22
- Start date
I really have no clue. When I bought the bike, the closest one said they had never seen a Tenere, "We mostly sell cruisers". I ended up going to Titusville over on the coast to buy it. But I have never had service done or bought any parts.How is your dealer? Maybe they can help or at least confirm they are backordered w/ Yamaha vs backordered with cheap cycle parts.
However the good folks at Cheap Cycle Parts were very helpful. As I expected their computers tie directly into Yamaha and when I order from them (or any other similar supplier), they order from Yamaha. No one could afford to actually stock all the OEM parts. So the BACKORDERED status on my order came directly from Yamaha. However, they were able to look up every backordered part and give me the projected arrival date. The valves (first thing I need) and a lot of the other parts will be to them in a few days. But the long poll in the tent is the tensioner assembly. The projected receive date for that is 16 October.
 So it looks like I will be down awhile. I think I will pull and lub the swing arm.
I ordered a 2013 FJR switch cluster shortly after the bike was released. It showed backordered immediately, with an estimated arrival of about 40 days, if I remember.
It arrived in 3 weeks. Half the time they estimated.
Maybe Yamaha purposely avoids optimistic estimates? A strategy to not disappoint?
Hope so, for your benefit.
It arrived in 3 weeks. Half the time they estimated.
Maybe Yamaha purposely avoids optimistic estimates? A strategy to not disappoint?
Hope so, for your benefit.
Dallara has posted similar experiences.snakebitten said:I ordered a 2013 FJR switch cluster shortly after the bike was released. It showed backordered immediately, with an estimated arrival of about 40 days, if I remember.
It arrived in 3 weeks. Half the time they estimated.
Maybe Yamaha purposely avoids optimistic estimates? A strategy to not disappoint?
Hope so, for your benefit.
Yamaha does seem to be very good about their backorder dates.
ac
Cool! Thanks guys, that is good to know. I better plan to have everything else ready well ahead of their promise date just in case. At lease I will be able to take my time with the valve lapping and putting the head back together. Being in a rush is probably at least part of why I screwed this up to start with. :-[
Try Ron Ayers and Stadium. Both Yamaha stocking dealers, I have had good success with both. Ron Ayers had a tensioner in stock for my FJR.
Quick update. I bolted the motor back in the frame this morning! ::012:: Still a LOT of work to do before I hear it run, and not a lot of time available to work on it right now. That whole work and family thing.
But the main thing I wanted to post is that I believe I fully understand what happened and wanted to let anyone out there that may want to adjust their own valves about the trap I got caught in. There are two related issues.
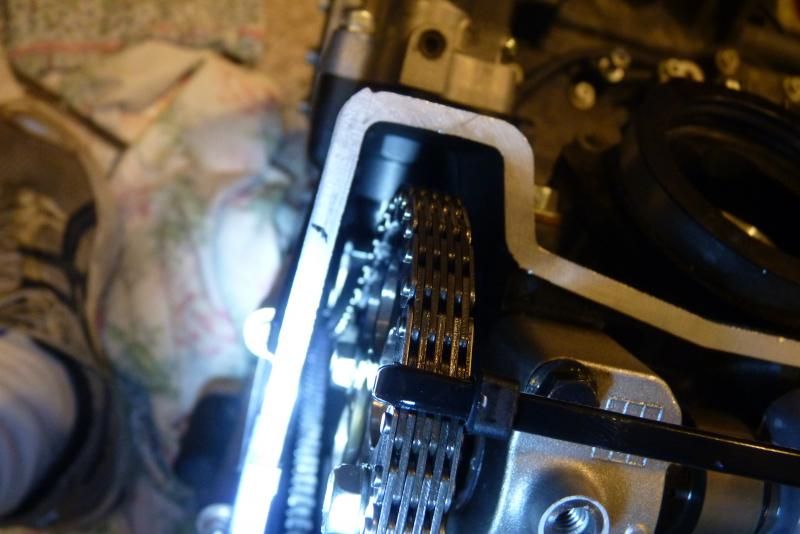
First when you put in the second cam (intake) with the timing mark aligned, it is actually pushing down a bit on the number 2 cylinder intake valves. If you look closely in this picture you can see that the cam will not quite lay flat in the bearings because the #2 lobes are hitting the valves.
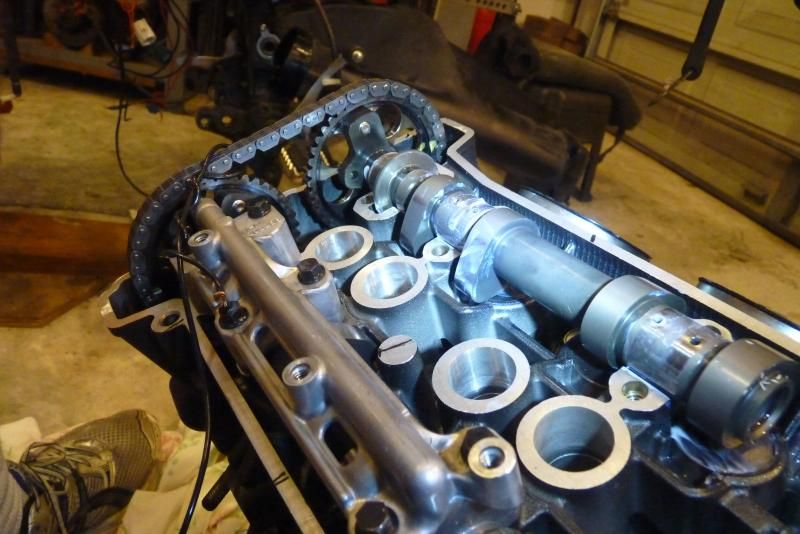
When you put the bearing caps on and tighten them down, it will cause the cam to twist hard to the right (clockwise). That is why the manual tells you to tie wrap the chain to the sprocket. If you don't the cam will rotate and jump a tooth on the chain. You can see the tie wraps in this picture:
I figured out that it actually requires that you install the cam one tooth to the left (counterclockwise) of the correct alignment before you tighten the bearing caps down because the cam will twist so hard that even with tie wraps locking the chain to the sprocket, it pulls the chain so tight that it ends up a tooth to the right.
All that is OK, just a bit of a pain when the motor is still in the frame. But all that tension helped hide the real problem.
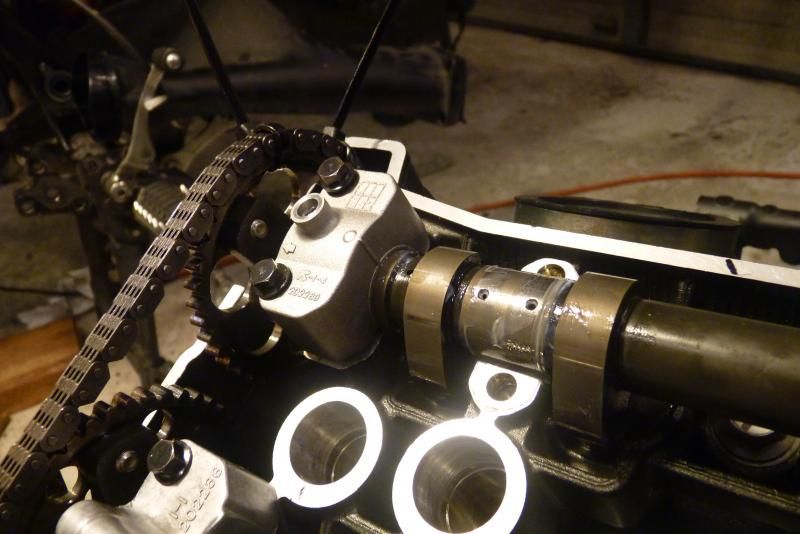
Because the cylinder slants forward, the rear (intake side) chain guide flops forward and down when the chain is loose. It can go way forward as you can see in this picture.
That will allow the chain to slip around the guide in the wider sections of the cam chain channel. As you can see here.
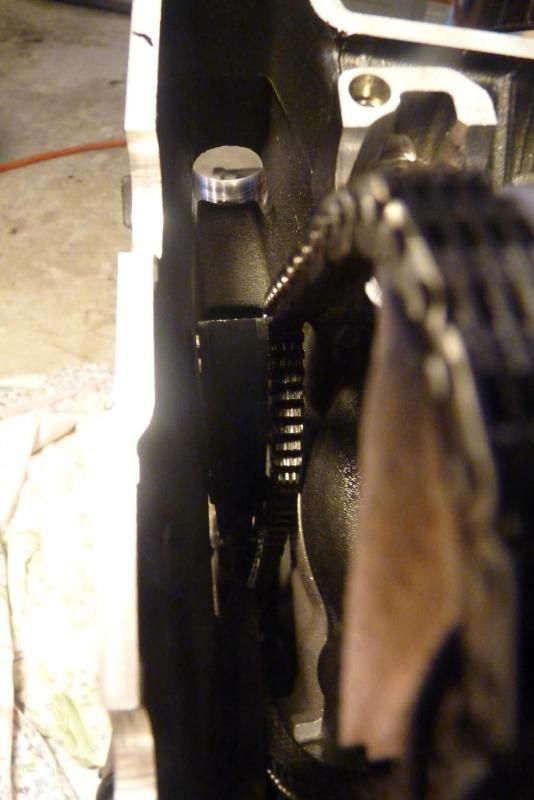
This is very easy to see when the motor is out of the frame but when installed in the bike it is very hard to see. And from the bottom. looking under the clutch cover, all looks normal. So while I was installing the cam and fighting the above cam rotation and tension issues, I noticed the chain seemed really tight to get over the sprocket but assumed it was because of the cams hitting the valves. ::005:: Now that I have done it with the motor out I can see that is should not have been that tight.
So the top of the guide got twisted to the side and that allowed the tensioner to push directly on the cam chain instead of on the guide. I can see from the groves worn in the case and the guide exactly how the chain was running. So it started up and ran fine. But of course, the chain slowly ate away the tip of the tensioner until the plunger fell out of the tensioner body and the cam chain then jumped off.
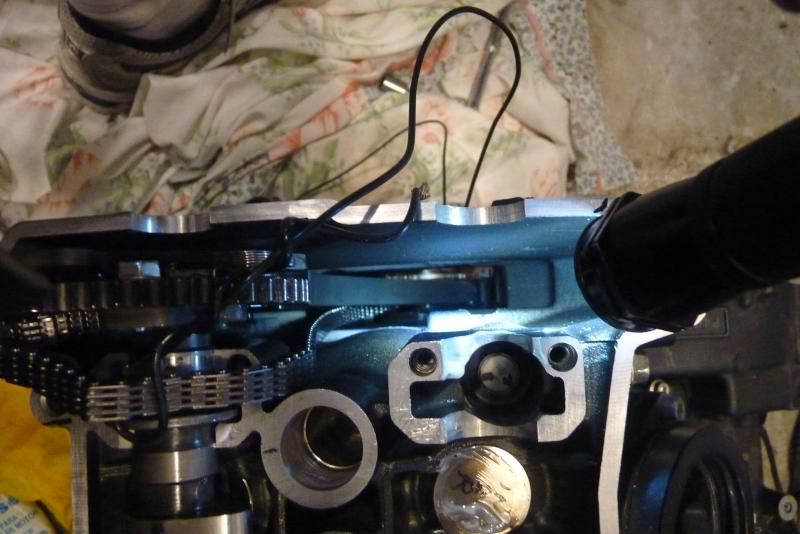
So the bottom line is, if you take the cams out, double check the cam chain guide alignment before you button it up. It should look like this when you are all done.
John
That whole work and family thing.But the main thing I wanted to post is that I believe I fully understand what happened and wanted to let anyone out there that may want to adjust their own valves about the trap I got caught in. There are two related issues.
First when you put in the second cam (intake) with the timing mark aligned, it is actually pushing down a bit on the number 2 cylinder intake valves. If you look closely in this picture you can see that the cam will not quite lay flat in the bearings because the #2 lobes are hitting the valves.
When you put the bearing caps on and tighten them down, it will cause the cam to twist hard to the right (clockwise). That is why the manual tells you to tie wrap the chain to the sprocket. If you don't the cam will rotate and jump a tooth on the chain. You can see the tie wraps in this picture:
I figured out that it actually requires that you install the cam one tooth to the left (counterclockwise) of the correct alignment before you tighten the bearing caps down because the cam will twist so hard that even with tie wraps locking the chain to the sprocket, it pulls the chain so tight that it ends up a tooth to the right.
All that is OK, just a bit of a pain when the motor is still in the frame. But all that tension helped hide the real problem.
Because the cylinder slants forward, the rear (intake side) chain guide flops forward and down when the chain is loose. It can go way forward as you can see in this picture.
That will allow the chain to slip around the guide in the wider sections of the cam chain channel. As you can see here.
This is very easy to see when the motor is out of the frame but when installed in the bike it is very hard to see. And from the bottom. looking under the clutch cover, all looks normal. So while I was installing the cam and fighting the above cam rotation and tension issues, I noticed the chain seemed really tight to get over the sprocket but assumed it was because of the cams hitting the valves. ::005:: Now that I have done it with the motor out I can see that is should not have been that tight.
So the top of the guide got twisted to the side and that allowed the tensioner to push directly on the cam chain instead of on the guide. I can see from the groves worn in the case and the guide exactly how the chain was running. So it started up and ran fine. But of course, the chain slowly ate away the tip of the tensioner until the plunger fell out of the tensioner body and the cam chain then jumped off.
So the bottom line is, if you take the cams out, double check the cam chain guide alignment before you button it up. It should look like this when you are all done.
John
John,
So glad it looks like you got to the bottom of it! Thank you VERY much for sharing this with the rest of us to hopefully prevent more catastrophes.
I've never worked on an inline, on v-twins you never fight valve pressure if you do it correctly.
ac
So glad it looks like you got to the bottom of it! Thank you VERY much for sharing this with the rest of us to hopefully prevent more catastrophes.
I've never worked on an inline, on v-twins you never fight valve pressure if you do it correctly.
ac
Good show man! I doubt I would have the patience to document that so well after figuring it all out! Props to you, and I hope the rest goes smoothly.jaeger22 said:Quick update. I bolted the motor back in the frame this morning! ::012:: Still a LOT of work to do before I hear it run, and not a lot of time available to work on it right now.
But the main thing I wanted to post is that I believe I fully understand what happened and wanted to let anyone out there that may want to adjust their own valves about the trap I got caught in. There are two related issues.
First when you put in the second cam (intake) with the timing mark aligned, it is actually pushing down a bit on the number 2 cylinder intake valves. If you look closely in this picture you can see that the cam will not quite lay flat in the bearings because the #2 lobes are hitting the valves.
When you put the bearing caps on and tighten them down, it will cause the cam to twist hard to the right (clockwise). That is why the manual tells you to tie wrap the chain to the sprocket. If you don't the cam will rotate and jump a tooth on the chain. You can see the tie wraps in this picture:
I figured out that it actually requires that you install the cam one tooth to the left (counterclockwise) of the correct alignment before you tighten the bearing caps down because the cam will twist so hard that even with tie wraps locking the chain to the sprocket, it pulls the chain so tight that it ends up a tooth to the right.
All that is OK, just a bit of a pain when the motor is still in the frame. But all that tension helped hide the real problem.
Because the cylinder slants forward, the rear (intake side) chain guide flops forward and down when the chain is loose. It can go way forward as you can see in this picture.
That will allow the chain to slip around the guide in the wider sections of the cam chain channel. As you can see here.
This is very easy to see when the motor is out of the frame but when installed in the bike it is very hard to see. And from the bottom. looking under the clutch cover, all looks normal. So while I was installing the cam and fighting the above cam rotation and tension issues, I noticed the chain seemed really tight to get over the sprocket but assumed it was because of the cams hitting the valves. ::005:: Now that I have done it with the motor out I can see that is should not have been that tight.
So the top of the guide got twisted to the side and that allowed the tensioner to push directly on the cam chain instead of on the guide. I can see from the groves worn in the case and the guide exactly how the chain was running. So it started up and ran fine. But of course, the chain slowly ate away the tip of the tensioner until the plunger fell out of the tensioner body and the cam chain then jumped off.
So the bottom line is, if you take the cams out, double check the cam chain guide alignment before you button it up. It should look like this when you are all done.
John
You have EARNED many many thousands of trouble free miles. May the Yamaha Gods bless you with them.
Seriously, your willingness to be honest and helpful to others says a lot about you. Count me as a fan.
Seriously, your willingness to be honest and helpful to others says a lot about you. Count me as a fan.
greg the pole
There are no stupid questions, only stupid people
::026:: to the above.
I will be checking my valves this winter, so my question to you is:
-is there an easier way to check/adjust the valves, than in the actual frame?
I know this will be a total PITA once it comes time.
Here is my thought...I'm due for a full fluid flush (coolant, brake, and clutch), how hard would it be to actually do a partial motor removal?
Is it not held in place by 4 bolts (two at the front of the frame, and two at the back? (I'm probably wrong).
but if I'm right, why not loosen off the rear bolts, remove the front ones (any and all associated sensors unplugged, exhaust, and skid plate out of the way etc..)
Now I know that some will say that this is a dumb way of doing it, but if you have all goddamn winter, and it's next to impossible to do the valves with the motor in frame, this could be a good way to do it properly, and not have to worry about blowing the motor up...
thoughts from you folks?
Thanks for the kind words Snake. I hope there will be many trouble free miles but will not trust it for awhile. Not due to any Yamaha issues but fear I may have missed something. So as soon as I get it all together I plan to ::001:: a lot close by. I have another trip planned for the first week in November that will total around 4,000 miles. I sure would hate to discover I made another dumb mistake 1000 miles from home. :-[
My heart goes out to you mate, seems the luck gods dealt you a pretty crap hand.
Very good of you to take the extra time to help make sure nobody else gets in the same mess.
Good luck for the future, and if we ever meet it is my round ::008::
Very good of you to take the extra time to help make sure nobody else gets in the same mess.
Good luck for the future, and if we ever meet it is my round ::008::
Greg, I am in Florida so we don't have a winter down time but if I did, I would seriously consider dropping the motor. It is a bit more work but you can do the valves very much easier and get to everything on the bike. For example, I did as Rasher suggested and pulled the swing arm and all the linkage and lubed all the bearings. That would have been a much bigger job with the engine in the frame. Simple with it out.I will be checking my valves this winter, so my question to you is:
-is there an easier way to check/adjust the valves, than in the actual frame?
I know this will be a total PITA once it comes time.
Here is my thought...I'm duel for a full fluid flush (coolant, brake, and clutch), how hard would it be to actually do a partial motor removal?
Is it not held in place by 4 bolts (two at the front of the frame, and two at the back? (I'm probably wrong).
but if I'm right, why not loosen off the rear bolts, remove the front ones (any and all associated sensors unplugged, exhaust, and skid plate out of the way etc..)
There are actually 7 bolts that hold in the motor. (not counting the front plate) Three in the back and 4 that go into the head.
Getting the engine back in was an adventure.
Here is my modified floor jack to lift the motor with.

And here with the motor sitting on it.

The next issue is that with the motor on the jack, it was too high to fit under the frame. ???
So I had to lean it way over and hold it up with ropes. Very high tech. LOL ::013::

Then a couple of hours of slowly worrying into position with the jack, straps, pry bars, and lots of colorful language, and I was ready to bolt it in. Now comes the slow part I expect. Nearly every cable and connector had to be pulled and now needs to be re-routed and re-connected.
greg the pole
There are no stupid questions, only stupid people
I figured I'd miss a few bolts.
Looking at the manual, I would actually keep the motor in the frame.
My idea is to pivot the motor on the two bottom bolts (loosened), tip it out of the frame and work on it that way.
that said, the shaft might get in the way, so the burning question is, can one do it with the bike on the c. stand, and the front wheel on....
with the motor accessible, the feel good factor, would be much higher
http://Looking at the manual, I would actually keep the motor in the frame.
My idea is to pivot the motor on the two bottom bolts (loosened), tip it out of the frame and work on it that way.
that said, the shaft might get in the way, so the burning question is, can one do it with the bike on the c. stand, and the front wheel on....
That might work but I expect you would have to remove the swing arm to allow the drive shaft output coupler to rotate. But I am thinking by that point you have done about 95% of the work needed to drop it all the way out. But yes you should be able to do it on the center stand.
greg the pole
There are no stupid questions, only stupid people
hmm...
should be an interesting project.
oddly enough the book make it look easy ???
for the valve check the throttle bodies, and air box need to go anyways correct?
For Jobs like these, you need friends and beer.
Having said that I did do a swap on two v-strom over a weekend, it was fairly straight forward.
http://thetenerist.wordpress.com/2013/02/20/v-strom-build/
Im concerned about doing the check in the frame.
I may do the check in the frame, if it actually requires adjustment, I may drop it then,
Dirt_Dad
Well-Known Member
Founding Member
2011 Site Supporter
2013 Site Supporter
2014 Site Supporter
::026:: Me too.snakebitten said:Seriously, your willingness to be honest and helpful to others says a lot about you. Count me as a fan.
You have convinced me to let the shop do this one. I always did it on my Stroms, but never enjoyed doing it myself. You have sufficiently scared me off from thinking this is something I should tackle on my own. Even if I were fortunately to learn all the lessons you just provided, I'd still be miserable doing it. Thank you.
jbrown
Active Member
When a vehicle maintenance job or repair is needed, the more difficult it is, the less likely I am to have a shop do it. In my entire life (58+ years), I've only had two occasions where a repair shop did not break something while fixing or adjusting something else. A really difficult job is difficult for everyone. If I have the required tools (or they aren't too expensive), I'll almost always try it myself. The first time may turn out to take me several tries, but it usually only costs time. Unfortunately for Jaeger, this one cost more than time.Dirt_Dad said:::026:: Me too.
You have convinced me to let the shop do this one. I always did it on my Stroms, but never enjoyed doing it myself. You have sufficiently scared me off from thinking this is something I should tackle on my own. Even if I were fortunately to learn all the lessons you just provided, I'd still be miserable doing it. Thank you.
I think Jaeger's main problem was choosing the title for this thread. The machine needed to live up to it.