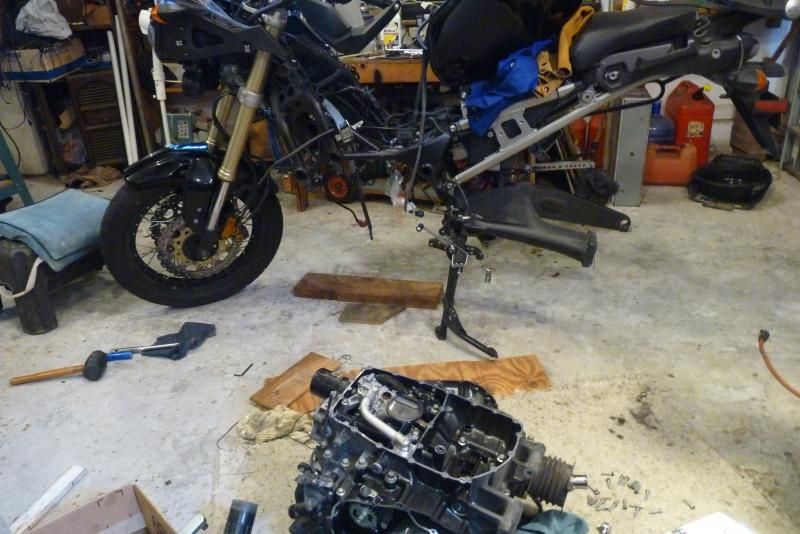
Valve Adjustment Nightmare!

jaeger22

Member
2012 Site Supporter
2014 Site Supporter
Joined
Jul 1, 2012
Messages
358
Location
Orlando, FL
Wow, how many miles? I would not think a piston would have that much carbon buildup on top.
27,700 miles. Yes it is a lot. Not sure why. I would think with all the high speed interstate riding it would be cleaner.

Do you plan to continue the tear down into the lower end?
Not sure yet AC. If I can convince myself the the main bearing on the left cylinder is OK then I may not. There is a risk either way. Obliviously there is risk that if I don't split the cases there could be an undetected issues. But if I do split them. there are several risks with that as well. Like the amateur wrench doing the work, screwing something up. Of course that could never happen. ::) Oh wait that is how I got here! LOL :D Also one of the big risks is that a critical part will be back ordered. The more I open up the more parts are required. Mostly gaskets and seals and they could be reused in a pinch but not if torn. If this were just one of my project bikes and I had plenty of time I would not be so worried about it but this is my main ride and I need it back on the road ASAP. But I also need it to be reliable. . . .
I am going to pull the bottom oil pan off next and the oil pump and see how that looks while I think about it.
 

avc8130

Active Member
Joined
Jan 29, 2012
Messages
3,269
Location
North NJ
Are you putting parts on order as you go to make sure you cut the lead time down? You already know you need intake valves, head gasket, etc.

ac
 

jaeger22

Member
2012 Site Supporter
2014 Site Supporter
Joined
Jul 1, 2012
Messages
358
Location
Orlando, FL
Good thought. I will make an initial order tonight with everything I know so far. I will be pulling the cylinders off so I will get everything for that also like base gasket and any O rings needed.
 

Duconce

New Member
Joined
Oct 10, 2012
Messages
151
Location
penn valley,ca
You will be pulling the oil pan to clean it anyway, photos look like you should be able to get to the rod cap from the bottom without splitting the cases. If you decide to pull the cap and check the bearing don't forget to put some plastic tubing on the rod bolts before pulling rod out, don't want to make any more work.
 

twinrider

Well-Known Member
Joined
Sep 28, 2011
Messages
1,882
Location
Yokohama
jaeger22 said:
27,700 miles. Yes it is a lot. Not sure why. I would think with all the high speed interstate riding it would be cleaner.
When I pulled my Road King's pistons out at 24,000 km they had similar carbon build up. I'm guessing it's pretty common.
 

jaeger22

Member
2012 Site Supporter
2014 Site Supporter
Joined
Jul 1, 2012
Messages
358
Location
Orlando, FL
You will be pulling the oil pan to clean it anyway, photos look like you should be able to get to the rod cap from the bottom without splitting the cases.
When I had the oil pump out, I could see the caps but not sure I could have removed them due to clearance issues. Maybe if I rotated the crank I could get it to a position that would work. I may have to take another look.
Anyway here is the belly of the beast.


I pulled, dissembled, cleaned and then resembled the oil pump. No issues were found. It felt good to finally put something back together! :p

Here is your basic S10 DIY kit. "some assembly required" ::025::


I ordered $400 worth of parts last night :'( I sure there will be more but that should be the worst of it If I don't find anything else major.
I will pull the cylinder next but have to go back to work today so progress will be slow.
John
 

Rasher

Active Member
2012 Site Supporter
2013 Site Supporter
Joined
Sep 25, 2011
Messages
1,955
Location
UK
May as well drop swingarm and grease that all up as well ::008::
 

avc8130

Active Member
Joined
Jan 29, 2012
Messages
3,269
Location
North NJ
Let's see, you still have the front wheel on and are still on the centerstand. Yup, this could be done "trail side". ::025::

I assume your new valves will need to be lapped to the head?

ac
 

jaeger22

Member
2012 Site Supporter
2014 Site Supporter
Joined
Jul 1, 2012
Messages
358
Location
Orlando, FL
May as well drop swingarm and grease that all up as well ::008::
Not a bad idea. If I run out of things to do while waiting on parts I may just do that.


Let's see, you still have the front wheel on and are still on the centerstand. Yup, this could be done "trail side". ::025::
LOL! :)) That would make it a bit more challenging!

I assume your new valves will need to be lapped to the head?
Correct.
 

Mzee

Active Member
Joined
Mar 17, 2013
Messages
823
Location
Johannesburg
I am no mechanic, but I have a lot of respect for you folks who make disassembling an engine seem simple. I will not attempt it though. :D
 

Rasher

Active Member
2012 Site Supporter
2013 Site Supporter
Joined
Sep 25, 2011
Messages
1,955
Location
UK
Mzee said:
I am no mechanic, but I have a lot of respect for you folks who make disassembling an engine seem simple.
In this instance the engine started disassembling itself ;)
 

Duconce

New Member
Joined
Oct 10, 2012
Messages
151
Location
penn valley,ca
Jaeger, the more I think about it, I would leave that rod alone, especially since the oil pump was clean, and your not taking the whole engine down. Just some more free advice.....
 

hexagonstiffnuts

New Member
2013 Site Supporter
Joined
Apr 7, 2013
Messages
15
Location
MX338
I would cut open the oil filter. It will give you a good idea of how much metal went through the oil pump. We do it all the time in the
aircraft industry. Take a hacksaw and cut around the base of the filter near the threaded end take out the paper filter media. Run a straight razor
around the end caps. You should be able to remove the paper from the support tube in one piece if done properly. Hang up the paper and let the oil drain.
Any metal should be pretty obvious.
 

bob dirt

Member
Joined
Jun 24, 2013
Messages
428
Location
phoenix arizona
...just thinking out loud. If the piston smacked the valve hard like the picture indicates, are you not afraid of a bent rod? I have been following your story but may have missed that.
 

jimmy z

Member
Joined
Aug 13, 2012
Messages
274
Location
south east wisconsin
I grind all my shims on a surface grinder. I grind bucket side of shim. Have been doing it that way for years.Can get exactly what i want that way.Sanding shims I personally would not do, it would be to easy to have them not flat and parallel.Jim
 

jaeger22

Member
2012 Site Supporter
2014 Site Supporter
Joined
Jul 1, 2012
Messages
358
Location
Orlando, FL
Jaeger, the more I think about it, I would leave that rod alone, especially since the oil pump was clean, and your not taking the whole engine down. Just some more free advice.....
Thanks Duconce and I agree. If I were seeing any bearing damage anywhere I would split the cases and check but so far, all bearings and ware surfaces have been pristine. ??? I am still checking stuff but so far I am feeling good about the bottom end.

I would cut open the oil filter. It will give you a good idea of how much metal went through the oil pump. We do it all the time in the
aircraft industry.
Yes Hexagon, another good thought. I actually started doing that but kept having to stop because of all the oil running out. I plan to finish taking it apart but the oil that ran out as I started cutting told me most of what I wanted to know. Lots of fine metal flakes as you can see here:


The oil filter system on this motor really works great! I strained all of the oil I drained from the motor through a black cotton cloth to see how much metal was still in the motor oil. Zero! None! ??? It was all captured in the filter or on magnets. But then it was released into the motor slowly over 50 miles so maybe I should not have been surprised.
The alternator cover was a bit interesting to get off. The magnets are so strong that it is very hard to pull off. And if you get your fingers under the cover and are not careful, it can snap down on your fingers. Ask me how I know! ::) So I expected to see a bunch of metal shavings stuck in that area. Surprise, none! Clean as can be. I assume that the centrifugal force was enough to overcome the magnetic force.
Here is what it looks like inside:


..just thinking out loud. If the piston smacked the valve hard like the picture indicates, are you not afraid of a bent rod? I have been following your story but may have missed that.
Yes I was very afraid! that is why I removed the cylinders and pistons. I have more measuring to do but so far it looks fine. The top end bearings are perfect and I can see no bend but I plan to do some precise measuring. The movement of the rods on the bottom bearings is smooth and there is no detectable side or up and down play. Here is looking into the top:

The piston is simple and straight forward to remove:

I can see no damage.
Here is another shocker. Look at the hatch marks in the cylinder. I expect to see slick smooth walls but it looks like it was just honed! This motor has 27,700 miles and it looks like it is not completely broken in yet!


I grind all my shims on a surface grinder. I grind bucket side of shim. Have been doing it that way for years.Can get exactly what i want that way.Sanding shims I personally would not do, it would be to easy to have them not flat and parallel.Jim
Yes Jim you are right on. I do sand but on a precision flat surface and I rotate every few seconds to make sure the sanding is even all around.
Still as I said above, if you have access to new ones without hassle or long delays, that is the best path. The sanding method just gets you back up faster.
 

bob dirt

Member
Joined
Jun 24, 2013
Messages
428
Location
phoenix arizona
I didn't know you already pulled the jugs. Besides a compression check, one way to check the rods is to see if the pistons come up to TDC.
It's nice to see your motor is not a pile of crap. You'll have if running in no time
 

jaeger22

Member
2012 Site Supporter
2014 Site Supporter
Joined
Jul 1, 2012
Messages
358
Location
Orlando, FL
Here is what I came up with to check the rods for straightness. I rotated the crank until both rods were up on the top side and so that they were equally high above the case. Installed the piston pins and slid both toward the center so they touched in the middle. I stuffed a rag around the base of the rods to hold them up and in place. I fiddled around turning the crank and adjusting the rag until the pins were in perfect alignment. The surface of the pins were flush with each other. I am pretty sure that can not happen if the rod is bent.
Here is a picture:


Then I got down and eyeballed through the center of the pins. They look to be perfectly aligned and our eyes will pick up even a slight misalignment. I tried to take a picture but it was hard to focus close enough. But you can get the idea.


I rechecked the alignment of the valve guides using a good valve and just by eye ball it looks perfect in both of the guides that had bent valves.
So I think I am about done checking and I am ready to start building as soon as I get parts. Job one will be to lap in the new valves and then reassemble the head.
 

jaeger22

Member
2012 Site Supporter
2014 Site Supporter
Joined
Jul 1, 2012
Messages
358
Location
Orlando, FL
This is truly turning into a nightmare. My worst fears confirmed. :'( It looks like 100% of the critical parts are back ordered.

Item Name Quantity Total Price Status
CIRCLIP 5 $4.95 Available
O-RING 1 $1.27 BACKORDER
GASKET, ELEMENT COVER 1 $8.43 Available
GASKET, STRAINER COVER 1 $13.80 BACKORDER
.O-RING 1 $2.91 Available
GASKET, CYLINDER 1 $10.91 BACKORDER
BOLT, WITH WASHER 6 $96.84 BACKORDER
GASKET, CYLINDER HEAD 1 1 $30.80 BACKORDER
.GASKET, HEAD COVER 1 1 $17.12 Available
CHAIN (98XRH2015-150M) 1 $27.59 BACKORDER
TENSIONER ASSY, CAM CHAIN 1 $98.95 BACKORDER
GASKET, TENSIONER CASE 1 $5.27 Available
DAMPER, CHAIN 2 1 $37.29 BACKORDER
VALVE, INTAKE 2 $27.28 BACKORDER
SEAL, VALVE STEM 2 $8.98 Available

This is from Cheap Cycle Parts, but I am pretty sure they don't actually stock anything, they just buy from mother Yamaha when they get an order.
I kind of expected this because there are relatively few S10 out there and very few that need these kinds of parts. This is the down side of having such a reliable machine. I plan to call them today and see if I can get any information. Any ideas?
 
Top