What TenereGUY has been up too

TenereGUY

Well-Known Member
Joined
Jan 19, 2023
Messages
1,011
Location
Illinois
Put on Yamaha Grip heaters and the infill panel sold by a member on here. Turned the key on and hit the menu button and there was the symbol for the heaters. Showed three levels. All works. Now for aux lights...
Oh, question answered about if I can raise the tank with Helibar setbacks on. You can! It is close but easily done.
 

SkunkWorks

Well-Known Member
Joined
Sep 13, 2018
Messages
1,783
Location
Colorado
Put on Yamaha Grip heaters and the infill panel sold by a member on here. Turned the key on and hit the menu button and there was the symbol for the heaters. Showed three levels. All works. Now for aux lights...
Oh, question answered about if I can raise the tank with Helibar setbacks on. You can! It is close but easily done.
Make sure you dive deeper into the Yamaha settings menus.
You can adjust the strength of the three levels of Grip-Heater (1-10 for each of the levels)
I want to say the factory settings for this were adjusted too low for my liking.
 

fac191

Well-Known Member
Joined
Jun 22, 2016
Messages
2,846
Location
London
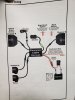
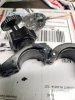
I have been avoiding the garage because it was a complete mess after several projects after I got home from Georgia. Finally had the energy and the courage at the same time yesterday and went at it. Slowly clearing up the work bench. I even threw away a box of cassettes as now I stream most music. I found my TPMS that I bought for the Tenere but didn't put it on as I wasn't able to put on my T-Valve cores as they didn't fit due to the tall ridges where the spokes connect to the rim. I may use a dremmel to get them to fit.
Got rid of an aluminum chock that I pulled off of that Aluma Trailer. Posted for free on Market Place. Two people wanted it but didn't want to come 6 miles south to get it. Wanted to meet next time I came up to Rockford... Really! A few hrs later someone saw it who wanted it and they came 25 miles. Found a home for an old ⛵ and they are coming 9 hrs North from TN. I told them if they pay for parts I will show them how to grease bearings and replace seals and tires so they won't have any worries on the way home. Nothing worse than smoking a trailer bearing on the road.
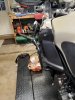
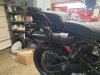
Today I cleaned up a pile and then went after changing out my MC lift's vise for a Condor Chock. It is the chock from the trailer I posted about earlier. I bought another mounting kit so I can use it on the lift as I take it off the trailer when not using it. Now with 4 thumb screws I can remove it from the lift too so I can park easily on the lift or even better... I can now work on the front wheels and forks of a MC without having to push it up backwards on the lift! Yay!! Garage is looking better and I have tomorrow off to finish it. Then the small 250 rebel will go on the lift. Drain the gas and put in fresh gas. See if it starts and then it goes up for sale. I may have to clean the carb as it sat a lot last year. No alcohol gas in it at all though. If anyone knows anybody looking for a decked out 250 Honda Rebel for a beginner I have one!

View attachment 101353
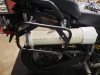
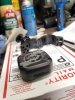
TPMS kit less than $50 USD. Well worth the money. I will get my T-Valve set up. Much easier to adjust tire pressure that way.

View attachment 101354
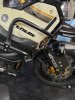
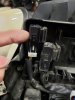
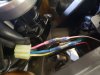
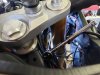
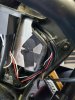
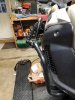
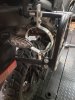
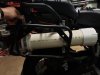
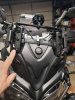
Just showing how it clamps on. Took 5 minutes. But I had to charge it from my on board pwr source as it came not charged. New Scorpion battery was still 13.0 volts after charging.

View attachment 101355
Dipped to 12.9 for a minute then back to 13.0. After charging I turned off the pwr source. I think this cost $17 on Amazon.

View attachment 101356
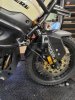
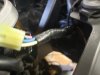
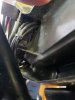
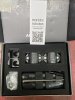
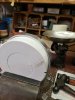
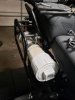
Wow, this is the first set that is marked F or R for even easier installation.
View attachment 101357
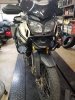
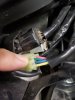
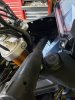
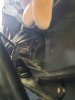
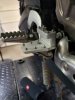
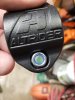
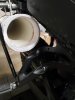
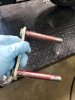
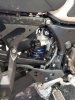
That ridge is stopping name from putting in steel T-Valve cores. Little black sensor mounted but the lock nut still needs to be soun up to lock the sensor on. Supposedly so nobody can steal it. I don't think anyone ever sees them.View attachment 101358
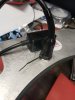
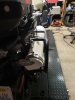
T-Valve is to short to clear the ridge. Was wondering if it would hurt to dremmel that ridge so it would clear. View attachment 101359

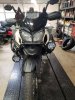
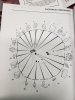
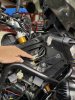
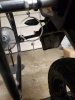
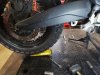
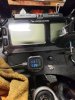
After charging and setting my Hi and Low alarms it looks like I have to raise my tire pressure. I am putting these MotoZ Tractionator Adventure tires at 30F and 33R. They are 35 max. View attachment 101360
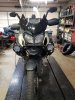
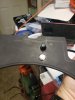
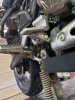
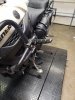
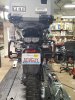
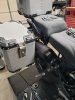
New Condor Chock in place. It also allows me to extend the lift table about 6 to 8 inches.
View attachment 101361
Holding the bike up. Now I don't need to Balance a GW or CBR or whatever bike I have while clamping it in. Much safer for me!
Not bad for a rainy day! I want to swap out these tires and wear out those Bridgestone tires and not these MotoZ tires. Might have to get a set of MotoZ GPS if going to Alaska. That waybI don't have to replace tires. Not sure yet as I like how the Tractionator handles gravel and anything else!
Nice clear display on the TPMS.
 

TenereGUY

Well-Known Member
Joined
Jan 19, 2023
Messages
1,011
Location
Illinois
Make sure you dive deeper into the Yamaha settings menus.
You can adjust the strength of the three levels of Grip-Heater (1-10 for each of the levels)
I want to say the factory settings for this were adjusted too low for my liking.
Thank you very much! I had no idea that I can do that. Very helpful advice.
TG
 

TenereGUY

Well-Known Member
Joined
Jan 19, 2023
Messages
1,011
Location
Illinois
Nice clear display on the TPMS.
Yes, I bought FOBO and hated it as it was in my pocket as it is a phone display only. These are cheap and work great. I always see my pressure as I scan my dash. I Wing as it only has a light that flashes for low pressure. After having these I like to know the exact pressure.
 

sheikyerbooty

Well-Known Member
Joined
Dec 12, 2021
Messages
543
Location
Dunedin, NZ
Rear brake caliper torque arm...just loosen forward bolt and push caliper up. Makes wheel off/ on easier as you use it to hold wheel in place. If that makes any sense.
 

TenereGUY

Well-Known Member
Joined
Jan 19, 2023
Messages
1,011
Location
Illinois
Rear brake caliper torque arm...just loosen forward bolt and push caliper up. Makes wheel off/ on easier as you use it to hold wheel in place. If that makes any sense.
Yes, that makes sense. I looked at it and thought that removing the rear one would be easier access. I'll try it like you described next time and let you know how it went.
 

TenereGUY

Well-Known Member
Joined
Jan 19, 2023
Messages
1,011
Location
Illinois
The last three nights I have been trying to figure out how to place and wire up a set of Clearwater lights and it ain't been easy! I purchased a hybrid set of Sevina/Super Sevina lights. They can be on full strength when the brights are on or dimmed to whatever I have the rheostat set at when the low beam is on. The first night it took me a bit to figure out where they could go and still be somewhat protected when the bike tips over. After studying it and trying three or four different places I got it.
20230611_182619.jpg
First try... Not to bad but a bit more vulnerable. 20230611_182632.jpg
But I really didn't like how these heavy lights would be out on the end like this and each bump and vibration force would be multiplied by the position on the end of basically a lever. Next!20230611_183728.jpg
This got rid of the lever affect but seemed low. Next!20230611_192529.jpg
I then rotated everything up. Instead of hanging down the brackets are almost stacked. Should be as durable and more protected. Also the wiring will definitely reach now. It still is inside the outer perimeter of the AltRider crash bars. Although it doesn't look it from this angle. 20230611_193022.jpg
Close to final position. The left one is probably where they will end up. I figured out what that left opening is for... routes air over the Rectifier to cool it. 1st night done.
 

TenereGUY

Well-Known Member
Joined
Jan 19, 2023
Messages
1,011
Location
Illinois
2nd night I was trying to figure out the wiring as this Tenere is different from my other bikes. It has two H7 bulbs that are both on all the time! So where to connect the trigger wire for when the Hi Beams are on??? Then I read on here about a shutter that moves for Low Beam. That didn't help. I looked at the electrical drawing for the rest of the night and it isn't even put on a fold out page to make it bigger and it's not in color! Come on Yamaha... Finally I saw that there is a yellow wire that energizes the blue light on the dash when the HB is on. Finished night two!
3rd night I took the right side panels off and tried locating the headlight relay. Got the wrong one as the FSM shows the bike from the left side (why?). Once I figured that out I went to the other end and found it. I had my 12V test lamp out to probe the backs of the connectors. Found that the Blue wire for the LB is switched power. 1 trigger wire figured out. Next HB. Went looking for the yellow wire at the headlight assembly. That didn't work. But I found the connector for the headlight assembly and started probing again. Key off. Probe to find blue with no power. Key on and bike started. Blue had power. Probed and red had no power with bike running and LB on. Put the HB on and red had power. 2nd Trigger wire done. Anyone know where the horn is on this thing? I need to trace that back as these lights have a trigger wire so when you hit the horn they go to full blast. 20230613_210536.jpg
Lights and easy instructions. 20230613_210049.jpg
Full page light diagram. Pertinent wires for lights are highlighted in white. Good thing I have a large magnifying glass!.20230613_210055.jpgexplains what each number is. 20230613_210138.jpg
94 is the head light relay. That y/b was messing with me as when the bike was off if I connected it to ground the headlights would come on. When running it had no power! It goes to the ECU. The L/B goes to the light switch if I remember correctly. The Br and R/Y are hot straight from the battery. 20230613_210130.jpg
91, 92,93 are the headlight assembly. 91 is the connector and the LB lights up both H7 bulbs and is switched power when the bike is running. Hence why the yellow at the relay is dead when bikes running but live when bike off. (My best guess).
That Y to R at the connector is hot when you switch on the HB! That yellow also lights up the blue HB indicator and comes from the switch. 20230613_210310.jpg
This shows the switch (81) and the blue indicator (72)
 

TenereGUY

Well-Known Member
Joined
Jan 19, 2023
Messages
1,011
Location
Illinois
Showing where the headlight relay is and the headlight connector. 20230613_204952.jpg
Number 8 is the headlight relay. But it is a left side view of the bike so you are looking at the backside of the relay panel. Remember that when you go to the right side to look at it!20230613_205006.jpg
20230613_205048.jpg
Close up of the headlight relay. Too far left relay.20230613_205106.jpg
Close up of the headlight connector with sheath pulled back. 20230613_205101.jpg
Zoomed out view of the headlight connector placement.
20230613_211631.jpg
Clearwater sent positaps and they work well but in a tight cramped area they don't. I considered putting a 2 into one bullet connection in but I may pull the wire out of the connector and solder the small trigger wire on to it or just cut the wire and put in a waterproof solder but splice with the trigger wire added. That would be permanent and the least space. I'll post up what my solution will be. These lights will throw approximately 18,000 lumens down range!
 

TenereGUY

Well-Known Member
Joined
Jan 19, 2023
Messages
1,011
Location
Illinois
I couldn't get the wire out of the coupler so I cut and soldered in the trigger wires in a new way. Used those things that melt using a heat gun and seal. Didn't seem to melt as easily as in the videos though! I'll see if it was successful Monday evening. I also routed the wires for the lights. Mounted the relay with 3M double sided sticky tape. Marked and drilled the infill dash panel and mounted the On/Off switch and the rheostat for the dim setting. Didn't get any further as I took the wife out to a balloon festival in Monroe Wisconsin. Rode the Wing. No wind and 82°F on the way and dark and 67°F on the way home. About 120 miles round trip. 20230617_134024.jpg
I really didn't want to do this but I did. Not much wire length to work with! Cut pink and blue wires.
20230617_140240.jpg
Those heat shrink tubing with solder and glue to seal. I tucked the trigger wire in there too.
20230617_140624.jpg
All wrapped up and ready to put back together.
20230617_140735.jpg
Routed back down under that frame rail through the hole and reconnected. Then I pulled the rubber sleeve up and over it.20230617_152504.jpg
Drilled the infill panel and mounted the switches. Put a zip tie around the push button switch rubber cover to ensure it stays in place. Then cut off the excess.
20230617_152510.jpgrheostat knob and the on/off push button switch. I will route these wires down through to the relay under the right upper panel. Will show routing on Monday. 20230617_204026.jpg
Balloons!


TenereGUY

Well-Known Member
Joined
Jan 19, 2023
Messages
1,011
Location
Illinois
Got most of the wiring done and did a quick hook up to the battery and everything works fine.
Just tested them. Rheostat works, on/off button works, and when brights are on they go 100%!
Now for adjusting the stock headlamps down. They couldn't put an extension knob on? Difficult when it doesn't have to be. Off to the salt mines now!
 

TenereGUY

Well-Known Member
Joined
Jan 19, 2023
Messages
1,011
Location
Illinois
Routed the wires into the right panel. Didn't want to drill and put a grommet into the back of the panel as it would possibly introduce a path for more moisture to get in there. I snaked the wires through an opening and then around that metal plate in front of the rectifier. My only misgivings about this route are... 1. possibly rubbing on that metal plate. 2. Does block some air flow to the rectifier but I finally got it positioned in an acceptable location (compromise).
This Hybrid Sevina-Super Sevina aux light combo has tested out beyond my hopes! Tested it last night and the Super Sevina has some flood and spot elements in it and it lights up the ditches most wonderfully while the Sevina spot light beam goes way down the road. Everything is lit up and it truly is a Night and Day difference compared to the Oxilam LEDS and they were a huge improvementover stock bulbs! Compared to the stock bulbs only... I guess the best description would be going from a 40 watt bulb to a million candle power spot light. No approaching cars flashed me like they did when I had the oxilam bulbs in as the stock aim was to high.
Adjusting the aim of the headlights.
After about 10 minutes trying to even figure out how to see the vertical adjustment screws/bolts I figured out a way. Pics below. I will conclude by saying...
I didn't want to spend more money on the bike as I have spent quite a bit already. But I am heading west and north where big animals are... deer hits are bad enough but moose, elk, bear and caribou are much worse. I have hit a deer at 65 mph square in the rib cage!!! I began asking myself how much would a deer/elk/moose hit cost me in pain and suffering let alone the dollar amount... so I ordered the lights. Once I got the lights adjusted correctly I told myself that these lights are worth every penny that I spent on them. No question whatsoever on that count.

20230619_174723.jpg
Positioned a light to try and see vertical adjustment screws. They are an 8 mm bolt head.
20230619_174730.jpg
I finally figured out that I can actually get a view of the bolt head. It's difficult and these old eyes had to squint and get the right angle for the trifocals. Once I could see it I discovered that with the right length I could get a 1/4" drive straight in if I went through the forks!20230619_180056.jpg
The correct length for the right side is represented by the top ratchet and extensions plus socket. The length needed for the left is shown by the long 8 mm socket. I removed the short extension and socket from the right and replaced with the deep 8mm for the left. Could adjust using a tiny arc of a turn but it worked fine.20230619_180229.jpg
I used a white piece of poster board to have my lights on so I could easily see the adjustments. I lowered maybe 2 to 3 inches. I was lucky and got it close enough to perfect for me on the first try. Bike was on the centerstand. 20230619_185914.jpg
First position of the wires coming into the right panel in front of the rectifier. Going over the sharp edge of metal. I put electrical tape over that edge. Then I had some small vacuum line that I sliced open and fit it over the edge then taped it in place. You can see it.20230619_190016.jpg
Better view of the tape and vacuum line. Also left the wires like this as it isn't near that metal and won't rub through. You can see the black relay in the upper left corner of the pic. Stuck there with 3M double sided sticky tape 20230619_190047.jpg
Final position of wires and another view of the relay in the upper left of the picture.
This positioning downfall is it makes it a little harder to get this panel on and off while the AltRider upper crash bars are in place.
 

TenereGUY

Well-Known Member
Joined
Jan 19, 2023
Messages
1,011
Location
Illinois
Today's update. I stripped out my preload adjuster knob and with my wife on the back the headlights climbed to the top of the trees. I don't want to go to Alaska with suspension travel severely reduced. A Penske shock was a 5 wk wait. I ordered an upgraded shock spring and a new knob made out of aluminum. After viewing some videos I think it will be an easy job. Will grease the lower suspension bolts while there. Just ordered AmsOil for the engine and rear drive. That will see me through the trip. Also need to install the airhawk seat pad, AltRider hwy pegs and rear brake lever enlarger w/riser. Now I am starting to think about a tubular tool box on the right side. I have an idea for one... just starting to formulate in my head.
 

TenereGUY

Well-Known Member
Joined
Jan 19, 2023
Messages
1,011
Location
Illinois
Now when you see the pics you'll be scratching your head until the last picture. No cheating. You can't go to the end and work backwards!
Put the AltRider rear brake pedal plate enlarger on. Super simple and pure quality. In fact everything that I have bought from AltRider has been thought out and quality. Their prices seem high until you receive the item and begin to handle it and put it on your bike. Then you see why it was more expensive than some other vendor's product. My 3 yr old LED shop light above my lift does too. So I replaced it with a 4 ft light that puts out 10,000 lumens. As long as you don't look at it it's great!20230624_142802.jpg
Rear brake foot pedal enlarger. Easy to put on and solidly stays in place with no wiggling. I was finding that I was a turning my foot in to brake. Won't have that problem anymore. The riser is for when you are standing and your foot is angled up. Thought it might be in the way. Not at all and it is right over and a little left of the original placement.
20230624_142807.jpg
20230624_145158.jpg
Quality from the way it is packed to how it installs and looks too. Very well made. They should be for the price and they are.
20230624_145500.jpg
These are great LED lights for $39 at Home Depot. 20230624_154015.jpg
I know what you're thinking. Before I bought these I tried to figure out places that I would be able to mount them. Right here... everything else was awkward and had the weight of me more focused on my tailbone.
20230624_154034.jpg
20230624_154049.jpg
Up and out of the way on back roads or rough stuff. My wife was really questioning my sanity when she saw these placed here.20230624_154407.jpg
As said, it is the little things that make the difference in installation and longevity. These are stainless under that anodized layer. Also all nuts are nylock and it's stuff like the nuts fitting snuggly down in the recess in the casting so they don't move while installing them or tightening them! This is all well made and built to last.
20230624_160403.jpg
Yes, I can get my legs up there and I am still resting on the broad part of my "petite" derriere along with part of my thighs. Lean forward more and I can stretch my hamstrings while going down the road. These will only be used in situations like crossing the plains... for hrs and all you need is a 5 minute shift in position.
Now going down to the barn to see if I have a 2' long piece of 4"PVC pipe. On to the next mod.
 

TenereGUY

Well-Known Member
Joined
Jan 19, 2023
Messages
1,011
Location
Illinois
I have been working on trying to fabricate a toolbox out of 4" PVC. Bent some brackets but it seems that the end cap on 4" PVC is to large to fit inside of the pannier mounting bracket without rubbing. May have to go to 3". I am using 1/8" aluminum sheet metal which is bendable and won't crack. Went to the Metal Supermarket to get some. They sheared it for me too. I thought it was a local business only but I guess it is a chain. If you have one near you it is a wonderful place to go to get metal for projects. Can't believe how much aluminum has gone up though!20230627_201611.jpg
First try at bending and installing bracket. Planning on bringing a brace from the lower bolt of the pannier mount for stability. 20230627_201615.jpg
I may have to bend another but move the tube forward and bend it around the end cap to clear some things. Maybe it is hopeless with 4" but we shall find out.
 

TenereGUY

Well-Known Member
Joined
Jan 19, 2023
Messages
1,011
Location
Illinois
Came home tonight and started fiddling and moved my back bracket to the front. Bent another bracket to fit over the end cap. Getting better and faster on the 2nd one! Had several pairs of vise grips out to hold things in place while bending and drilling. Almost to the final product. Will do final adjustments tomorrow and then paint the tube and brackets black to blend in a bit more. Will carry a wrench in a pannier for opening it up as it can be tough by hand. Then Friday or Saturday I will take the rear shock out as my new spring came in tonight. When the bike is done I will clean it up and check all bolts. Then be sure I write down all tools that I use to do it so I can bring them along. Then it's on to doing an inventory of camping gear and clothing to bring along. Then start packing20230628_205725.jpg
I measure the cap circumference with a flexible measuring tape I stole from my wife's sewing room. Then mark it at 0° and 180° I bend the aluminum to a 90° angle in the vise. Then I put the end cap in the vise in such a way that it is level and I line up the 90° bent AL at the 0° mark then clamp it with a vise grip. 20230628_205932.jpgthen start to bend it around the end cap using it as a form. Beating it a bit with a ball peen hammer. Then mark the AL at the 180° mark and bend it to a 90° angle. Then do it again with another strip so I have my bracket formed. Just need to drill it after that. Using Vise grips to hold in place while drilling it. 20230628_221141.jpg
20230628_221153.jpg
20230628_221159.jpg
Didn't have a perfectly tight bend but it's close. Had some rubber gasket material on the shelf so I cut a strip and put it under the bracket/band. Had to reduce it to 2 pieces so the top and bottom of the brackets would come together. Very tight now and the rubber will keep it from shifting position. 20230628_221224.jpg
Will cut this shorter tomorrow. Measured for suspension compression clearance. Right at 8.5 to 8.75" and that's to close so I will shorten the rear bracket strap and it will raise it an inch. 20230628_222112.jpg
View of the shortening. 20230628_221411.jpg
Big old maw gaping open. Will hold a good amount of tools.
20230628_222134.jpg
Slight rake back so tools settle to the back instead of against the opening. There is someone who is getting rid of a temperpedic mattress and I am going to cut some foam from it and experiment with compressing it and the stuffing it in on top of the tools so it will expand and hold them in place so they won't jar around.
That is it for today! Happy riding!
TG
 
Last edited:

TenereGUY

Well-Known Member
Joined
Jan 19, 2023
Messages
1,011
Location
Illinois
Sanded and painted brackets and tube. Put tube on top of a broom handle and that gave me a way to hold it up. Opened the garage door and hung brackets from the door hinges with wire.
Turned out better than I could have hoped. Very solid. Doesn’t move at all. No braces or zip ties needed. I found a rustoleum paint that looks like a hammered finish so it matches the bag mount paint very well. Almost matches the grab handles too. New spring is in. I went 30 minutes to the Honda shop as they said to bring it up when I got the shock out. So today I did... they were closed this Saturday due to 4th weekend! Called the Yamaha shop... yeah, would can swap it out.... next Wednesday or Thursday. Ok... Hmmm, I think I will go home and see if I can do this with my old spring compression tools meant for cars. Yep, it was a tight fit to get them on that small spring and I was waiting for it to explode... but nope I got it. They scratched the nice rubber coating so I shot some paint over it to keep it from rusting. I put that new aluminum adjuster knob on and it is wonderful and I bet I could have skipped the new spring for this trip. But that new spring is wider and beefier so it should do the job well when loaded. Greased all the lower dog bone bolts and bearing. Seemed low on lubricant just like everything else on this bike. The oil doesn't need changing for 5,000 miles but I most like will dump it and the rear drive oil and start fresh with AmsOil products in it. Won't worry about changing out oil on the trip. Thst paint matches so well I sprayed a few spacers and bolt heads on the pannier mount so it blends in now.20230701_112649.jpg
New spring is definitely wider and thicker20230701_132332.jpg
20230701_133545.jpg
Greased those as they needed it.
20230701_134151.jpg
20230701_171152.jpg
Can't believe how well the paint matches!
20230701_171201.jpg
20230701_172149.jpg
Hides it quite well.
20230701_172157.jpg
My wife sat on it and the tube just grazes her leg. But she e riding with me unless we are on the Wing
20230701_172212.jpg
New shock and adjuster knob. Get this know! It is so much better. Fills the hand better too. Very easy to grip and turn... and it won't strip out!
 

Attachments

TenereGUY

Well-Known Member
Joined
Jan 19, 2023
Messages
1,011
Location
Illinois
Test ride report on the AltRider rear brake pedal plate enlarger. I'll make this simple. Just order the thing and put it on. Done!
Before I was very conscious about twisting my size 12-13 foot in to engage the pedal. I rode 30 miles to a friend's house last night and didn't even think about the rear brake. On the way home I realized I was not twisting my foot inwards. I began to consciously pay attention. The set screws used for grip... I was worried that it would be very aggressive and grad my sole. Nope, good grip but never a worry about to much. Pedal was right under my foot where it should be. Haven't tried the riser as a didn't go slow and stand up.
Shock spring: bike is level and have it set up on the stock 2nd line down(?) And I can probably go softer by 1 line. So I have almost the full range of preload available to me! To me this means loaded on a month of more trip the suspension won't bottom out and will do its job.
 

TenereGUY

Well-Known Member
Joined
Jan 19, 2023
Messages
1,011
Location
Illinois
I started putting things together for the trip. Tried out my battery set up for my BiPap machine. It works! Battery to go into my tank bag for charging while traveling the next day. Pack for it fit the accessories for the battery converter and it fits well in the top box. Put a bolt I was missing in the windshield mount. Other three were loose. Oh, .36 ft/lbs of torque! Well, I put them in at 1#. Started cleaning and also packing. These Moose racing panniers and top box come with organizers in the lids but they waste space around the edges. So I am putting stuff there first that I don't plan on using but can get to. Plugs, Xtra neck cooling gaiters that can be a dust filter too.

I ordered some bladders and a rotopax fuel can and mount. We will see what's best.
While cleaning the bike and looking everything over for looseness. Found my TPMS mount broken. Must have stressed it while working on the handlebars. I will try to JB weld it or mount it on the bike with EZPASS mounts.
Well, I JB welded it and then thought... nope, so I cut the back plastic reinforced captured nut off in 2 minutes with a hacksaw and mounted it like I did on my CBR 1100XX Super Black Bird.

Put on those IPASS/Ezpass sticky mounts and put it on the dash I installed. Much better!20230705_174539.jpg
Missing Bolt. I clean with Topcoat F-11. Yes, it isn't cheap but a little goes a long way. I clean the whole bike with it. No water and it takes bugs off. Put three applications up front and the bugs really come off much easier. I even clean my visor with it and on my CBR with my leather glove I can wipe off Black bugs. If clear or yellow they smear lime glue. Really extends the riding before I have to clean my visor. I love the stuff. This bike front end was covered in bugs. Not now.20230705_204204.jpg

24 hr JB Weld. Think that it won't pivot or hinge now. Lots of stress on that joint 20230705_204810.jpg
Two minutes with a hacksaw! 20230705_205736.jpgnow stuck on my infill dash!
That's it for tonight! Have to dig up my dry bag for the tent... it has gone through 2 teen boys... be lucky to locate it!
 
Top