What you did to your Tenere today??!!

Don in Lodi

Well-Known Member
Founding Member
2012 Site Supporter
2013 Site Supporter
2014 Site Supporter
Joined
Feb 1, 2011
Messages
5,779
Location
Lodi Kalifornia
yukondood said:
picking up my new tires installed on the rims afterwork. will install tonight and proceed to enjoy wearing them out!
Wadja get? 50/50? TKC or K60...
 

AVGeek

Well-Known Member
Founding Member
2014 Site Supporter
Joined
Sep 5, 2010
Messages
2,779
Location
Boulder City, NV 89005
fredz43 said:
If he is talking about the throttle cables, there is plenty of slack when raising the bars. It is the hydraulic lines that are the limiting factor. I thought he did something so that you don't have those throttle cables sticking way up in front of the instruments, etc.
All I did was loosen the throttle housing, remove the brake controls , and rotate the throttle housing around until the cables come out the bottom. I was able to gingerly pass the entire brake/mirror/hand guard assembly around the throttle cables, so that nothing was tangled. After today's ride, I think I'll still try to secure the throttle cables so they don't ride up in front of the gauges. I also added two more zip ties to the handlebars to better secure the wires fro both switch clusters.

And I hit first dirt today! I had less than 100 miles on the ODO when the pavement ended...
 

Attachments

1200ST

New Member
Joined
Aug 23, 2011
Messages
4
Location
Texas
I installed the factory crash bars and battery tender fused harness. total effort was just under an hour for installation time. Now i have to go shopping for skid plate.
 

justbob

"crashin' sucks"
Founding Member
2011 Site Supporter
2012 Site Supporter
2013 Site Supporter
2014 Site Supporter
Joined
Dec 25, 2010
Messages
873
Location
Louisville Kentucky
Today I installed a tire pressure monitor, its called the TP CHecker.
I like that the display stays on and shows both tire pressues constantly or it can show the tire temperature or alternate between the 2 . The display is backlit in blue and changes to red if the temperature or pressue changes to your preset limits.
This picture is not very good but the display actually looks very nice.
http://s184.photobucket.com/albums/x118/bm1327/Super%20Tenere/?action=view&current=IMG_2115.jpg
 

biting_point

New Member
Joined
Jan 29, 2011
Messages
161
Location
Singapore
AVGeek said:
All I did was loosen the throttle housing, remove the brake controls , and rotate the throttle housing around until the cables come out the bottom. I was able to gingerly pass the entire brake/mirror/hand guard assembly around the throttle cables, so that nothing was tangled. After today's ride, I think I'll still try to secure the throttle cables so they don't ride up in front of the gauges. I also added two more zip ties to the handlebars to better secure the wires fro both switch clusters.

And I hit first dirt today! I had less than 100 miles on the ODO when the pavement ended...
some photos will be great!!
 

stevepsd

New Member
Founding Member
2011 Site Supporter
2012 Site Supporter
Joined
Oct 3, 2010
Messages
1,500
Location
Idaho & OR
AVGeek said:
All I did was loosen the throttle housing, remove the brake controls , and rotate the throttle housing around until the cables come out the bottom. I was able to gingerly pass the entire brake/mirror/hand guard assembly around the throttle cables, so that nothing was tangled. After today's ride, I think I'll still try to secure the throttle cables so they don't ride up in front of the gauges. I also added two more zip ties to the handlebars to better secure the wires fro both switch clusters.
Hummm....ever ride/race off road much?

If you don't venture off-road please ignore, however if you do:

There is a reason we all went to upper (or back towards the rider) throttle cables on our dirt bikes in the late 70's.....when you crash off road (notice I say when, not if) you will in more likely-hood snap off your throttle cables/housings if they are in the position you describe and may leave you stranded with a inop throttle. That is why they are routed out the top.

Also, you should wrap a bit of teflon tape (the white stuff used for sealing pipes) around the handlebars where the brake, clutch and throttle perches clamp. The teflon will allow them to rotate in a crash and hopefully not snap off.

Just speaking from years of experience......
 

fredz43

Well-Known Member
Founding Member
2011 Site Supporter
2012 Site Supporter
2013 Site Supporter
2014 Site Supporter
Joined
Sep 1, 2010
Messages
3,297
Location
IL, the land of straight, flat, boring roads
Good points, Steve. I believe the throttle perch is pinned, so one would have to grind the tab off in order for the teflon tape to be effective.
 

stevepsd

New Member
Founding Member
2011 Site Supporter
2012 Site Supporter
Joined
Oct 3, 2010
Messages
1,500
Location
Idaho & OR
fredz43 said:
Just checked my throttle housing. It is pinned.
All mine were pinned, notice I said 'were'. I did not like the angle of the switch pods, so I fixed it.

The wrap of teflon is a good thing to do, since either the clutch or brake master cylinder is probably over $200 each.

If you want to get fancy and not use the white teflon tape, you can use the 'Lever Mate' product from R&J Engineering (they also make the seal mate tool)

http://www.sealmate.net/levermateinstructions.html
 

troll

New Member
Founding Member
2011 Site Supporter
Joined
Dec 30, 2010
Messages
862
Location
Frozen wastelands of the barren north ( NW Canada
AVGeek said:
The throttle housing isn't pinned (as far as I could tell), but the switch pod is.

One pic from a top perspective, one from the bottom.
Hey AVGeek, the throttle housing is pinned and I think can see in your pictures that there is a gap in the mating surfaces of your throttle housing that should be closed up - maybe from the pin holding the housing off the bars and too wide apart.
 

twistedthrottle

New Member
Founding Member
Vendor
Joined
Nov 22, 2010
Messages
320
Location
Exeter, RI
digitalmoto said:
wired up my Bags Connection tank bag.
How did it go? Which way did you route the electric bottom ring? Pics would be great. I will make a short tutorial for all of the other guys if you get me the info

Kev
 

AVGeek

Well-Known Member
Founding Member
2014 Site Supporter
Joined
Sep 5, 2010
Messages
2,779
Location
Boulder City, NV 89005
troll said:
Hey AVGeek, the throttle housing is pinned and I think can see in your pictures that there is a gap in the mating surfaces of your throttle housing that should be closed up - maybe from the pin holding the housing off the bars and too wide apart.
I saw that after reading through the post this morning. I went back and re-clocked the throttle cable housing, and found the pin. Its soft aluminum, so cranking it down flattened it.

Now I have the housing almost back to the stock position, with the cables now riding over the top of the brake reservoir. I also added a zip tie to the throttle cables at the guide on the front of the triple tree to keep them from riding up. I've done a test ride with the handlebars to full lock in each direction with no ill effects.
 

Firefight911

Active Member
2011 Site Supporter
2012 Site Supporter
Joined
Mar 13, 2011
Messages
1,613
Location
Folsom, CA
twistedthrottle said:
How did it go? Which way did you route the electric bottom ring? Pics would be great. I will make a short tutorial for all of the other guys if you get me the info

Kev
Got a lot done today and yesterday. Lots of time spent here with the search engine looking up the wiring for my relay on the fuse panel. Thanks!! Went with the auxiliary light plug brown wire for my trigger. Super easy connection that way and I have power as soon as I turn on the key which is just what I wanted.

Wired the tank bag ring into the fuse panel. This created a bit of redundancy but it's fine and I really like the wiring harness the ring comes with. I think the only criticism I could/would make is that it is difficult to thread the harness throughout the bike and along the existing wiring harnesses on the bike due to the relay/fuse block. Perhaps a connector of some form could be incorporated at some point to make it easier to run the wiring and tehn plug in the block? Truly a minor niggle though and since the Tenere is so easy to work with it was not a major concern.

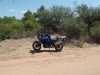
I ran the harness from the ring along the tank to the left side of the steering neck, around the front of this and along the OEM harness back over to the electrical panel where I cut a notch so the flat wire harness would not be pinched in any way. Once in the electrical tray I pulled all the relays, junctions, and fuse blocks off their respective rubber straps/seats and ran the wire harness behind these and then replaced the OEM stuff back from whence it came. Dropped the loom down and velcro attached the bag block/relay to the open and flat are just forward of the battery. It fit perfect here. From here I ran the wires back up and through the OEM harnesses to my fuse block location where I screwed the wires in to their seat. Easy. Just took some time to run the harness and make sure everything laid nice and flat and didn't have any pinch points or interference with anything else.

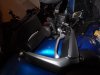
For the fuse panel, I used what I had which was a Centech panel and Centech relay harness. The panel fit in to the open space at the top right of the electrical tray. I just shaved down the plastic rib that was in the way of allowing the Centech to sit flat. I unbolted the regulator/rectifier and its heat sink and pulled them out of the way so I could drill through the plastic and create my fuse panel anchors. Refit the regulator/rectifier and heat sink.

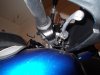
I placed the relay for the panel in the tool tray as I carry my tools under the seat. To locate the relay I created a post for the relay to attach to by drilling a hole and placing a small machine screw with washer, o-ring to seal the hole behind the screw head, and a nut and tightened. On this the relay went and was bolted on to the post with another nut which sandwiched the relay holding tab between the two nuts on the screw. Wires were incorporated in to the OEM harnesses back to the battery and to the trigger wire I used which was the brown wire on the auxiliary light plug.

Voila! I am electrified!!!!


jajpko

New Member
Founding Member
2011 Site Supporter
2012 Site Supporter
Joined
Nov 26, 2010
Messages
2,776
Location
North Texas
MotorcopBBQ said:
Picked up the motor today. Only have 0 miles on it. I put 40 miles on,until I had to come home.
Congrats MotorcopBBQ!! Enjoy your new ride... ::013::
 

Firefight911

Active Member
2011 Site Supporter
2012 Site Supporter
Joined
Mar 13, 2011
Messages
1,613
Location
Folsom, CA
UPS showed up at 6 PM with the Givi bars. They were installed by 730 PM and that included finishing dinner! :) ::015:: ::013::
 

dehmlow

Member
Founding Member
Joined
Dec 11, 2010
Messages
73
Location
Fresno, CA - USA
hey what's that on the porch?...somebody left something round and covered with plastic wrap....on closer inspection it's a....a......a Heidenau K60 Scout 150/70-17 ! http://www.yamahasupertenere.com/Smileys/DarkB/tongue.gif

now to figure out WHEN to mount (currently have about 1400 mi. on the odometer)

and IF to try mounting myself or let the pros handle it... any ideas?

I've heard to NOT attempt it on my own, although I see videos of the beemer guys changing their own...
what are the compelling reasons NOT to?? i change tires fairly often on the xt 250, the old KLR, other spoked wheels, etc....
 

Firefight911

Active Member
2011 Site Supporter
2012 Site Supporter
Joined
Mar 13, 2011
Messages
1,613
Location
Folsom, CA
Why not change them yourself? Well, the Heidenau's have one of the stiffest carcasses known to man. They are doable but you better hydrate before hand!
 
Top