SkunkWorks
Well-Known Member
So the Super Tenere is overdue for its first valve clearance check. In fact it has right at 32,000 miles on it.
I've been putting it off as I've had other projects going on.
The bike has actually been parked since earlier this year with leaking fork-seals, so I haven't been riding it. (been riding the FJ1200 around lately)
I had collected all of the parts and gaskets that I might need previously, and I borrowed a shim-kit from another local member a couple months ago.. (thank you @Paul466!)
I have also been collecting parts to go through the Suspension, but with summer camping-trips and all kinds of other projects I just couldn't get to it.
This weekend I finally had a couple free days to tear into it!
First I'd like to say a big "Thank You" to the other members who have posted about this procedure! All of the pictures and explanations are an invaluable resource to anyone who follows!
I did my research, both in the posts on here as well as various youtube videos.................I was mentally prepared for most anything that I would encounter.
All of the Member's posts were a huge help!
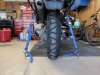
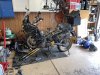
Since I knew part of this service was going to involve rebuilding the front suspension, the first thing I did was strap it to the Garage-Floor.
I have a few extra Anchors mounted in the floor certain places around the garage. When I need them, I just thread a couple eyelets into the anchors and get to work.
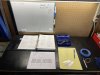
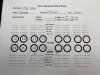
I set up my workbench for easy access to the Service-Manual, my worksheets, and feeler-gauges.
A lot of people wouldn't take the time to measure their feeler-gauges with a micrometer, but I do.
Having the "actual" thicknesses comes in handy, especially when you start stacking two different ones to zero-in on the exact measurements....................Just something that my Dad taught me years ago that I still do.
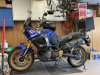
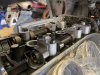
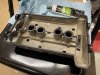
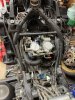
Next I got busy with the disassembly.
It actually only took me about an hour and a half to get to this point, and that included blowing all the dust and dirt out of everything with compressed-air as i went.
I figured since the forks are going to be coming off anyway, I might as well remove them first to gain easier access to the front of the Engine.
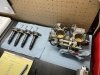
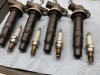
Next was to remove the Throttle-Bodies and Ignition Coils.
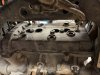
I labeled every single connector one-by-one as I disconnected them...............This makes a huge help when it comes time to reconnect everything.
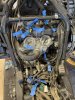
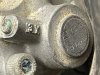
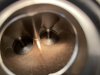
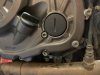
I peered down inside the intake ports before covering them up with plastic and rubber-bands.
A slight amount of carbon on the backs of the intake valves, but not too bad.............
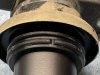
I removed the spark-plugs next and inspected those. They look normal and appear to be functioning properly.
Only the #2 spark-plug had a trace of corrosion on the top of the metal shell. None of the other ones did.
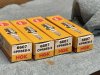
I would be installing a brand-new set of factory-spec ones while I'm in there.
I've been putting it off as I've had other projects going on.
The bike has actually been parked since earlier this year with leaking fork-seals, so I haven't been riding it. (been riding the FJ1200 around lately)
I had collected all of the parts and gaskets that I might need previously, and I borrowed a shim-kit from another local member a couple months ago.. (thank you @Paul466!)
I have also been collecting parts to go through the Suspension, but with summer camping-trips and all kinds of other projects I just couldn't get to it.
This weekend I finally had a couple free days to tear into it!
First I'd like to say a big "Thank You" to the other members who have posted about this procedure! All of the pictures and explanations are an invaluable resource to anyone who follows!
I did my research, both in the posts on here as well as various youtube videos.................I was mentally prepared for most anything that I would encounter.
All of the Member's posts were a huge help!
Since I knew part of this service was going to involve rebuilding the front suspension, the first thing I did was strap it to the Garage-Floor.
I have a few extra Anchors mounted in the floor certain places around the garage. When I need them, I just thread a couple eyelets into the anchors and get to work.
I set up my workbench for easy access to the Service-Manual, my worksheets, and feeler-gauges.
A lot of people wouldn't take the time to measure their feeler-gauges with a micrometer, but I do.
Having the "actual" thicknesses comes in handy, especially when you start stacking two different ones to zero-in on the exact measurements....................Just something that my Dad taught me years ago that I still do.
Next I got busy with the disassembly.
It actually only took me about an hour and a half to get to this point, and that included blowing all the dust and dirt out of everything with compressed-air as i went.
I figured since the forks are going to be coming off anyway, I might as well remove them first to gain easier access to the front of the Engine.
Next was to remove the Throttle-Bodies and Ignition Coils.
I labeled every single connector one-by-one as I disconnected them...............This makes a huge help when it comes time to reconnect everything.
I peered down inside the intake ports before covering them up with plastic and rubber-bands.
A slight amount of carbon on the backs of the intake valves, but not too bad.............
I removed the spark-plugs next and inspected those. They look normal and appear to be functioning properly.
Only the #2 spark-plug had a trace of corrosion on the top of the metal shell. None of the other ones did.
I would be installing a brand-new set of factory-spec ones while I'm in there.


")