Sounds like a change for the better ::008:: The U.S. Dollar loses less against the Canadian dollar (close to 1:1) than it does against the pound, so I'll stick with the Canadian outfit (yamahagenuineparts.com).Monty said:Not my experience with Yamabits, who confirmed my order and sent it the next day. ::012::
Matt
Yamaha LED Turn Signals
- Thread starter Bowana
- Start date
AlsoRan
Member
Thanks everyone. Decided to go with Oakville Yamaha in Canada as their service was good and they were very specific about delivery. Blinkers on the way! ::013::
That's a little better choice, the other dealer mentioned by Tremor38 won't see me there again. I'm hopeful that I'll find one that is interested in knowing about the S10, has a service manual of their own for this bike, someone I can trust.AlsoRan said:Thanks everyone. Decided to go with Oakville Yamaha in Canada as their service was good and they were very specific about delivery. Blinkers on the way! ::013::
I just want to say that my beef with the guy was personal, I think they're all good at seling you parts.
~TABASCO~
RIDE ON ADV is what I do !
Founding Member
2011 Site Supporter
2012 Site Supporter
2013 Site Supporter
2014 Site Supporter
Vendor
Came across your link to the flasher, I bought one and installed it this morning.... FINALLY my Yamaha LED blinkers work properly... Thanks for the link !!! The install was about five minutes... Happy camper now ! ::008::Gat said:
AlsoRan
Member
Thanks for the report...I have one sitting on my desk and now waiting for the blinkers to arrive!~TABASCO~ said:Came across your link to the flasher, I bought one and installed it this morning.... FINALLY my Yamaha LED blinkers work properly... Thanks for the link !!! The install was about five minutes... Happy camper now ! ::008::
Bowana
Member
Same here. Installed the relay last night and all is well. Thanks again for the link!~TABASCO~ said:Came across your link to the flasher, I bought one and installed it this morning.... FINALLY my Yamaha LED blinkers work properly... Thanks for the link !!! The install was about five minutes... Happy camper now ! ::008::
Awesome stuff Bowana and Tabasco! ::012::Bowana said:Same here. Installed the relay last night and all is well. Thanks again for the link!
I hope to meet some of you Canadian guys this summer ::001::
I always have beer and some tools for a Tenere guy/girl, oh, I also have an outdoor shower too ::025:: Ok, the ladies can use the indoor one.Gat said:Awesome stuff Bowana and Tabasco! ::012::
I hope to meet some of you Canadian guys this summer ::001::
AlsoRan
Member
Just got a call out of the blue from Oakville Yamaha today, since the LED shipment was a two step process they just wanted to provide a progress report. They did not have to go that extra step after the sale...so I'm chalking one up for their excellent customer service. ::008::
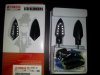
Mine arrived and will be fitted later. Looks like they come with something that could be an inline resistor for each one, but not sure. It is a black thing with wires anyway!
Time to farkle....
Matt
Sent from my phone using Tapatalk. Sorry for spelling mistakes!
Time to farkle....
Matt
Sent from my phone using Tapatalk. Sorry for spelling mistakes!
Attachments
-
 34.8 KB Views: 178
~TABASCO~
RIDE ON ADV is what I do !
Founding Member
2011 Site Supporter
2012 Site Supporter
2013 Site Supporter
2014 Site Supporter
Vendor
Those are resistors for each light.. I still have those on my bike installed... When I originally installed my LED lights with the resistors they would blink slow "normal" down the high way... At any type of slow speed or engine speed the blinkers would blink really fast.. I installed that new blinker module and they work 'normal' at any speed now. I have not messed with removing the factory resistors, and probably will leave it alone...
Hi folks,
I am planning to fit my indicators later, and thought it worth asking if there is anything I should know or a walk-through anywhere? Not sure which pieces of bodywork need to be removed, where the wire connectors are and that kind of stuff. I can find out through trial and error (with more error than trial usually) but any pointers would be appreciated.
Thanks,
Matt
I didn't ger the Yamaha LEDs (now I have to pay doble) and the front ones olready have water in them, are the Yamaha LEDs ok?
Mat, I had to cut the wires at the front to solder the LEDs wires, if you have to cut them just remember that the right wire/plug is different than the left, I had to resolder one of them because I cut it too short.
Mat, I had to cut the wires at the front to solder the LEDs wires, if you have to cut them just remember that the right wire/plug is different than the left, I had to resolder one of them because I cut it too short.
Wasp did a quick-and-dirty walk-through in the early pages of his first thread on advrider (in the vendors section). First page for the rear indicators and somewhere around page 10 for the fronts.Monty said:Hi folks,
I am planning to fit my indicators later, and thought it worth asking if there is anything I should know or a walk-through anywhere? Not sure which pieces of bodywork need to be removed, where the wire connectors are and that kind of stuff. I can find out through trial and error (with more error than trial usually) but any pointers would be appreciated.
Thanks,
Matt
I've got mine apart as my Yamaha indicators are on their way, and here are some things I've noticed, depending on how involved you want to get.
The rear indicators terminate at a plug near the ABS pump under the front seat. The wires snake all over to get to the rear. Easiest would be to do what Wasp did and cut and splice in under the passenger seat.
The front indicators terminate at the bundle of plugs on the battery-side of the bike up near the headlight. Side panels (both the lower and painted uppers) as well as the headlight will need to come out to get to the radiator side indicator wire that snakes over the headlight.
It sounds involved, but it's really simple.
I ordered NT 3P connectors from EasternBeaver for my install, but cutting the factory stuff works easily, too.
Thanks for the info. I should have done more research before buying, as I am one of those people who for no rational reason just can't stand to cut original wiring. Also I can't solder and I hate crimping stuff!
Hmmm... I may have these bad boys for sale shortly!
Regards,
Matt
Hmmm... I may have these bad boys for sale shortly!
Regards,
Matt
I'm usually that way as well, but in this case, you're not cutting a main harness, just the leads from the turn signals, but that is why I bought NT 3P connectors, so I wouldn't cut anything.
Wish I would of known about those connectors for the turn signals in front. I would of made a harness with these ends. I too cut and soldered the wire to the original plugs. By the way they assemble, I think if we were to order the OEM turn lenses, it would come as an assembly with wire and ends.
That is correct. For me, I was ordering stuff anyway, and $3 in connectors is worth it to be able to resell the stock indicators. >
AlsoRan
Member
I used the same Wasp thread which was very helpful to get an idea of the process. Pages 1 and 13 I think.Cerenkov said:Wasp did a quick-and-dirty walk-through in the early pages of his first thread on advrider (in the vendors section). First page for the rear indicators and somewhere around page 10 for the fronts.
I've got mine apart as my Yamaha indicators are on their way, and here are some things I've noticed, depending on how involved you want to get.
The rear indicators terminate at a plug near the ABS pump under the front seat. The wires snake all over to get to the rear. Easiest would be to do what Wasp did and cut and splice in under the passenger seat.
The front indicators terminate at the bundle of plugs on the battery-side of the bike up near the headlight. Side panels (both the lower and painted uppers) as well as the headlight will need to come out to get to the radiator side indicator wire that snakes over the headlight.
It sounds involved, but it's really simple.
I ordered NT 3P connectors from EasternBeaver for my install, but cutting the factory stuff works easily, too.
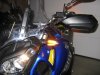
A couple of things about the front - after removing the RIGHT side panel, windscreen, headlight cover and headlight, if found there was no need to unplug the headlight as it moved away enough to get to the blinkers. Also there are 3 wires on the front blinker harness - the blue wire I left alone as I think this is for the running lights which do not apply to the LED blinkers. For the rear lights I removed too much hardware including the seat latch looking for the harness and plugs but this was a complete waste of time. ::010:: Only need to figure on splicing under the rear seat. I did not like the idea of cutting and splicing as well especially on a new bike but it was not too bad. I probably left too much extra wire but I'm an electrical dummy and did not want to come up short. Also there is no need for the resistors as the ELFR-1 was an easy plug a play.
It worked out ok, so overall it was worth the effort. There is probably a cleaner way to arrainge the plugs-in (I did not know about the NT 3P connectors until it was too late), but the supplied hardware works good enough.
Attachments
-
 88.8 KB Views: 137