Weapons - What you have (NOT a political discussion)
- Thread starter Checkswrecks
- Start date
SkunkWorks
Well-Known Member
Stevens - Springfield Model 107B (part 2)
The "Tenite" material that the Stock is made of was developed in the late 1920's by the Eastman Corporation (of Eastman-Kodak fame)
It is a Cellulose-Acetate material that is not unlike the composition of Movie-Film.
It was widely used in the 1930's and 1940's to make a number of different things ranging from Radios, to Toothbrushes, to Eyeglass Frames, and even automobile Steering-Wheels.
From info that I can find, Savage-Stevens offered it on their Shotguns starting in 1940 and early 1941. They did not produce any civilian sporting-arms during WW-II from 1941-1945.
They started again offering it on their Shotguns in 1946 and continued to offer it until 1948.
Problems arose with the material, mostly if exposed to high heat or if left in direct sunlight. It would warp, shrink, and cause cracking.
There are stories of automobile steering-wheels with all the plastic material broken off or severely cracked.
Stevens stopped offering it on their Shotguns after 1948
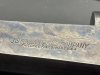
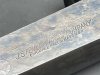
There was differences in how the Stevens name was displayed on their Firearms over the years. According to info I found, how the name was written depicts what era the Firearm was manufactured.

I'm not sure how accurate all of this is, but if this info is in-fact correct, then this particular Shotgun was manufactured in 1940?
My Grandfather died some time in the 60's, and my Father is gone too, so there's no way to know for sure. The era sounds about right?

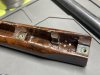
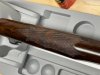
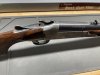
This one has the Color-Case-Hardening finish on the Receiver, which is still in really nice shape.
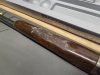
Surprisingly enough for its age, the Stock only has one ding in the fore-end and is overall in pretty nice shape.
I've heard that they didn't last long with rough use, with many of them broken over the years and replaced with Wood Stocks.
Although this one shows signs of much use, it must have been really well taken care of over its early life.
Most of my younger years I remember it hanging on the wall in the bedroom in my Grandma's old house. (along with some other Firearms I'll get to at some point)
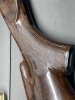
The Tenite material itself is what's causing the issues now.
Apparently as the material ages and degrades, it will leach acidic compounds out of itself., both in liquid form and gasses.
Not only will this cause problems with the Tenite material as it ages, but will also cause issues to nearby metal objects and some fabrics.
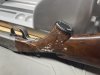
What I originally thought was some sort of mold or mildew attacking the gun, is actually crystalized acid-type compounds. Some of them are a white powdery substance that rub-off easily, and some are hard-stuck on the Stock and require gently scraping to remove.
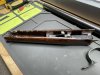
It also was causing some corrosion underneath the spring mechanism that attaches the fore-end to the Barrel.
The "Tenite" material that the Stock is made of was developed in the late 1920's by the Eastman Corporation (of Eastman-Kodak fame)
It is a Cellulose-Acetate material that is not unlike the composition of Movie-Film.
It was widely used in the 1930's and 1940's to make a number of different things ranging from Radios, to Toothbrushes, to Eyeglass Frames, and even automobile Steering-Wheels.
From info that I can find, Savage-Stevens offered it on their Shotguns starting in 1940 and early 1941. They did not produce any civilian sporting-arms during WW-II from 1941-1945.
They started again offering it on their Shotguns in 1946 and continued to offer it until 1948.
Problems arose with the material, mostly if exposed to high heat or if left in direct sunlight. It would warp, shrink, and cause cracking.
There are stories of automobile steering-wheels with all the plastic material broken off or severely cracked.
Stevens stopped offering it on their Shotguns after 1948
There was differences in how the Stevens name was displayed on their Firearms over the years. According to info I found, how the name was written depicts what era the Firearm was manufactured.
I'm not sure how accurate all of this is, but if this info is in-fact correct, then this particular Shotgun was manufactured in 1940?
My Grandfather died some time in the 60's, and my Father is gone too, so there's no way to know for sure. The era sounds about right?
This one has the Color-Case-Hardening finish on the Receiver, which is still in really nice shape.
Surprisingly enough for its age, the Stock only has one ding in the fore-end and is overall in pretty nice shape.
I've heard that they didn't last long with rough use, with many of them broken over the years and replaced with Wood Stocks.
Although this one shows signs of much use, it must have been really well taken care of over its early life.
Most of my younger years I remember it hanging on the wall in the bedroom in my Grandma's old house. (along with some other Firearms I'll get to at some point)
The Tenite material itself is what's causing the issues now.
Apparently as the material ages and degrades, it will leach acidic compounds out of itself., both in liquid form and gasses.
Not only will this cause problems with the Tenite material as it ages, but will also cause issues to nearby metal objects and some fabrics.
What I originally thought was some sort of mold or mildew attacking the gun, is actually crystalized acid-type compounds. Some of them are a white powdery substance that rub-off easily, and some are hard-stuck on the Stock and require gently scraping to remove.
It also was causing some corrosion underneath the spring mechanism that attaches the fore-end to the Barrel.
SkunkWorks
Well-Known Member
12-gauge is so widely used here that it's still relatively cheap.Who can afford 20ga ammo?
It costs more than 12ga here.
410 is about the same cost.
20-gauge and 410 is a little less common, and is typically more expensive here.
16-gauge and 10-gauge are not that common anymore and getting harder to find
Wow. I've seen those steering wheels with that stuff. None of them in good shape. And I think I've seen some rifles with that kind of stock. Could have been a shotgun I guess, it was forever ago. I think I'd go the wood stock route too. I'd be worried what that acidic stuff would do to skin or innards with a lot of contact.
SkunkWorks
Well-Known Member
They used them on other Rifles and Firearms over the years, maybe even as late as the 1960's or 1970's.
I mainly tried researching these Break-Open Shotguns. (they used Tenite stocks on the "Doubles" too)
From what I found, Stevens only used it on these during the 1940's
I mainly tried researching these Break-Open Shotguns. (they used Tenite stocks on the "Doubles" too)
From what I found, Stevens only used it on these during the 1940's
Or tonite without the explosivenessTenite…?
Is that like Bakolite?
")
SkunkWorks
Well-Known Member
Not really.Tenite…?
Is that like Bakolite?
Completely different chemical properties.
Tannerite? If you're speaking of the stuff the explodes when shot by a bullet.Or tonite without the explosiveness
SkunkWorks
Well-Known Member
I've had a few "Tonights" that were pretty explosive, back in the day......................
Heavy loads?I've had a few "Tonights" that were pretty explosive, back in the day......................
Yeah that’s it! Although I just googled tonite and that is something explosive too. Coincidence.Tannerite? If you're speaking of the stuff the explodes when shot by a bullet.
View attachment 108880
Tannerite is quite stable. Looking at how Google describes tonite, that sounds a little less stable. Dunno.Yeah that’s it! Although I just googled tonite and that is something explosive too. Coincidence.
SkunkWorks
Well-Known Member
Stevens - Springfield Model 107B (part 3)
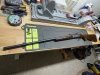
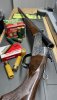
The "Cleaning" portion of this project had commenced.
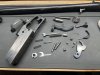
I started with the metal bits first.
I used some solvent and an old toothbrush to clean all the small parts in an old metal travel-mug.
There was quite a bit of residue and dirt left behind when I was done.
I used a piece of Scottish-Brite Pad to polish all the bare-metal parts that had some surface rust on them.........They all came out nice and shiny!
I wiped all the parts that had a blued finish on them with a rag and some CLP. It worked really well.
Took the Receiver out to the garage and sprayed it down with some brake-cleaner and brushed all the gunk out with a toothbrush.
I'm quite pleased with the results!
The Trigger-guard is Aluminum, and was once painted black.
That finish was long since worn-off with use...........I cleaned it up and will leave it as-is. It has a nice patina to it.
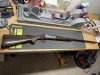
Next was the Barrel.
Since the surface-rust was very minimal, I decided to use the "0000-Steel Wool and gun-oil" method.
It worked pretty well. With only a little bit of light rubbing it came right off.
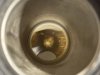
I finished with running a brass bore-brush down the inside about 15 times with some bore solvent, followed by a bunch of patches and then a light film of CLP.
my phone struggled with what to focus on here.
After reading a whole bunch of suggestions and various forum-talk about how to clean and care for "Tenite", I settled on a safe and gentle method.
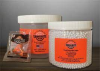
It was most recommended to use a warm-water solution with a slightly alkaline cleaner like dish-detergent.
I used Dawn and a nylon vegetable-brush, along with an old toothbrush.
Solvents will attack the material and soften it, and are not recommended.
The warm bath cleaned most of the loose-powdery stuff off, but I had to use a plastic scraping-tool to get the stuck-on residue off.
I used a plastic-pick to gently scrape all of it out of the checkering. That was tedious work but it paid-off in the end.
I am really pleased with the final result!
This Stock really is in nice overall shape considering its age, and what its made of...........
I'm glad I spent the time to research what exactly I have here, and how to properly care for it.
The aging process will never stop. The cleaning and care processes will always be ongoing with this material.
The ultimate fix would be to fit a Wood-Stock to this gun, take the original Tenite parts and vacuum-seal them up in bags to store them away?
Maybe some day down the road if my boys are interested in helping me with that project...............
The "Cleaning" portion of this project had commenced.
I started with the metal bits first.
I used some solvent and an old toothbrush to clean all the small parts in an old metal travel-mug.
There was quite a bit of residue and dirt left behind when I was done.
I used a piece of Scottish-Brite Pad to polish all the bare-metal parts that had some surface rust on them.........They all came out nice and shiny!
I wiped all the parts that had a blued finish on them with a rag and some CLP. It worked really well.
Took the Receiver out to the garage and sprayed it down with some brake-cleaner and brushed all the gunk out with a toothbrush.
I'm quite pleased with the results!
The Trigger-guard is Aluminum, and was once painted black.
That finish was long since worn-off with use...........I cleaned it up and will leave it as-is. It has a nice patina to it.
Next was the Barrel.
Since the surface-rust was very minimal, I decided to use the "0000-Steel Wool and gun-oil" method.
It worked pretty well. With only a little bit of light rubbing it came right off.
I finished with running a brass bore-brush down the inside about 15 times with some bore solvent, followed by a bunch of patches and then a light film of CLP.
my phone struggled with what to focus on here.
After reading a whole bunch of suggestions and various forum-talk about how to clean and care for "Tenite", I settled on a safe and gentle method.
It was most recommended to use a warm-water solution with a slightly alkaline cleaner like dish-detergent.
I used Dawn and a nylon vegetable-brush, along with an old toothbrush.
Solvents will attack the material and soften it, and are not recommended.
The warm bath cleaned most of the loose-powdery stuff off, but I had to use a plastic scraping-tool to get the stuck-on residue off.
I used a plastic-pick to gently scrape all of it out of the checkering. That was tedious work but it paid-off in the end.
I am really pleased with the final result!
This Stock really is in nice overall shape considering its age, and what its made of...........
I'm glad I spent the time to research what exactly I have here, and how to properly care for it.
The aging process will never stop. The cleaning and care processes will always be ongoing with this material.
The ultimate fix would be to fit a Wood-Stock to this gun, take the original Tenite parts and vacuum-seal them up in bags to store them away?
Maybe some day down the road if my boys are interested in helping me with that project...............
Last edited:
nice work! After looking into the Tenite resin system, with the wisdom of hindsight I see why it is inherently unstable and it will continue to degrade regardless if what you do. My storage suggestion is cool, dark and controlled humidity. i.e. Keep it with the beerStevens - Springfield Model 107B (part 3)
The "Cleaning" portion of this project had commenced.
I started with the metal bits first.
I used some solvent and an old toothbrush to clean all the small parts in an old metal travel-mug.
There was quite a bit of residue and dirt left behind when I was done.
View attachment 108892
I used a piece of Scottish-Brite Pad to polish all the bare-metal parts that had some surface rust on them.........They all came out nice and shiny!
I wiped all the parts that had a blued finish on them with a rag and some CLP. It worked really well.
Took the Receiver out to the garage and sprayed it down with some brake-cleaner and brushed all the gunk out with a toothbrush.
I'm quite pleased with the results!
The Trigger-guard is Aluminum, and was once painted black.
That finish was long since worn-off with use...........I cleaned it up and will leave it as-is. It has a nice patina to it.
View attachment 108893
Next was the Barrel.
Since the surface-rust was very minimal, I decided to use the "0000-Steel Wool and gun-oil" method.
It worked pretty well. With only a little bit of light rubbing it came right off.
I finished with running a brass bore-brush down the inside about 15 times with some bore solvent, followed by a bunch of patches and then a light film of CLP.
View attachment 108894
my phone struggled with what to focus on here.
View attachment 108895
After reading a whole bunch of suggestions and various forum-talk about how to clean and care for "Tenite", I settled on a safe and gentle method.
It was most recommended to use a warm-water solution with a slightly alkaline cleaner like dish-detergent.
I used Dawn and a nylon vegetable-brush, along with an old toothbrush.
Solvents will attack the material and soften it, and are not recommended.
The warm bath cleaned most of the loose-powdery stuff off, but I had to use a plastic scraping-tool to get the stuck-on residue off.
I used a plastic-pick to gently scrape all of it out of the checkering. That was tedious work but it paid-off in the end.
I am really pleased with the final result!
View attachment 108896
View attachment 108897
View attachment 108898
View attachment 108899
This Stock really is in nice overall shape considering its age, and what its made of...........
I'm glad I spent the time to research what exactly I have here, and how to properly care for it.
The aging process will never stop. The cleaning and care processes will always be ongoing with this material.
The ultimate fix would be to fit a Wood-Stock to this gun, take the original Tenite parts and vacuum-seal them up in bags to store them away?
Maybe some day down the road if my boys are interested in helping me with that project...............
SkunkWorks
Well-Known Member
Stevens - Springfield Model 107B (part 4)
Using the "exploded-view" Diagram and a few Youtube videos, I was confident I could get this sweet-baby back together without incident.................maybe a little too confident......
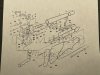
I reassembled all of the small parts into the Receiver in the order that made the most sense. ( IE, you need to be able to access certain screws only before you install other parts)
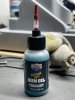
I used a good quality Gun-Oil on all the pivoting and sliding contact points, instead of whatever grease had been in there for approx 80-years.............
The needle-applicator tip made this an easy task.
The assembly process was mostly an easy affair.......................until I got to installing the Mainspring assembly.
There is no easy or good way to get it back into the Frame without a specialized jig, or armorer's press.......
Most of the videos I've watched on this step show the user simply using brute-force against the edge of a table or workbench, to muscle it into the Frame.
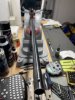
I took it out to the garage and locked the Receiver into my bench-vice using the soft jaws. Using a large Punch with a knurled-handle, I pushed down on the cone-shaped tip of the mainspring-cap while guiding it into the Frame with my other hand.
This technique worked, however when the mainspring popped into the Receiver the punch slipped off the cone-shaped end, and smashed my thumb so hard into the bench-vice that it split open!
(I don't have any pictures of that to share, I was too busy trying to stop the bleeding)
I honestly thought I broke my thumb, I hit it so hard............. Luckily it was numb for about a half-hour before the throbbing started, and I was able to finish guiding the end of the mainspring-cap into its hole in the rear of the Receiver.
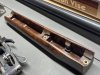
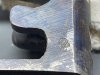
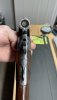
The Receiver all cleaned, lubed, and assembled!
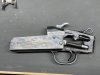
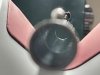
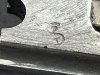
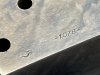
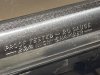
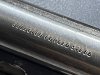
Here's a couple pictures of the proof-marks, and some of the other markings before final assembly of the Gun.
Using the "exploded-view" Diagram and a few Youtube videos, I was confident I could get this sweet-baby back together without incident.................maybe a little too confident......
I reassembled all of the small parts into the Receiver in the order that made the most sense. ( IE, you need to be able to access certain screws only before you install other parts)
I used a good quality Gun-Oil on all the pivoting and sliding contact points, instead of whatever grease had been in there for approx 80-years.............
The needle-applicator tip made this an easy task.
The assembly process was mostly an easy affair.......................until I got to installing the Mainspring assembly.
There is no easy or good way to get it back into the Frame without a specialized jig, or armorer's press.......
Most of the videos I've watched on this step show the user simply using brute-force against the edge of a table or workbench, to muscle it into the Frame.
I took it out to the garage and locked the Receiver into my bench-vice using the soft jaws. Using a large Punch with a knurled-handle, I pushed down on the cone-shaped tip of the mainspring-cap while guiding it into the Frame with my other hand.
This technique worked, however when the mainspring popped into the Receiver the punch slipped off the cone-shaped end, and smashed my thumb so hard into the bench-vice that it split open!
(I don't have any pictures of that to share, I was too busy trying to stop the bleeding)
I honestly thought I broke my thumb, I hit it so hard............. Luckily it was numb for about a half-hour before the throbbing started, and I was able to finish guiding the end of the mainspring-cap into its hole in the rear of the Receiver.
The Receiver all cleaned, lubed, and assembled!
Here's a couple pictures of the proof-marks, and some of the other markings before final assembly of the Gun.
SkunkWorks
Well-Known Member
Next was to attach the barrel back into the receiver.
Before I did so, I cleaned and lubed the ejector assembly. It's spring-loaded, and will launch an empty shell over your shoulder when you open the Breach.
The fore-end of the Stock snaps onto the bottom of the Barrel using a spring-loaded steel clip.
It's held on with enough spring-pressure that it doesn't come off even with the recoil force of the gun, but will come off easily if you simply pull down on the front edge of it for breakdown and cleaning.
When I first removed the Buttstock, it was held on by a flathead screw that was fairly chewed up. It was also missing the washer that's supposed to be on it.
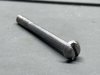
It is located way up inside the hollow Stock, and I didn't feel like fighting this thing upon reassembly............... trying to line it up with the hole on the end of a flathead screwdriver.
While I had the Gun apart on the bench I sourced a replacement from an online bolt supplier, and also got a flat washer and lock-washer to go with it.
It's sort-of an uncommon size thread. (#12-24 x 2-1/8" long) most places nearby that sell screws skip from #10 straight to 1/4".
I went with a socket-head screw to make it easier to feed up into the hole using a hex-bit.
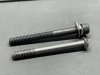
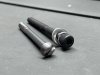
It's hidden way up inside there once assembled and never seen, so I wasn't worried about it not matching the rest of the fasteners.
It went in easily using a long extension and a bit-driver. I tightened it down snugly.
The last step was to install the threaded metal cap in the hole at the end of the Buttstock.
You can use a Coin to remove/install it, but this spare washer I had laying around fit perfectly.
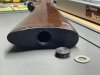
I think I read somewhere that these Shotguns may have came with a cleaning-rod kit that would have been stored in the hollow Stock..
If that was the case, the one that came with this gun is long-gone!
Before I did so, I cleaned and lubed the ejector assembly. It's spring-loaded, and will launch an empty shell over your shoulder when you open the Breach.
The fore-end of the Stock snaps onto the bottom of the Barrel using a spring-loaded steel clip.
It's held on with enough spring-pressure that it doesn't come off even with the recoil force of the gun, but will come off easily if you simply pull down on the front edge of it for breakdown and cleaning.
When I first removed the Buttstock, it was held on by a flathead screw that was fairly chewed up. It was also missing the washer that's supposed to be on it.
It is located way up inside the hollow Stock, and I didn't feel like fighting this thing upon reassembly............... trying to line it up with the hole on the end of a flathead screwdriver.
While I had the Gun apart on the bench I sourced a replacement from an online bolt supplier, and also got a flat washer and lock-washer to go with it.
It's sort-of an uncommon size thread. (#12-24 x 2-1/8" long) most places nearby that sell screws skip from #10 straight to 1/4".
I went with a socket-head screw to make it easier to feed up into the hole using a hex-bit.
It's hidden way up inside there once assembled and never seen, so I wasn't worried about it not matching the rest of the fasteners.
It went in easily using a long extension and a bit-driver. I tightened it down snugly.
The last step was to install the threaded metal cap in the hole at the end of the Buttstock.
You can use a Coin to remove/install it, but this spare washer I had laying around fit perfectly.
I think I read somewhere that these Shotguns may have came with a cleaning-rod kit that would have been stored in the hollow Stock..
If that was the case, the one that came with this gun is long-gone!
SkunkWorks
Well-Known Member
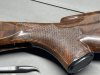
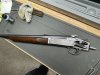
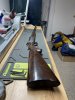
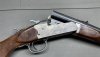
Some pictures after final assembly.
Cleaned, oiled, and ready for Action...................She sure is Gorgeous!
Cleaned, oiled, and ready for Action...................She sure is Gorgeous!
Better than new!