RCinNC
Well-Known Member
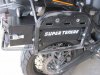
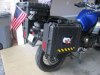
I wanted to have a toolbox mounted on the bike that would be able to carry my tool kit, some spares (like a spare headlight bulb), and an air compressor/tire plug kit. I wanted it to all fit inside a bike mounted toolbox in case I went somewhere without the side cases and top case. The photos here and in the associated album show the construction of the toolbox. It was made to fit with a set of Happy Trail racks, but I’m sure it could be adapted to other rack systems. As always, I post these projects in case someone else can use the ideas and adapt them to their own use.
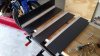
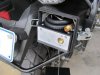
Initially I wanted to just use a piece of extruded vinyl square tubing, like the kind they make for vinyl fenceposts. Unfortunately, the only sizes available were either too small to contain my compressor, or so big that there wasn’t sufficient clearance between the rack and the frame of the bike to contain the box. I decided to make one to my own dimensions; the box is 4 1/2” wide by 4 1/8” high by 18 1/2” long. The box is the same width as my old 4” ABS drainage pipe tool tube. Before I started building, I made a mock up of the box out of 3/16” foam core board, to make sure it would fit in the space between the rack and the bike. Although the new box and the old tube are both 4 1/2” wide, the box will have less clearance with a compressed suspension than the tube did. The box dimensions take into account that the rear suspension has a maximum of 7 1/2” of compression. I also hung a plumb bob from the inside edge of the box down to the ground, to make sure that none of the parts of the brake caliper would whack into the box during compression.
The box was made from 3/16” ABS sheet plastic, which I bought from TAP Plastics. To make my life easier, I had TAP Plastics cut the sheet to the dimensions I needed. To assemble the box, I used 1” x 1” x 1/16” aluminum angle to reinforce the edges. The aluminum was attached to the long edges of the box with #6 machine screws. The screws were placed through the plastic into threaded holes in the aluminum angle, then the excess was cut off and ground flush. The box edges were then glued with solvent, and once that dried, I welded the edges together using a soldering iron. Prior to assembly the inside of the box (but not the aluminum) was painted white, to make it easier to see things in the box. The aluminum was left bare so the air compressor would slide inside the box easier.
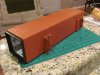
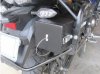
The mounts were made from steel corner reinforcements (from a hardware store) and sections of 2” x 2” x 1/8” aluminum angle. The draw latches are standard hardware store items. The inside edge draw latch ends up acting more like a hinge than a latch, since there isn’t enough clearance with the fender to flip the latch open. It works fine that way, though.
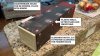
Two of the sides of the lid were reinforced with pieces of steel cut from an old ammo can. I did that because when I initially screwed the hooks for the draw latches into the sides of the lid, the holes in the plastic tended to strip out. Now, the hooks are attached using #6 machine screws that go into tapped holes in the steel reinforcing plate. The plates were JB Welded to the sides of the lid, and also screwed into place. The lid has a rubber gasket inside to keep the rain out.
I made a little lanyard out of steel wire, to keep the lid attached to the box so it wouldn’t get lost in the dark. The attachment points for the lanyard were carved with a file out of a couple little pieces of 1/4” square aluminum stock. The ends of the wire are secured with crimped ferrules, filed down so they’d fit in the recesses of the attachment points. The attachment points have tapped #4 holes, and are screwed to the box and the lid.
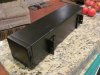
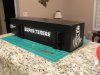
The box and lid were primed and then sprayed with Krylon satin black spray paint. The decals were something I whipped up on my computer. They’re not perfect (my ink cartridge was running low), but they won’t be seen much anyway.
The compressor, plug kit, tools, etc all fit nicely inside the box. I’ll road test it for a while, and if something goes belly up on it, I’ll make sure to add a follow-up to this thread.
There are more photos of the box here: http://www.yamahasupertenere.com/index.php?action=media;sa=album;in=102;asc;nw
Initially I wanted to just use a piece of extruded vinyl square tubing, like the kind they make for vinyl fenceposts. Unfortunately, the only sizes available were either too small to contain my compressor, or so big that there wasn’t sufficient clearance between the rack and the frame of the bike to contain the box. I decided to make one to my own dimensions; the box is 4 1/2” wide by 4 1/8” high by 18 1/2” long. The box is the same width as my old 4” ABS drainage pipe tool tube. Before I started building, I made a mock up of the box out of 3/16” foam core board, to make sure it would fit in the space between the rack and the bike. Although the new box and the old tube are both 4 1/2” wide, the box will have less clearance with a compressed suspension than the tube did. The box dimensions take into account that the rear suspension has a maximum of 7 1/2” of compression. I also hung a plumb bob from the inside edge of the box down to the ground, to make sure that none of the parts of the brake caliper would whack into the box during compression.
The box was made from 3/16” ABS sheet plastic, which I bought from TAP Plastics. To make my life easier, I had TAP Plastics cut the sheet to the dimensions I needed. To assemble the box, I used 1” x 1” x 1/16” aluminum angle to reinforce the edges. The aluminum was attached to the long edges of the box with #6 machine screws. The screws were placed through the plastic into threaded holes in the aluminum angle, then the excess was cut off and ground flush. The box edges were then glued with solvent, and once that dried, I welded the edges together using a soldering iron. Prior to assembly the inside of the box (but not the aluminum) was painted white, to make it easier to see things in the box. The aluminum was left bare so the air compressor would slide inside the box easier.
The mounts were made from steel corner reinforcements (from a hardware store) and sections of 2” x 2” x 1/8” aluminum angle. The draw latches are standard hardware store items. The inside edge draw latch ends up acting more like a hinge than a latch, since there isn’t enough clearance with the fender to flip the latch open. It works fine that way, though.
Two of the sides of the lid were reinforced with pieces of steel cut from an old ammo can. I did that because when I initially screwed the hooks for the draw latches into the sides of the lid, the holes in the plastic tended to strip out. Now, the hooks are attached using #6 machine screws that go into tapped holes in the steel reinforcing plate. The plates were JB Welded to the sides of the lid, and also screwed into place. The lid has a rubber gasket inside to keep the rain out.
I made a little lanyard out of steel wire, to keep the lid attached to the box so it wouldn’t get lost in the dark. The attachment points for the lanyard were carved with a file out of a couple little pieces of 1/4” square aluminum stock. The ends of the wire are secured with crimped ferrules, filed down so they’d fit in the recesses of the attachment points. The attachment points have tapped #4 holes, and are screwed to the box and the lid.
The box and lid were primed and then sprayed with Krylon satin black spray paint. The decals were something I whipped up on my computer. They’re not perfect (my ink cartridge was running low), but they won’t be seen much anyway.
The compressor, plug kit, tools, etc all fit nicely inside the box. I’ll road test it for a while, and if something goes belly up on it, I’ll make sure to add a follow-up to this thread.
There are more photos of the box here: http://www.yamahasupertenere.com/index.php?action=media;sa=album;in=102;asc;nw
Attachments
-
 36.7 KB Views: 198
 -
 50.8 KB Views: 196
 -
 44.6 KB Views: 180
 -
 44.4 KB Views: 175
 -
 44.4 KB Views: 200
 -
 44.4 KB Views: 225
 -
 41.4 KB Views: 197
 -
 40.8 KB Views: 205
 -
 45.7 KB Views: 224
 -
 47.1 KB Views: 198


