Koinz
Active Member
Founding Member
2011 Site Supporter
2012 Site Supporter
2013 Site Supporter
2014 Site Supporter
I was looking around and thought that retracting the plunger on the Chain Tensioner deserves it's own thread. I searched around and found the AC posted a youtube vid of a Dutchman showing an easy technique, so I'm reposting here so it's easier to find.
XT1200z Nokkenas ketting spanner resetten ( cam chain tensioner, steuerketten spanner)
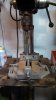
A slight variation of this is to use a drill press (if you have one) to apply pressure on the plunger while turning the arbor by hand to retract the plunger. Once the plunger is bottomed, it's much easier to hold it, while setting the clip in it's grove. I have a small drill press vise that the tensioner sat in while performing the operation.
In the attached pictured, I substituted a socket to depict the tensioner, since I had already completed my valve adjustment.
XT1200z Nokkenas ketting spanner resetten ( cam chain tensioner, steuerketten spanner)
A slight variation of this is to use a drill press (if you have one) to apply pressure on the plunger while turning the arbor by hand to retract the plunger. Once the plunger is bottomed, it's much easier to hold it, while setting the clip in it's grove. I have a small drill press vise that the tensioner sat in while performing the operation.
In the attached pictured, I substituted a socket to depict the tensioner, since I had already completed my valve adjustment.
Attachments
-
 28.2 KB Views: 291
