Tenman
Well-Known Member
You will feel it cycle through the brake pedal
So cycling it either through the front or rear brake is fine? The rear is easy to activate.You will feel it cycle through the brake pedal
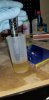
I just bled the clutch , front and rear brakes. The service manual specifically tells you to cycle the ABS and flush again. I did it, but didn't find it necessary for me. Below is a picture I took after cycling the ABS and bleeding the brakes. I tested the brake fluid before and after and the concentration of water in the brake fluid was the same. Under 1%.Does doing this eliminate the need to cycle the ABS pump? I had my dealer change my brake fluid when they were replacing the pads and they probably didn't cycle the ABS pump if the service manual doesn't mention it.
 .
.I just completed this today on my ‘15 and the pump cycled fine with the kill switch in the OFF position. Front brake lever pulses first then the rear pedal and the pump motor continues to run for a bit. Took 10-15 seconds before it stopped. I kept the brakes applied for the whole cycle. I was surprised how noisy the process is! In the garage at least, the brakes feel nice and firm. Purged the clutch while I was at it too. That reservoir is ridiculously small. Besides that, fluid tends to squirt up out of it when releasing the lever. You have to rest the kid in place to avoid that, making it hard to monitor the level. Two bleed cycles and it sucked air! Took a bunch of additional work, topping up after every cycle to get the air back out. PITA!I just performed this service yesterday and yes... kill switch needs to be in the “run” position to activate the ABS purge.
Just did it, thanks!On 2104 and newer models the procedure is a bit simpler.
Jumper the same wires.
Put the kill switch in the off position.
Hold front and rear brakes on.
Turn on the key.
The ABS system will cycle front, rear, front.
Turn off key.


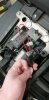
Very nice! Thanks.I made up a little kit for the ABS cycling maintenance task and keep it under my seat. I'm making it part of my regular maintenance, rather than depending on my previous "trigger it on a gravel road when the opportunity presents itself" method.
The jumper wire is one of those cheapie test leads they sell on amazon. I just cut it and spliced it so it would be smaller. The tips of the alligator clips are pretty small, so they fit into the openings on the modular plug, and they grip tight enough to stay in place.
And because my memory ain't what it once was, I made up a cheat sheet with the instructions on how to cycle the pump, plus some photos of where to attach the lead. The cheat sheet folds up and is stored in the plastic envelope with the test leads.
I've attached a PDF of the cheat sheet, in case anyone wants to print it and use it. My bike is a 2014 model, and these instructions apply to it; I presume that later models use the same method, but I don't guarantee it.
Photo of the cheat sheet:
And the kit:
Since I'm guaranteed to have the seat off multiple times a year, seeing the kit under there will be a reminder of "hey, do this task", and with the tool and the instructions right there in front of me, I won't have to put it off, even if I'm nowhere near my garage.
Any chance you would put together a few of these kits and sell them on this forum?
Since I'm guaranteed to have the seat off multiple times a year, seeing the kit under there will be a reminder of "hey, do this task", and with the tool and the instructions right there in front of me, I won't have to put it off, even if I'm nowhere near my garage.
I figured as much but I gave it a shot anyway....Probably not, MFP; I already have too many projects going at one time LOL.


 absstuurapparaten.nl
Sumitomo – Part No. 23-85930-00 | 23P8593000
Sumitomo – Part No. 28.5610-1112.3 | 28561011123
ATE – Part No. 10.0961-7901.3 | 10096179013
ATE – Part No. 10.0618-3970.1 | 10061839701
ATE – Part No. 10.0214-5017.4 | 10021450174 <---- Sticker on ABS my ABS pump matches this.