RCinNC
Well-Known Member
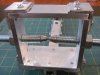
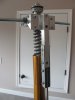
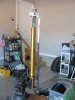
I just did a fork oil change on my Super Tenere. I knew when I was planning to do this that I’d need a fork spring compressor. I saw several $100.00 plus tools, and one from the UK that was almost $300, so I knew I didn’t want to go that route. I didn’t want to go the ratchet strap route either, since they can be a pain to get to release properly and I didn’t want to have to pad the fork tube while I was working on it. I wanted it to be simple to use, and wouldn’t need a second set of hands to use it. It also had to be cheap ( because that’s how I am); in fact, I wanted to be able to build it just out of stuff I had laying around in the garage. I have a box of aluminum pieces that are left over from other projects, and after sifting through it I found the stuff I needed. Because I had some flat aluminum stock, and flat shapes are way easier to fabricate than round ones, I decided to make the compressor yoke square instead of round. The yoke was made from four pieces of flat stock that measured the following:
two pieces, 3” W x 1 ¼ ” H x ¼” thick
one piece, 3 ½” W x 1 ¼ H x ¼” thick
one piece, 3 ½” W X 2” H x ¼” thick
The rear of the yoke is wider because I didn’t know how much force would be exerted on that part of the yoke when the spring was being compressed. I probably could have got away with making it the same height as the other pieces.
The corners of the box were joined with pieces of double layered 1/16” aluminum angle. I doubled it for the extra strength, and I didn’t have any 1/8” angle on hand. I tapped all the holes for the machine screws because it makes for a smoother interior on the yoke and less chance of scratching the fork tubes, but it could also be done with machine screws and nuts. I made the spine of the compressor yoke from a piece of scrap ¾” aluminum tubing (with 1/8” walls). The spine is necessary because it makes it simple to attach the compressor yoke to the bar from a bar clamp.
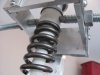
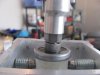
The holes in the sides of the compressor yoke are ½” in diameter, and are tapped for a piece of ½”-13 threaded rod. The threaded rod is the one thing I had to buy. In order to get the blunt points on the ends of the rod (which you’ll need so they fit into the collar on top the fork spring), I chucked an electric hand grinder upside down in my vise, and rotated the threaded rod against the wheel until the points were relatively uniform. Kind of like sharpening a pencil.
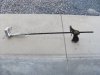
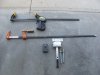
I have some trigger clamps and bar clamps from my days of woodworking. The bar clamps are those super cheap ones that are sold by Harbor Freight. I needed the bar from the cheapie clamp, since the clamping pad on the bar of the trigger clamp seemed to be molded on, and I didn’t want to cut it off and ruin the clamp. Fortunately the bar of the cheapie clamp fit the trigger clamp. I just ground the rivet off that secured the clamping pad to the bar, and later I would put the pad back on with a nut and bolt so the clamp could still be used.
The compressor yoke was attached to the bar from the cheapie clamp with a couple nuts and bolts. I had to drill one extra hole on the bar. On the trigger portion of the clamp, I did take off the stock rubber pad and replaced it with a pad I made from layered ABS sheet plastic, glued together. The pad slides onto the trigger clamp in the same way the stock pad did. The pad locks to the clamp, and the pad has a pin that fits in the hole in the bottom of the shock. This was all done mainly to make sure that the bottom of the clamp couldn’t slip off the shock while it was being compressed. You could probably skip this, as I didn’t notice that the clamp had any tendencies to slip, but I wanted to err on the side of caution.
The compressor worked really well. Easy to use by one person, easy to control, and keeps the fork tube from getting dinged up. Once you’re done with it you can put the clamps back together and still use them for other things. I know that not everyone has a box of scrap aluminum pieces laying around, but I priced out the stock on an online retailer (Metals Depot), and it would run about $22.00 for the aluminum.
I put a bunch of photos in my photo album so you can see closer shots of it, if you were inclined to build one. It was made with basic hand and power tools (drill, jigsaw, electric hand grinder, files). The most sophisticated tool I used was a tap and die set, but you could build this without one. Feel free to use the idea and improve on it.
Here's the link to the additional photos in my album: http://www.yamahasupertenere.com/index.php?action=media;sa=album;in=95
two pieces, 3” W x 1 ¼ ” H x ¼” thick
one piece, 3 ½” W x 1 ¼ H x ¼” thick
one piece, 3 ½” W X 2” H x ¼” thick
The rear of the yoke is wider because I didn’t know how much force would be exerted on that part of the yoke when the spring was being compressed. I probably could have got away with making it the same height as the other pieces.
The corners of the box were joined with pieces of double layered 1/16” aluminum angle. I doubled it for the extra strength, and I didn’t have any 1/8” angle on hand. I tapped all the holes for the machine screws because it makes for a smoother interior on the yoke and less chance of scratching the fork tubes, but it could also be done with machine screws and nuts. I made the spine of the compressor yoke from a piece of scrap ¾” aluminum tubing (with 1/8” walls). The spine is necessary because it makes it simple to attach the compressor yoke to the bar from a bar clamp.
The holes in the sides of the compressor yoke are ½” in diameter, and are tapped for a piece of ½”-13 threaded rod. The threaded rod is the one thing I had to buy. In order to get the blunt points on the ends of the rod (which you’ll need so they fit into the collar on top the fork spring), I chucked an electric hand grinder upside down in my vise, and rotated the threaded rod against the wheel until the points were relatively uniform. Kind of like sharpening a pencil.
I have some trigger clamps and bar clamps from my days of woodworking. The bar clamps are those super cheap ones that are sold by Harbor Freight. I needed the bar from the cheapie clamp, since the clamping pad on the bar of the trigger clamp seemed to be molded on, and I didn’t want to cut it off and ruin the clamp. Fortunately the bar of the cheapie clamp fit the trigger clamp. I just ground the rivet off that secured the clamping pad to the bar, and later I would put the pad back on with a nut and bolt so the clamp could still be used.
The compressor yoke was attached to the bar from the cheapie clamp with a couple nuts and bolts. I had to drill one extra hole on the bar. On the trigger portion of the clamp, I did take off the stock rubber pad and replaced it with a pad I made from layered ABS sheet plastic, glued together. The pad slides onto the trigger clamp in the same way the stock pad did. The pad locks to the clamp, and the pad has a pin that fits in the hole in the bottom of the shock. This was all done mainly to make sure that the bottom of the clamp couldn’t slip off the shock while it was being compressed. You could probably skip this, as I didn’t notice that the clamp had any tendencies to slip, but I wanted to err on the side of caution.
The compressor worked really well. Easy to use by one person, easy to control, and keeps the fork tube from getting dinged up. Once you’re done with it you can put the clamps back together and still use them for other things. I know that not everyone has a box of scrap aluminum pieces laying around, but I priced out the stock on an online retailer (Metals Depot), and it would run about $22.00 for the aluminum.
I put a bunch of photos in my photo album so you can see closer shots of it, if you were inclined to build one. It was made with basic hand and power tools (drill, jigsaw, electric hand grinder, files). The most sophisticated tool I used was a tap and die set, but you could build this without one. Feel free to use the idea and improve on it.
Here's the link to the additional photos in my album: http://www.yamahasupertenere.com/index.php?action=media;sa=album;in=95
Attachments
-
 73.8 KB Views: 85
 -
 72.3 KB Views: 75
 -
 72.9 KB Views: 72
 -
 65 KB Views: 78
 -
 73.3 KB Views: 77
 -
 65.5 KB Views: 75
 -
 73.4 KB Views: 89


")