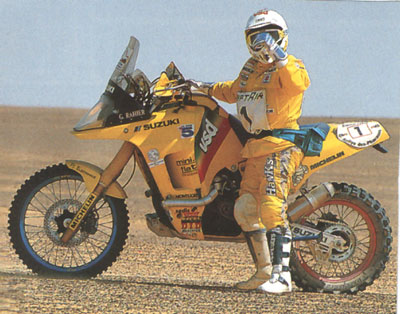
High front guard to suit the 21" wheel on the WASPmobile..

cbat

Member
Joined
Mar 26, 2012
Messages
108
Location
Texas
Wasp said:
What the heel do you need to put your feet down for.... That's how you break the damn things off. ;)

Ya never heard Gaston moan. He was happy to be able to reach the pegz. :))


Greg.
::012::
 

troll

New Member
Founding Member
2011 Site Supporter
Joined
Dec 30, 2010
Messages
862
Location
Frozen wastelands of the barren north ( NW Canada
Wasp said:
What the heel do you need to put your feet down for.... That's how you break the damn things off. ;)

Ya never heard Gaston moan. He was happy to be able to reach the pegz. :))


Greg.
I'm kind of with Tremor on this one, and I would consider him tall - I have a 28 5/8" inseam. Never did perfect the rolling mount and dismount.

I really like the look and the high quality work that you and Woody have put out. Absolutly beautiful stuff. Makes me envious. That Woody is a master craftsman and you sir are the cats ass in design and innovation. My hat is off to both of you ::008::
 

JonnyCinco

Ever Dance with the Devil in the Pale Moonlight?
Founding Member
2011 Site Supporter
2012 Site Supporter
2014 Site Supporter
Joined
Sep 7, 2010
Messages
769
Location
Richmond, Vagina
may i suggest for you "little people" out there.....


::015::
 

Waspworks

New Member
Founding Member
2011 Site Supporter
2012 Site Supporter
Joined
Nov 2, 2010
Messages
414
Location
Perth, Western Orstrailya - Wear the fox hat!!
troll said:
I'm kind of with Tremor on this one, and I would consider him tall - I have a 28 5/8" inseam. Never did perfect the rolling mount and dismount.

I really like the look and the high quality work that you and Woody have put out. Absolutly beautiful stuff. Makes me envious. That Woody is a master craftsman and you sir are the cats ass in design and innovation. My hat is off to both of you ::008::
Problem solved Troll/Tremor...


Thread the loops through your belt and you're good to go. ::014::

Greg.
 

Tremor38

All roads fair game...all game outta the way!
2011 Site Supporter
2012 Site Supporter
Joined
Apr 28, 2011
Messages
2,562
Location
Aomori, Japan
:D :D ::005:: NOT FUNNY!! ::025::

I'll bet Gaston's touring machine is much lower 8)
 

Waspworks

New Member
Founding Member
2011 Site Supporter
2012 Site Supporter
Joined
Nov 2, 2010
Messages
414
Location
Perth, Western Orstrailya - Wear the fox hat!!
OK - Enough short people joke's... My apologies. I can only hope my comments went straight over your head ::015::


Sorry..... ::013:: ::013:: ::013:: ;) 8) ??? ::) :-* >:D ::26:: ::021::


More development as I have been progressing on the high guard mount and the fork leg guards.

I have returned the guard I borrowed from my friend and ordered a new one from Suzuki Australia. $Au110 and apparently you dont get a free bike with that, it's just the guard... They dont even offer any anal lube before sticking it in ???

Along with the design of the high guard mount came an epiphany as to the routing of the brake lines. I'm really pleased with the way it is taking shape and will post pics as soon as it is in place.

Not wanting to chance the look of the fork leg guards without a proper design, I decided to create a solid model on the computer so they could be massaged to the exact look that I am after.
I could not find any accessory plastic units that would go anywhere near close to fitting so I thought I would laser cut and press them from 2mm S/S with a view to pulling some from F/glass or carbon later if I felt the need for change.

This is the result:


Really enjoying this project. ::012::

Greg.
 

emack

New Member
Joined
May 1, 2011
Messages
1
Greg,
What did you use for that fixed beak? I looked for it on your site but couldn't find anything. Are you not selling it?

Thanks!
Erik

Wasp said:
That was going to be a fixed beak as it would obviously not have room to move inside of the bodywork at that point.

I was unsure about the acceptance of such a large beak fixed in place, but personally I to find it nicer looking than the lower guard.

As I said, im still looking for the right guard, but any unit fitted to be able to turn with the front wheel will have to be mounted considerably lower that the one above.

Greg.
 

Waspworks

New Member
Founding Member
2011 Site Supporter
2012 Site Supporter
Joined
Nov 2, 2010
Messages
414
Location
Perth, Western Orstrailya - Wear the fox hat!!
Shiney new guard....

My brand spank'n shiney new mudguard arrived today and was installed quick as a flash.

All it need's to finish the job now is the aforementioned Woody's Wheel Works sticker. Clean scratch free empty space is reserved and waiting for same.


I have the fork leg guards laser path finalized and ready to go off to the laser first thing Thursday as it is our ANZAC day memorial holiday tomorrow. The high guard/brake hose mount is also ready and will be cut and pressed at the same time. Still temporarily mounted at the moment. Very strong though and more than adequate for the short term.

I eagerly await being able to post pics of them installed to show how they turned out.

Greg.
 

EricV

Riding, farkling, riding...
2011 Site Supporter
2012 Site Supporter
2013 Site Supporter
2014 Site Supporter
Joined
May 22, 2011
Messages
8,298
Location
Tupelo, MS
Looking good. I look forward to seeing what the high fender kit entails, and the price. Hoping that you'll sell the mounting kit and the p/n for the Suzuki fender to allow peeps to buy their own fender, rather than pay the shipping cost for over seas shipments of a large, light item.

Fork protectors look very Mad Max-ish. Or perhaps just Waspish. :D :D :D
 

Waspworks

New Member
Founding Member
2011 Site Supporter
2012 Site Supporter
Joined
Nov 2, 2010
Messages
414
Location
Perth, Western Orstrailya - Wear the fox hat!!
High mudguard and fork leg covers project nearly complete now.

I finally got a chance to was the bike today.. The proper clean will likely come during the week (if I get time) when I finish off the full clean with some WD40.

I welded and linished the fork leg covers on Friday and removed the high guard mount bracket so that I could give them both a coat of paint, so I decided today was a good time to pull out the pressure washer.
My Son and the two grand-kids were out all day + the cook had disappeared for the arvo so I had complete peace and quiet O0.
I find cleaning the bikes very therapeutic and quite enjoyed my afternoon.


Once dried (while the engine is warming up to dry out) it presented a good opportunity to wack on a couple of the Woody's Wheel Work's stickers... The least I can do for such a great job.


Gratuitous close-up..


I even snuck one on the back:


High mudguard mount bracket received a coat of jam and was secured into place.
As I posted before, the expanding sleave up the inside of the steering stem works a treat and the bracket worked out nice and sturdy with the pressings to firm things up.
These are the only two holes on the bottom triple clamp to attach anything too.


Mudguard installed and fork leg covers welded/linished/painted and fitted...Phew - Finally. Just have to get head down and bum up to finish the hose routing.


Nearly completed (this phase anyway ;)). Will try and finish the clean during the week so I can go out to the forest and get it dirty again .... :'(


I didnt get a chance to trial the 18" rear this weekend, although I could have gone out if I knew the wife was going to disappear, so it looks like this coming weekend is the test day. I will keep all (who might be interested) well reported.

Greg.
 

EricV

Riding, farkling, riding...
2011 Site Supporter
2012 Site Supporter
2013 Site Supporter
2014 Site Supporter
Joined
May 22, 2011
Messages
8,298
Location
Tupelo, MS
looks outstanding! I'm virtually sure that washing the bike voids the warranty though. ;)

Looks like a stout bracket for the raised fender. Nice!
 
Top