JBB
Member
Hi All- I haven't seen this anywhere else, so thought I would post. Two new adventures for me: 1) I've never covered and stapled my own seat before. I found it's more intimidating to think about than to actually do. 2) I've never spent a couple hundred dollars on a new seat and immediately taken a dremel to it. Turns out, it was okay.
For those who may be unfamiliar, the seat cushion and cover came from "Seat Concepts," one of the vendors here in the forum.
I found a heated seat element from Sargent. http://www.sargentcycle.com/Seats-Accessories/DIY-Heat-Kit/ I liked this because of it's shape, but the kicker for me was the variable controller. I learned from the Tenere's heated grips that I really like having more choices than low and high. It's pretty self explanatory what I did from the pictures. I traced the seat element onto the seat cushion, then beveled it out with a dremel to the depth of the heating element.

The blue plastic stick is how I threaded the wires down through the cushion. I snuck it out of my wife's sewing room, then had to buy her a new one when I broke this one.

The tape was not to hold the element down, but rather to bridge the small gap between the element and the cushion, so it wouldn't show through the seat cover when I was done.


The grommet and wire harness were supplied by Sargent

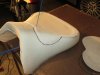
Finished


The controller fit real nicely just inside the left radiator cover, and I hooked it up to a master switch on the dash infill panel.


I'm very pleased with the comfort and quality of the seat from Seat Concepts, and am also happy with the quality and variable heat controller from Sargent. Although I was intimidated by this project at first (seemed like an awful lot of money to be gambling with for my first experience like this), I feel pretty good about having been able to do it.
For those who may be unfamiliar, the seat cushion and cover came from "Seat Concepts," one of the vendors here in the forum.
I found a heated seat element from Sargent. http://www.sargentcycle.com/Seats-Accessories/DIY-Heat-Kit/ I liked this because of it's shape, but the kicker for me was the variable controller. I learned from the Tenere's heated grips that I really like having more choices than low and high. It's pretty self explanatory what I did from the pictures. I traced the seat element onto the seat cushion, then beveled it out with a dremel to the depth of the heating element.

The blue plastic stick is how I threaded the wires down through the cushion. I snuck it out of my wife's sewing room, then had to buy her a new one when I broke this one.

The tape was not to hold the element down, but rather to bridge the small gap between the element and the cushion, so it wouldn't show through the seat cover when I was done.


The grommet and wire harness were supplied by Sargent

Finished


The controller fit real nicely just inside the left radiator cover, and I hooked it up to a master switch on the dash infill panel.


I'm very pleased with the comfort and quality of the seat from Seat Concepts, and am also happy with the quality and variable heat controller from Sargent. Although I was intimidated by this project at first (seemed like an awful lot of money to be gambling with for my first experience like this), I feel pretty good about having been able to do it.
Attachments
-
 31.5 KB Views: 11
