I decided to have a go at repairing my sticking front brake light switch which was causing a cruise malfunction and causing the brake light to stay on. It's an easy enough job and definitely worth having a go before parting with £140 odd for a new one - even though my bike was out of warranty by 1 day when Yamaha extended the warranty by 3 months on all motorcycles in the UK due to Covid.
You don't need to disconnect the switch before removal, but I would advise not turning the ignition on until you've completed the job, just undo the 1 screw shown below
View attachment 73289
Once removed, the switch is easy to pull downwards. When you've gained access to it you need to cut the cable tie to free the cable - be careful not to nick the cable or the outer sheath
With the cable tie removed you will notice the 4 legs of the top cover to the switch assembly, the fiddliest bit of the job is gently pulling those legs back so that you can remove the top and slide it along the cable. I did them 2 at a time - first one side then the other to release them, sliding it back is the easy bit. The photo below shows what I mean and also shows the 4 legs.
View attachment 73291
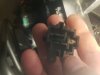
After lifting off the rubber block - dont lose it, you will be able to pull out both of the switches. Looking at the assembly as it's shown in the photo, the right hand switch is your brake light switch and the left one is the cruise switch. It is the brake lamp switch that causes the cruise issues, I flushed it out 2 or 3 times with switch/contact cleaner whilst repeatedly working the switch before letting it dry for 10 minutes. You could do both switches but I decided that since there didn't appear to be a problem with the other one I'd leave it alone - if it aint broke dont fix it.
I then gave each switch a liberal coating of dielectric grease before re-inserting them back into the assembly, replacing the rubber block (when I eventually figured out how to orientate it!) at least you won't have that problem with the photo above and then slipping the cover back down clipping it back into place as shown below
View attachment 73292
And then threaded a new cable tie re-secure the cable
View attachment 73293
I then cut the tail off the cable tie and refitted back to the bike, obviously you need to ease back the brake lever slightly to get it back in there but it slips in really easily, don't forget to tighten the srew properly and it might be a good idea to put some thread lock on to stop it vibrating out in the future.
You could of course test it before replacing it, just remember that when it's not fitted to the bike the brake light will be illuminated until you press the plunger to turn it off. With the plunger held down turn the ignition switch on, activate your cruise button and voi la - no flashing cruise light and you've saved £140 odd