Folding shift lever via CBR600R

KENAROO

New Member
Joined
Dec 18, 2012
Messages
40
Location
Austin Texas
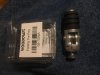
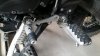
[smg id=1230 type=preview align=center caption="IMG 0403[1]"]

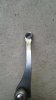
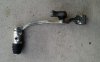
Love my bike but thought the OEM shift lever looked like a cobbled POS. as a dirt biker, I know what rocks, roots and tip overs can do to a shift lever.. really didn't understand why Yamaha would not have made a folding shift lever stock on the S-10. I did some research and found that the 2003-2004 Honda cbr600r shift lever is the same length. but would need a few tweaks to make it work correctly as the ball joint shank was male and the pivot bolt hole ID is larger than the s-10. it was pretty easy to find online.

to make this happen I needed the following
1qty: aftermarket folding shift lever for 2003-2004 CBR600RR (E-bay)
1qty: CBR600r Pivot bolt. (OEM)
1 QTY: 6mm x 1.0 ball joint with left hand threaded female shank (mcmaster carr)
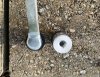
The CBR shifter has a male threaded shank and needs to be replaced with the female one. I just drilled out the existing ball joint thread and installed the new one with a closed nut. I used loctite to make sure it doesn't come off.. I was a little worried I'd notice the nut while shifting but I don't.. the S-10 spring washer and large washer are reused...

Total cost: $36 plus shipping.. I have about 500 miles on the mod and it works well.. I noticed that If I hit it too hard I can flip up the shifter.. to where it flops... I need to work on the that. but it doesn't happen often.
 

baisleyde

Member
Joined
Mar 10, 2016
Messages
40
Location
Big Bone KY
This is sweet , but can't find that ball joint on the mcmaster carr site , can anybody post up a link for that part ?
 

HeliMoto

Member
Joined
Jan 5, 2015
Messages
53
Location
Sault Ste Marie,On.Canada
McMaster-Carr has some very nice shielded SS ball joints BUT ... they won't sell to private individuals, only businesses or schools, I tried to order yesterday but they promptly cancelled my order !
 

Berg_Donk

Active Member
Joined
Jun 26, 2013
Messages
158
Location
Snowy Mts Oz
Nice work from the OP.

If you have a welder, the stocker is steel so easy to modify. i acquired a cheap pit bike shifer on eBay and adapted the tip to the stock lever with some scrap, making it a bit longer too.


holligl

Find the road less traveled...
Joined
Nov 13, 2015
Messages
2,259
Location
IL/AZ
Tenman said:
Woodcraft folding toe peg. Cut off your old tip, drill it and bolt it on. It's looks factory.
Did this yesterday. Hope Pics work. This peg is a little bigger and longer than the OEM. Folded, it is ~1/2 of original. Easy enough job, but it really looks like it would mount better on a heftier stem. Even though it is a little bigger, it still feels natural to me.
 

Attachments

tomatocity

Active Member
2011 Site Supporter
2012 Site Supporter
2013 Site Supporter
2014 Site Supporter
Joined
Mar 1, 2011
Messages
5,251
Location
Sacramento, CA USA
holligl said:
Did this yesterday. Hope Pics work. This peg is a little bigger and longer than the OEM. Folded, it is ~1/2 of original. Easy enough job, but it really looks like it would mount better on a heftier stem. Even though it is a little bigger, it still feels natural to me.
Looks good and yes a little extra peg would be nice. Can you let us know how you removed the OEM peg, what size drill, what you used to taper the newly drilled hole, and what size bolt you used to secure the peg. Thanks.
 

holligl

Find the road less traveled...
Joined
Nov 13, 2015
Messages
2,259
Location
IL/AZ
tomatocity said:
Looks good and yes a little extra peg would be nice. Can you let us know how you removed the OEM peg, what size drill, what you used to taper the newly drilled hole, and what size bolt you used to secure the peg. Thanks.
Cut old peg off with a metal cutting grinder blade (take your time or it gets very hot).
Ground it flat with a hand grinder, final flatness with a hand file. I left some of the old weld area to let it be thicker.
Then did some minor straightening before adding the new peg.
The screw is a 6mm counter sink. Drilled smaller pilot holes first to ensure it was centered. 15/64" final hole. As my only counter sink was for wood, I did buy a new Rigid 88* 3/4" Steel capable countersink at home depot. (What is a project without at least one new tool?). Applied blue locktite.

It would be an ideal time to add a grease fitting, but I didn't think that far ahead, just re-greased mine. Shifter lever is easy off, easy on. Center to center on the shift rod is spec'd at 7". Shifter rod has the opposing thread directions, start them concurrently.
 

tomatocity

Active Member
2011 Site Supporter
2012 Site Supporter
2013 Site Supporter
2014 Site Supporter
Joined
Mar 1, 2011
Messages
5,251
Location
Sacramento, CA USA
holligl said:
Cut old peg off with a metal cutting grinder blade (take your time or it gets very hot).
Ground it flat with a hand grinder, final flatness with a hand file. I left some of the old weld area to let it be thicker.
Then did some minor straightening before adding the new peg.
The screw is a 6mm counter sink. Drilled smaller pilot holes first to ensure it was centered. 15/64" final hole. As my only counter sink was for wood, I did buy a new Rigid 88* 3/4" Steel capable countersink at home depot. (What is a project without at least one new tool?). Applied blue locktite.

It would be an ideal time to add a grease fitting, but I didn't think that far ahead, just re-greased mine. Shifter lever is easy off, easy on. Center to center on the shift rod is spec'd at 7". Shifter rod has the opposing thread directions, start them concurrently.
This is an excellent Project Report. Thank you CBR600R.
 

Stridey

Member
Joined
Jun 21, 2015
Messages
400
Location
Ilminster, Somerset UK
Or if you are not very mechanically minded look at this?
Folding Gear lever EVO adjustable in aluminium from www.off-the-road.de


Sent from my iPhone using Tapatalk
 
B

ballisticexchris

Guest
holligl said:
Cut old peg off with a metal cutting grinder blade (take your time or it gets very hot).
Ground it flat with a hand grinder, final flatness with a hand file. I left some of the old weld area to let it be thicker.
Then did some minor straightening before adding the new peg.
The screw is a 6mm counter sink. Drilled smaller pilot holes first to ensure it was centered. 15/64" final hole. As my only counter sink was for wood, I did buy a new Rigid 88* 3/4" Steel capable countersink at home depot. (What is a project without at least one new tool?). Applied blue locktite.

It would be an ideal time to add a grease fitting, but I didn't think that far ahead, just re-greased mine. Shifter lever is easy off, easy on. Center to center on the shift rod is spec'd at 7". Shifter rod has the opposing thread directions, start them concurrently.
Hi there Holligl, thank you for the great modification!! Good job and smart thinking.
 
Top