Final Drive Front Seal and O-ring Replacement

holligl

Find the road less traveled...
Joined
Nov 13, 2015
Messages
2,257
Location
IL/AZ
First - thanks to @eemsreno for special tools, shop, and assistance in doing this job.

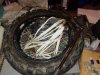
If your whole rear wheel looks like this from oil weeping from the bottom of the swing arm it is most likely a bad seal and/or O-ring in the front of the final drive.

It was a slow leak. I needed to add a couple ounces of oil after 1,000 miles.

After reading of other's issues I ordered all the seals and the coupler gear which I anticipated would have a groove worn in it. The coupler gear is the most expensive item and was on backorder for a few weeks.

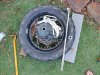
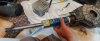
After removing the wheel and final drive you have to remove the drive shaft. It pulls out from the final drive, only held in by the flexible seal. This one required significant pounding to separate (wood block and big hammer). The circlip does not need to be removed unless you replace that seal. Mine was not leaking so reused that seal for now.

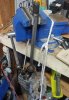
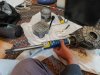
Next remove the coupler gear nut. We used an impact driver.

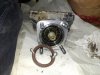
Next the bearing retainer ring. Left hand threads with the special nut wrench. The ring comes out with the seal and O-ring.

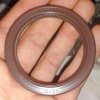
Removing the seal from the ring was a bear but it did come out with significant pounding. As anticipated, the seal had worn a small groove in the coupler gear so we used the new one.
Find a cylinder the size of the seal to seat it. This was the best Steve had and it did the job.

Grease the o-ring, install and torque the bearing retainer nut. (Left hand threads)

Next is the coupler gear nut. Tough to torque without a holder. Tried using the wheel but the drive would still rotate even trying to hold it with a board. Finally resorted to the impact driver then staked the nut. Looking back at the picture, we probably could have used some straps around the tire and drive to keep the drive from rotating. You do need some longer handles to get the specified torques.


Reinstall the spring and driveshaft, reseating the flexible seal. Reinstall the drive and wheel. Refill the final drive. Spun it some during refill to ensure any voids were filled.

At 90,000 miles this is a fairly rare repair. I believe the old seal was just old and brittle. I'm keeping the old couple gear for the rework posted in another thread.

Sent from my SM-N950U using Tapatalk
 
Last edited:

holligl

Find the road less traveled...
Joined
Nov 13, 2015
Messages
2,257
Location
IL/AZ
A couple things I missed.
1. The washer under the Coupler gear nut is concave. "Out" label faces out.
2. While the manual calls out greasing the back splines on the drive shaft, those splines are behind the flexible seal and bathed in the Rear Drive oil. Any grease you apply will just end up in the oil.
 

~TABASCO~

RIDE ON ADV is what I do !
Founding Member
2011 Site Supporter
2012 Site Supporter
2013 Site Supporter
2014 Site Supporter
Vendor
Joined
Apr 4, 2011
Messages
7,355
Location
TEXAS
Excellent. Can you post a picture(s) of the special tool ?
 

lund

Well-Known Member
Joined
Jul 8, 2019
Messages
811
Location
Okanagan Valley, Canada.
Isn't there not a "rolling" torque on that nut or is it just torqued?
Usually this type of set up has a rolling torque, especially when there is a lot of heat involved.
 

holligl

Find the road less traveled...
Joined
Nov 13, 2015
Messages
2,257
Location
IL/AZ
Isn't there not a "rolling" torque on that nut or is it just torqued?
Usually this type of set up has a rolling torque, especially when there is a lot of heat involved.
Simple torque. Steve has reused nuts in the past. I bought a new one.
 

holligl

Find the road less traveled...
Joined
Nov 13, 2015
Messages
2,257
Location
IL/AZ
Excellent. Can you post a picture(s) of the special tool ?
Sorry, I did not get a shot of it. It is the ring wrench that Steve had. 4 protrusions that fit the 4 notches in the bearing retainer ring. Some have made their own in some related threads using a large socket machined to leave the notches. It needs to be pretty good to handle the high torque. One could pretty easily fabricate a holder for the Coupler gear with the right size U bolts and metal stock.
 

jwrands

Member
Joined
Jan 6, 2021
Messages
35
Location
San Luis Obispo, CA
Hey @holligl @eemsreno, couldn't the front seal be replaced without removing the Bearing Retainer? By pulling it out with a screw inserted into face of the seal. I get that removing the Bearing Retainer would give better access to the seal, but is removing it really necessary?
 

Jlq1969

Well-Known Member
Joined
May 5, 2018
Messages
1,806
Location
Argentina
Looking at the first pic, I think the culprit of the oil leak is the brake disc. It has too much ventilation, it does not take temperature, and this does not allow the seal to expand and seal correctly.:):):)
 

holligl

Find the road less traveled...
Joined
Nov 13, 2015
Messages
2,257
Location
IL/AZ
Hey @holligl @eemsreno, couldn't the front seal be replaced without removing the Bearing Retainer? By pulling it out with a screw inserted into face of the seal. I get that removing the Bearing Retainer would give better access to the seal, but is removing it really necessary?
No, look at the pics above. The seal is under/behind the ring. It goes into the rear of the ring. Only way out is removal of the ring.
 
Last edited:

holligl

Find the road less traveled...
Joined
Nov 13, 2015
Messages
2,257
Location
IL/AZ
Looking at the first pic, I think the culprit of the oil leak is the brake disc. It has too much ventilation, it does not take temperature, and this does not allow the seal to expand and seal correctly.:):):)
Looking at the old and new seals, my guess it is aging related to temperature cycling. More likely from the heat of the rear drive than the brake. The old seal appears more brittle, and will actually wear a groove in the metal coupler.
 

holligl

Find the road less traveled...
Joined
Nov 13, 2015
Messages
2,257
Location
IL/AZ
No, look at the pics above. The seal is under/behind the ring. It goes into the rear of the ring. Only way out is removal of the ring.
Plus it was a bear to get out. A lot of pounding.
 

scott123007

Well-Known Member
Joined
Jul 27, 2012
Messages
1,484
Location
Jupiter, Florida
Years ago, when we had the Tenere gathering in Arkansas, my rear seal started to leak. Being from Florida, I was kind of in a panic and bought a quart of GL-5 to keep in my trunk for topping off for the ride home. I checked the level after I discovered the leak, but there was not enough missing to add any. I then cleaned the wheel and checked it 100 miles later. Dirty wheel but still minimal to no, level drop. Cleaned the wheel again, stopped after another 100 miles, and the wheel was clean. Never leaked again. Had 20K ish at the time and sold it with 54K. YMMV
 

Cycledude

Well-Known Member
Joined
Jan 29, 2016
Messages
4,034
Location
Rib lake wi
Years ago, when we had the Tenere gathering in Arkansas, my rear seal started to leak. Being from Florida, I was kind of in a panic and bought a quart of GL-5 to keep in my trunk for topping off for the ride home. I checked the level after I discovered the leak, but there was not enough missing to add any. I then cleaned the wheel and checked it 100 miles later. Dirty wheel but still minimal to no, level drop. Cleaned the wheel again, stopped after another 100 miles, and the wheel was clean. Never leaked again. Had 20K ish at the time and sold it with 54K. YMMV
I wonder if maybe someone had overfilled it and thats what caused it to leak, oil expands as it heats up and builds up pressure.
 
Last edited:

holligl

Find the road less traveled...
Joined
Nov 13, 2015
Messages
2,257
Location
IL/AZ
No, look at the pics above. The seal is under/behind the ring. It goes into the rear of the ring. Only way out is removal of the ring.
I WAS WRONG ON THIS POST! It has been a while. It was driven in from the front as shown with the container. However, you will never pull this seal with the screw in the face. That trick works on the wheel side seal.
 

holligl

Find the road less traveled...
Joined
Nov 13, 2015
Messages
2,257
Location
IL/AZ
Years ago, when we had the Tenere gathering in Arkansas, my rear seal started to leak. Being from Florida, I was kind of in a panic and bought a quart of GL-5 to keep in my trunk for topping off for the ride home. I checked the level after I discovered the leak, but there was not enough missing to add any. I then cleaned the wheel and checked it 100 miles later. Dirty wheel but still minimal to no, level drop. Cleaned the wheel again, stopped after another 100 miles, and the wheel was clean. Never leaked again. Had 20K ish at the time and sold it with 54K. YMMV
Funny you should mention this. For our TransWisconsinTrail trip, both Steve's and my seal were leaking. We both ended up adding a minor amount. After getting home, mine kept leaking and Steve's stopped. His have been changed a couple times on his high mileage bike. If it stays as residue on the wheel, I would just watch it. When it starts leaving a small puddle when parked it needs a closer look.
 

holligl

Find the road less traveled...
Joined
Nov 13, 2015
Messages
2,257
Location
IL/AZ
Supplemental comments on torquing the coupler nut.

According the the manual, lock tight should be used. Steve has never used it as the nut is also "staked".

Since we did not have the special tool for holding the coupler, we used an impact driver which is obviously less precise than a torque wrench. If I were doing it over (I like using specified torques) I would put the axle up through the wheel, add a spacer to hold it together, and add straps to keep the wheel from turning as shown in this sketch. There is high torque and leverage so it might require several wraps. I would not use the hub studs as you would not want to bend them. I don't recall the twist direction so I show restraint straps for either direction. Impact driver for removal is probably quickest and easiest.

Note that I have not tested this approach so it is only a suggestion. A quick attempt to fashion a friction holder was not strong enough to obtain the required torque.


Sent from my SM-S918U using Tapatalk
 

jwrands

Member
Joined
Jan 6, 2021
Messages
35
Location
San Luis Obispo, CA
I just finished job on my bike with 105,000 mi. I was able to get it done without special tools, without using an impact, and without removing the Bearing Retainer. Here are some pics of how I did it.

I clamped the shaft in my vice vertically and hammered downward on the final drive case to separate the two. Rope through the final drive to prevent it from falling to the ground.
20231028_170434.jpg

To remove the coupling gear nut (27 mm socket), I placed the final drive back onto the wheel hub and tied it to the spokes to prevent it from rotating. Thanks to @holligl for the idea in post above. The rope was tied to 4 spokes to distribute the load and prevent damage to them. I'd say the nut needed 100-150 lb on a 2 ft breaker bar for it to break free. This required two people: one to lean on the breaker bar, and the other to hold the wheel down by standing on it. I didn't use heat, but it probably would have made loosening the nut easier by softening the Loctite. Wood blocks under the wheel to keep the rotor off the ground.
20231029_163734.jpg

Easy to pull the seal without removing the bearing retainer using screw(s) threaded into the seal as shown.
20231029_172028.jpg

Seal# is MK050F4 by KOYO. The only place I found it in stock in the US was at Rocky Mountain ATV/MC.
20231029_180507.jpg
I used a 1-1/2" PVC coupling to drive the new seal.

Used same rope method to tighten the coupling gear nut with a torque wrench to 108 ft-lb. Difficult to stake the nut while it is inside the coupling gear, so I only used Loctite.
20231029_204833.jpg

Need something 48-49 mm OD to drive the shaft seal. I used an old caulking tube with the nozzle cut off as a seal driver. Not the best because the wall of the tube is thin, but it worked. I think 1-1/2 PVC would work better.
20231030_150956.jpg

This job isn't that big of a deal if you don't remove the bearing retainer. The hardest part is removing the coupling gear nut (if you don't have an impact wrench). Hope this helps!
 

Attachments

holligl

Find the road less traveled...
Joined
Nov 13, 2015
Messages
2,257
Location
IL/AZ
I just finished job on my bike with 105,000 mi. I was able to get it done without special tools, without using an impact, and without removing the Bearing Retainer. Here are some pics of how I did it.

I clamped the shaft in my vice vertically and hammered downward on the final drive case to separate the two. Rope through the final drive to prevent it from falling to the ground.
View attachment 106508

To remove the coupling gear nut (27 mm socket), I placed the final drive back onto the wheel hub and tied it to the spokes to prevent it from rotating. Thanks to @holligl for the idea in post above. The rope was tied to 4 spokes to distribute the load and prevent damage to them. I'd say the nut needed 100-150 lb on a 2 ft breaker bar for it to break free. This required two people: one to lean on the breaker bar, and the other to hold the wheel down by standing on it. I didn't use heat, but it probably would have made loosening the nut easier by softening the Loctite. Wood blocks under the wheel to keep the rotor off the ground.
View attachment 106509

Easy to pull the seal without removing the bearing retainer using screw(s) threaded into the seal as shown.
View attachment 106510

Seal# is MK050F4 by KOYO. The only place I found it in stock in the US was at Rocky Mountain ATV/MC.
View attachment 106511
I used a 1-1/2" PVC coupling to drive the new seal.

Used same rope method to tighten the coupling gear nut with a torque wrench to 108 ft-lb. Difficult to stake the nut while it is inside the coupling gear, so I only used Loctite.
View attachment 106512

Need something 48-49 mm OD to drive the shaft seal. I used an old caulking tube with the nozzle cut off as a seal driver. Not the best because the wall of the tube is thin, but it worked. I think 1-1/2 PVC would work better.
View attachment 106514

This job isn't that big of a deal if you don't remove the bearing retainer. The hardest part is removing the coupling gear nut (if you don't have an impact wrench). Hope this helps!
As hard as my seal came out, I am surprised you were able to pull it with screws. Good for you. How hard did it pull?
Good to hear tying the hub works but not sure I would trust spokes alone. I think inserting the axle from the bottom would help stabilization.

Were you able to see how much of a groove was worn in the coupler?

Sent from my SM-S918U using Tapatalk
 

jwrands

Member
Joined
Jan 6, 2021
Messages
35
Location
San Luis Obispo, CA
As hard as my seal came out, I am surprised you were able to pull it with screws. Good for you. How hard did it pull?
The seal came out very easy using a nail puller on the screw head. Probably even easier to pull than the wheel side seal since this seal is only held in place around the outside.

Good to hear tying the hub works but not sure I would trust spokes alone. I think inserting the axle from the bottom would help stabilization.
I could see the spokes deflect quite a bit under the load, but it seemed to work out fine. I'm not recommending this method, only stating what worked for me. I'm sure it would have be safer to tie a strap around the rim. There was no need for additional support from the axle, maybe since the ropes I used helped to tie the gear case down.

Were you able to see how much of a groove was worn in the coupler?
Yeah, there was definitely a decent groove worn into the coupler, but I didn't get a pic of it. I just put it back in as is. I figure the new rubber should do a good enough job to seal it.
 

jwrands

Member
Joined
Jan 6, 2021
Messages
35
Location
San Luis Obispo, CA
Just took a closer look at my rear spokes, and it looks like a two of them actually did get slightly bent from doing this. So maybe secure it to more than 4 spokes or go to the rim if you try this method. I wasn't too worried about it though because I have spare spokes on hand.
 
Top