88millimeter
Member
Im in the middle of adjusting my valves, its a job and a half. Had i known how tedious and long of a job it'd be i probably would have paid a mechanic. Like most people who have attempted this service i was weary of having to reset the tensioner. Most diy posts suggest using a bench vise or a drill press of which i have neither. I came up with a method that i believe to be the easiest way to reset the tensioner and it involves using a $4 "C" clamp (or vise) from Harbor Freight.
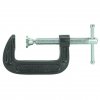
http://www.harborfreight.com/media/catalog/product/cache/1/image/9df78eab33525d08d6e5fb8d27136e95/i/m/image_17226.jpg
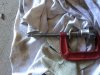
I used this type of clamp and placed the external or housing end of the tensioner on the side of the clamp that does not move. I placed the plunger end of the tensioner on the side of the clamp that screws in and out. In order to get a good grip on the plunger i placed a piece of leather between the plunger and the clamp rod. The finger off of an old work glove works well. The leather piece provides enough grip to be able to grab the plunger on the sides and turn it plus it protects the plunger from being scraped by the clamp rod.
The key here is to tighten the clamp down just enough to allow you to turn the plunger clockwise into the body and repeat this process until the plunger is fully seated and you can place the circ clip in the groove. I cant stress enough how little pressure you need to put on the plunger. I started off by applying minimal pressure and turning the plunger to ensure the threads were engaged, this is the hardest part, getting the threads started. Once you have them started tighten the clamp until you feel resistance from the plunger then back off slightly, this is the right amount of pressure to be able to turn the plunger. After a lot of practice i found that i could turn the clamp rod ~ a quarter turn and then turn the plunger, repeat this process until plunger is fully retracted.
Hope this helps.
http://www.harborfreight.com/media/catalog/product/cache/1/image/9df78eab33525d08d6e5fb8d27136e95/i/m/image_17226.jpg
I used this type of clamp and placed the external or housing end of the tensioner on the side of the clamp that does not move. I placed the plunger end of the tensioner on the side of the clamp that screws in and out. In order to get a good grip on the plunger i placed a piece of leather between the plunger and the clamp rod. The finger off of an old work glove works well. The leather piece provides enough grip to be able to grab the plunger on the sides and turn it plus it protects the plunger from being scraped by the clamp rod.
The key here is to tighten the clamp down just enough to allow you to turn the plunger clockwise into the body and repeat this process until the plunger is fully seated and you can place the circ clip in the groove. I cant stress enough how little pressure you need to put on the plunger. I started off by applying minimal pressure and turning the plunger to ensure the threads were engaged, this is the hardest part, getting the threads started. Once you have them started tighten the clamp until you feel resistance from the plunger then back off slightly, this is the right amount of pressure to be able to turn the plunger. After a lot of practice i found that i could turn the clamp rod ~ a quarter turn and then turn the plunger, repeat this process until plunger is fully retracted.
Hope this helps.
Attachments
-
 22.3 KB Views: 20