Well I have a 2012 so Gen 1...i've seen one too (one good guy from Brasiz)
I did ask him and he said it was for the first gen, gen2 he said does have a different valve cover and there is no need to do so
When i changed my sparks i did not put any silicon on the seal
Changing out Spark plugs
- Thread starter coastie
- Start date
hitgwin
New Member
I made the mistake of not noting which coil connector goes where. Does it matter? One on each side has a white band.
Thanks for any insight you can share.
Jeff
Thanks for any insight you can share.
Jeff
SilverBullet
Well-Known Member
Yes it does as determines firing order. I don't have my bike or service manual with me to help you connect correctly though. Wanted to respond quickly so you didn't guess at order and then button it back up.
BTW, no issue swapping coil sticks around once disconnected from wires.
Sent from my SM-G860P using Tapatalk
BTW, no issue swapping coil sticks around once disconnected from wires.
Sent from my SM-G860P using Tapatalk
hitgwin
New Member
Thanks for the quick reply. I was digging through the manual and found my answer. White tape to the right side of each pair.
I believe it will be pretty difficult to connect the plugs to the coils incorrectly.
The cables are pretty tight and hardly reach out where not intended. If you need to stretch a cable it's a bad sign..
I haven't noticed any white (tape?) on my coils when did service the sparks though...
The cables are pretty tight and hardly reach out where not intended. If you need to stretch a cable it's a bad sign..
I haven't noticed any white (tape?) on my coils when did service the sparks though...
yoyo
Well-Known Member
I noticed coloured shrink wrap on the coil wires but as already said you'd really struggle to plug the incorrect lead to the coil, the wires are very tight.
Make sure you 'click' the connect on to the coil properly, I failed to do this and the back ran correctly for a minute then cut out and wouldn't restart until I stripped it down and found the dislodged connector.
Sent from my ELE-L29 using Tapatalk
Make sure you 'click' the connect on to the coil properly, I failed to do this and the back ran correctly for a minute then cut out and wouldn't restart until I stripped it down and found the dislodged connector.
Sent from my ELE-L29 using Tapatalk
hitgwin
New Member
Actually on mine it's pretty easy to switch the two for each cylinder, no way to mix up cylinders though.
s.ga.rider
Well-Known Member
I changed mine in my 2014 toaday at 15k miles. They looked ok but 3 of the 4 were out of spec. I replaced them with the oem plugs. It was a fairly simple job.
RCinNC
Well-Known Member
I changed my spark plugs a couple weeks ago, and found that this homemade tool made inserting the plugs a lot easier:

It's just a variation on the typical vinyl tubing tool. I used 5/16" ID vinyl tubing, but I inserted a piece of thin walled 5/16" OD aluminum tubing to add rigidity to the tubing. There's an inch of tubing at the end of the tool that isn't supported by the aluminum tubing; this is the end that goes on the end of the spark plug. The overall length of the tool is 6.5". The black tape at the end of the tool is just to make it a little bigger, so it's easier to grip. The vinyl tubing over the end of the plug will slip if you start to cross thread the spark plug, and the aluminum tubing keeps the vinyl tubing from flopping around while you're trying to turn it. It worked really well for inserting the plugs in both my S10 and my girlfriend's Honda CR-V. It's very easy to get a feel for whether or not the plug is threading in correctly when you use the tool.
I also added the O-rings to the ends of the coil sticks to (hopefully) create a better seal against water getting into the spark plug wells. The details for this are found in this thread: https://www.yamahasupertenere.com/index.php?threads/water-in-plug-wells-prevention-a-possible-solution.23850/
The last step was to add a bead of high temperature waterproof grease around the underside of the cap on top the coil stick. I used BelRay's grease. Hopefully this will add another layer of protection against water ingress.
Thanks for showing a photo, in my mind and looking to your spark plugs, I will not hesitate to replace them because the center electrode in not clean sharp, all have a very well defined roundness due to the sparking, also the gap can be other issue to consider! Thanks.I changed mine in my 2014 toaday at 15k miles. They looked ok but 3 of the 4 were out of spec. I replaced them with the oem plugs. It was a fairly simple job.
View attachment 67661
mcycle-nut
Active Member
Had one plug look like that (inner plug, #! cylinder), after 28,000Km (17,000) miles. The rest were fine. Gaps were a hair over spec. Replaced them.Here is a good reason to at least be checking the spark plugs regularly. This one only has 11,000 miles on it but it is obvious that water got down into it from riding in some hard rain and the plug has quite a bit of rust on it with the washer rusted to the plug. Glad I was still able to get it out.
~TABASCO~
RIDE ON ADV is what I do !
Founding Member
2011 Site Supporter
2012 Site Supporter
2013 Site Supporter
2014 Site Supporter
Vendor
View attachment 75546
Just noticed that one coil has the wrong rubber cap.
Does anyone know where I can source th correct replacement.
Cheers
Ive been looking for four new ones, I have yet to find them. If ANYONE knows where to find the stock rubber replacement boots, PLEASE post ! Thanks
Boris
Well-Known Member
Just checked the plugs. Definitely less road debris and no sign whatsoever of water ingress to the plug wells. Fender extender is looking to be a worthwhile addition.Yep, unfortunately the potential water ingress to the plug wells does make this a necessity, even if just to check. I fitted a fender extender just before the start of winter. It’ll be interesting to see if it makes much difference to water and debris around the coil top area.
I shall update next winter.
gunslinger_006
Well-Known Member
Yeah either the fender extender or a tall bash plate that catches most of the spray.
Sent from my iPhone using Tapatalk
Sent from my iPhone using Tapatalk
RCinNC
Well-Known Member
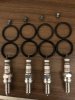
I changed out my plugs last week. They were a little over a year old, with 11,764 miles on them. When I installed those plugs, I used O-rings to help prevent water ingress into the plug wells. The process is described in this thread: https://www.yamahasupertenere.com/index.php?threads/water-in-plug-wells-prevention-a-possible-solution.23850/page-3
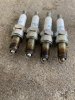
I modified the method a little: in addition to the O-rings, I added a bead of Bel Ray waterproof grease on top the O-ring. This is how my plugs looked after a year of all weather riding:

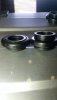
The number 1 plug is the one on the downside of the bike when it's on the sidestand. This plug has been pretty rusted in the past when I changed it, that's why I did the O-ring method. This is how the coil sticks looked:

None of them had any corrosion on the metal sleeve.
Back when I did my first plug change, I numbered the wires for each coil stick from left to right, and numbered the tops of each coil stick from left to right with white out. It was just a way to visually double check the work so I didn't have one of those OCD moments of wondering if I hooked everything up correctly after I'd already reinstalled the airbox and fuel tank.
I modified the method a little: in addition to the O-rings, I added a bead of Bel Ray waterproof grease on top the O-ring. This is how my plugs looked after a year of all weather riding:
The number 1 plug is the one on the downside of the bike when it's on the sidestand. This plug has been pretty rusted in the past when I changed it, that's why I did the O-ring method. This is how the coil sticks looked:
None of them had any corrosion on the metal sleeve.
Back when I did my first plug change, I numbered the wires for each coil stick from left to right, and numbered the tops of each coil stick from left to right with white out. It was just a way to visually double check the work so I didn't have one of those OCD moments of wondering if I hooked everything up correctly after I'd already reinstalled the airbox and fuel tank.
B
ballisticexchris
Guest
Thank you for sharing. Those plugs and coils look really good.