BAJA DESIGNS **GROUP BUY** SQUADRON from RIDE ON ADV

~TABASCO~

RIDE ON ADV is what I do !
Founding Member
2011 Site Supporter
2012 Site Supporter
2013 Site Supporter
2014 Site Supporter
Vendor
Joined
Apr 4, 2011
Messages
7,386
Location
TEXAS
For the guys that want to wire the lights to your HIGH BEAM... Here is the trigger wire.... ;) Tap your BAJA YELLOW to this Yamaha Yellow.... When you do, your BAJA driving lights will go 100% full bright along with your high-beams... ::008::


merchant

Active Member
2012 Site Supporter
Joined
Jan 26, 2012
Messages
717
Location
North Texas
For those keeping score at home, Jaxon and I are both pointing to the same yellow wire. I simply did not follow it all the way back to the connector. I like Jaxon's suggestion better as it will be cleaner/neater. Plus, he had brains enough to take some pics. ::)
 

Desert Dave

New Member
Joined
Dec 4, 2011
Messages
75
Location
Nor Cal
See Jaxon , I knew if I waited a minute someone would do the thinking for me so I wouldn't have to pull out the wiring diagram ;) Thanks guys. I swear, I'd rather rebuild a transmission than pull out my voltmeter sometimes.....
 

merchant

Active Member
2012 Site Supporter
Joined
Jan 26, 2012
Messages
717
Location
North Texas
First ride with Sqaudrons

Had to be at work this morning at O'dark 30, so had my first opportunity to test out the Sqaudron lights. During most of the commute, I had the lights at maybe 50% and they helped brighten the way. However, when I exited from the highway to the service road, I flipped on my brights (taking the Squadrons to 100%) and it was as if the sun rose in front of me. ??? OH MY!!! These lights are spectacular!!!

Thanks Jaxon for putting together this group buy and for pushing Baja Designs to come up with the right solutions. ::008:: I will be digging on these lights for years.
 

stevepsd

New Member
Founding Member
2011 Site Supporter
2012 Site Supporter
Joined
Oct 3, 2010
Messages
1,500
Location
Idaho & OR
Anyone have some close-up pics of the lights as they are installed and how the brackets are positioned?
 

~TABASCO~

RIDE ON ADV is what I do !
Founding Member
2011 Site Supporter
2012 Site Supporter
2013 Site Supporter
2014 Site Supporter
Vendor
Joined
Apr 4, 2011
Messages
7,386
Location
TEXAS
Im sure I can Email ya a pic.....
 

merchant

Active Member
2012 Site Supporter
Joined
Jan 26, 2012
Messages
717
Location
North Texas
DIY Squadron Mounting Bracket

My parents were visiting from Indiana this weekend. Dad and I spent most of Saturday installing this light kit - father/son bonding at it's finest. ::003:: Here is how we went about it. The material of choice was a sheet of aluminum, roughly 2.2mm thick.

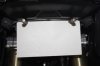
There are two sets of holes recessed in the plastic under the headlight. One set is higher up and closer together, the other lower and farther apart. We decided to use the upper, closer together holes. To get the spacing of the holes right, place a sheet of paper in front of the holes. Use a couple of hole punches/pencils/nails/whatever to punch holes in the paper. Center the paper and punch one hole. Keep that punch in the first hole while you punch the other side.

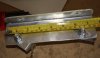
We roughly measured the dimensions of the piece to be 7 5/8 inches wide by 5 inches tall. You won't need anywhere near 5 inches, but you can always cut some off. We cut the aluminum with a jig saw and smoothed the edges with a file. For the two corners that tuck up to the bike, round those corners off. It makes fitment easier.

Take the sheet of paper with the holes in it and line up along one of the long edges. Use a sharpie to mark the holes. Use a hole punch and hammer to mark where you will drill the holes. This will keep the drill bit from "walking" on you. Initially drill a smaller hole than needed and gradually increase the diameter of drill bit. This will help keep the hole centered.

You will need stainless screws that are at least 1 inch long. I don't remember the diameter of the bolts, but it's easy enough to eyeball it and buy a range of sizes. I used aircraft nuts so I wouldn't have to screw with lining up flat/lock washers in tight spaces.

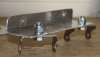
Dry fit the bracket. If the holes line up, mark with a sharpie where you want the bend to be. Then place the piece in a vise for the bend. If the vise is not wider than the piece, you will need to sandwich the piece between two pieces of steel. This will help you get a straight bend. Get medi-evil and beat on it until you have a nice square right angle.

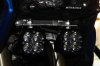
Now mount it on the bike again. This time you're figuring out where the fixtures will mount on the shelf you just created. After you have them where you want them (probably an inch + from the front edge), mark their position with a sharpie. ** Be sure to keep plenty of clearance in front of the brake lines. These lights get hot. ** Remove the bracket and mark across it with a sqaure. Cut off the excess. Like the first holes, use a hole punch to mark where you want the hole. Drill the holes. Remove the brackets from the fixtures and mount them on your fabbed bracket. Be aware that there are rubber washers on either side of the fixture bracket.

The rest of the assembly is evident. I suggest applying anti-seize to the stainless mounting bolts. Let me know if you have any questions. I probably can't answer them, but it can't hurt to ask. :D
 

Attachments

Combo

DSN
Founding Member
2011 Site Supporter
2012 Site Supporter
2013 Site Supporter
2014 Site Supporter
Joined
Oct 18, 2010
Messages
1,541
Location
Santa Fe, Texas
Nice job and looks good. ::008::

Spending time with Dad no matter what it is, is always time well spent.
::026::
 

stevepsd

New Member
Founding Member
2011 Site Supporter
2012 Site Supporter
Joined
Oct 3, 2010
Messages
1,500
Location
Idaho & OR
Is it me or does it look like the lights look like they are hanging a bit low? Do you have 7.5" of clearance between the bottom of the lights and the front fender?
 

Tremor38

All roads fair game...all game outta the way!
2011 Site Supporter
2012 Site Supporter
Joined
Apr 28, 2011
Messages
2,562
Location
Aomori, Japan
Re: Re: BAJA DESIGNS **GROUP BUY** SQUADRON from RIDE ON ADV

stevepsd said:
Is it me or does it look like the lights look like they are hanging a bit low? Do you have 7.5" of clearance between the bottom of the lights and the front fender?
Wondering the same thing. Maybe it's just the angle.

Sent from my F-05D using Tapatalk 2
 

merchant

Active Member
2012 Site Supporter
Joined
Jan 26, 2012
Messages
717
Location
North Texas
Good question - I had to run out to the parking garage with a ruler. The clearance between the top of the fender to the bottom of the lights is exactly 6 inches. I have had no issue with the lights impacting the fender, but will keep an eye on it.
 

johnpitts01

Super Tenere Blue
Founding Member
Joined
Dec 13, 2010
Messages
324
Location
New Jersey
Jaxon:

This wire that you have pointed out........
And the connector.
Are not readily apparent on my bike. Above the battery is a "boot" @ 2" in diameter with lots of wires going in and out. Do i need to cut this boot apart to get to the connector and yellow wire you are holding in the photos?


~TABASCO~ said:
For the guys that want to wire the lights to your HIGH BEAM... Here is the trigger wire.... ;) Tap your BAJA YELLOW to this Yamaha Yellow.... When you do, your BAJA driving lights will go 100% full bright along with your high-beams... ::008::


stevepsd

New Member
Founding Member
2011 Site Supporter
2012 Site Supporter
Joined
Oct 3, 2010
Messages
1,500
Location
Idaho & OR
merchant said:
Good question - I had to run out to the parking garage with a ruler. The clearance between the top of the fender to the bottom of the lights is exactly 6 inches. I have had no issue with the lights impacting the fender, but will keep an eye on it.
With your forks fully extended you need 7.5" of clearance from the fender to the lights....since the forks have 7.5" of travel.
 

~TABASCO~

RIDE ON ADV is what I do !
Founding Member
2011 Site Supporter
2012 Site Supporter
2013 Site Supporter
2014 Site Supporter
Vendor
Joined
Apr 4, 2011
Messages
7,386
Location
TEXAS
johnpitts01 said:
Jaxon:

This wire that you have pointed out........
And the connector.
Are not readily apparent on my bike. Above the battery is a "boot" @ 2" in diameter with lots of wires going in and out. Do i need to cut this boot apart to get to the connector and yellow wire you are holding in the photos?
Just pull the boot back or trim it back.. The bike that this picture was taken from had already had extensive wiring done for all the Mods.. At the time of the picture the bike was not 'bone stock'.... If you need more details feel free to call me..
 

merchant

Active Member
2012 Site Supporter
Joined
Jan 26, 2012
Messages
717
Location
North Texas
stevepsd said:
With your forks fully extended you need 7.5" of clearance from the fender to the lights....since the forks have 7.5" of travel.
While I can't argue the facts, I will let it ride for now. In my years of riding, I cannot recall bottoming out the front forks on any bike. Bouncing on the forks with all my weight moves them a scant 2 inches. I am not sure if the stock springs are progressive or not, but doubt highly the lights will ever touch the fender. If they do, I owe myself a big dope slap (and a new fender). ;)
 

stevepsd

New Member
Founding Member
2011 Site Supporter
2012 Site Supporter
Joined
Oct 3, 2010
Messages
1,500
Location
Idaho & OR
merchant said:
While I can't argue the facts, I will let it ride for now. In my years of riding, I cannot recall bottoming out the front forks on any bike. Bouncing on the forks with all my weight moves them a scant 2 inches. I am not sure if the stock springs are progressive or not, but doubt highly the lights will ever touch the fender. If they do, I owe myself a big dope slap (and a new fender). ;)
On road it might be difficult, unless you hit a pothole or something like that....off-road I have done it numerious times!
 

Tremor38

All roads fair game...all game outta the way!
2011 Site Supporter
2012 Site Supporter
Joined
Apr 28, 2011
Messages
2,562
Location
Aomori, Japan
Just completed about 90% of the install. No in-process pics, because I took way more time than I had anticipatied. If you have a fuze box like the PC-8 or FZ1 installed the relay is a bit redundant unless you plan on triggering the power to the dimmer with your low beams on or apply power manually with a swich. I dissassembled the harness and used the very durable segments and connectors to route power to the dimmer from the PC-8 (switched side), then send power directly from the dimmer to the lights. I also wire-up the dimmer's high beam trigger. Pulled the high beam wire/pin from the connector (jewelers screwdriver in the notch to release the pin, then pulled out the wire/pin), exposed some insulation, soldered in the trigger wire from the dimmmer, slipped some heat shrink over that, then re-insterted the pin (didn't want a Posi-tap coming off that wire at a 90 deg. angle). Connected what used to be the fused battery harness (removed the fuse holder) to the dimmer output wires (white + and brown -) with posi-locs, then plugged the connector on the other end of that harness to the wires that terminate at the Baja light connectors. Twisted together the wires that used to be connected to the relay contacts, then soldered and put heatshrink on that. I raised the tank, then removed the RH tank mount casting to more easily string the wires out the hole and behind the electrical panel. I think the only real tough part of stringing the wires was getting the connector for the LH Baja light fed behind and through that metal support behind the headlights.

Will get whatever pics are possible later... I pretty much scuttled the thought of in-process photos when I realized how long it would take to rework the harness.
 

johnpitts01

Super Tenere Blue
Founding Member
Joined
Dec 13, 2010
Messages
324
Location
New Jersey
I mounted the lights yesterday and got the wiring done tonight. Took me about 3 hours total.

All I can say for these lights is

HOLY FOOKIN HELL THEY ARE BRIGHT!!!!

These lights are fantastic. For anyone that is considering HID's or any other accesory lights forget it and get these lights.
Great job by Jaxon putting this together.

I am not electrically inclined in the least. Made a couple of calls to Jaxon and with his help I figured out the wiring.

Sorry no pics. Maybe tomorrow.
 

Tremor38

All roads fair game...all game outta the way!
2011 Site Supporter
2012 Site Supporter
Joined
Apr 28, 2011
Messages
2,562
Location
Aomori, Japan
Re: Re: BAJA DESIGNS **GROUP BUY** SQUADRON from RIDE ON ADV

johnpitts01 said:
I mounted the lights yesterday and got the wiring done tonight. Took me about 3 hours total.

All I can say for these lights is

HOLY FOOKIN HELL THEY ARE BRIGHT!!!!

These lights are fantastic. For anyone that is considering HID's or any other accesory lights forget it and get these lights.
Great job by Jaxon putting this together.

I am not electrically inclined in the least. Made a couple of calls to Jaxon and with his help I figured out the wiring.

Sorry no pics. Maybe tomorrow.
+1! Even at 30% (4 button pushes above max dim), these lights fill in the dead spots nicely while in low beam. High beam is an inferno!

The only thing that has me slightly concerned is that the bottom of the lights are 6" above the fender. I rode on some fairly bumpy roads today with a spot tie on the fork and still had about about 4" to spare, but am wondering what will happen off road or while crossing the pothole you meant to miss. Guess we'll find out in due time.

Sent from my F-05D using Tapatalk 2
 

sail2xxs

New Member
Founding Member
2011 Site Supporter
2012 Site Supporter
2013 Site Supporter
2014 Site Supporter
Joined
Oct 24, 2010
Messages
931
Location
Edgewater, MD
Are you using the RideOnADV mounts, or some other mounting method?

Chris
 
Top