Remove panel 'B' (that is the painted panel on the right side - the one with the Yamaha logo on it), above the battery. There is tons on room in that area. Very protected as well! And easy access to power & ground connections.
Anyone mount an FZ-1 Fuze block?
- Thread starter tiogajoe
- Start date
tomatocity
Active Member
2011 Site Supporter
2012 Site Supporter
2013 Site Supporter
2014 Site Supporter
Is there an easy way to convert the 12V DC Outlet to Unswitched? Until I get the GPS hardwired I am running it from the 12V DC Outlet and I don't like having to shut the GPS off everytime I turn off the Super Tenere.
colorider
Moderator
Global Moderator
Founding Member
2011 Site Supporter
2012 Site Supporter
2013 Site Supporter
Hmmmm, pulled my side panel again last night and did not see any blue panel above the battery. All I see is the harness and several large connectors covered with rubber boots. I located my fuse block in the empty space above the tool kit.stevepsd said:Remove panel 'B' (that is the blue colored panel on the right side), above the battery. There is tons on room in that area. Very protected as well! And easy access to power & ground connections.
You want to get above the fuse blocks. Pull the big right side panel again, then the panel above it. (The one with the Yamaha emblem.)ColoRider said:Hmmmm, pulled my side panel again last night and did not see any blue panel above the battery. All I see is the harness and several large connectors covered with rubber boots. I located my fuse block in the empty space above the tool kit.
There's a perfect spot where the voltage regulator screws come through.
As for pics, we're working on the WeeStrom today to get my son ready for a big ride. It'll be a couple of days before I get to my own switched power installation.
colorider
Moderator
Global Moderator
Founding Member
2011 Site Supporter
2012 Site Supporter
2013 Site Supporter
Okay - did not go that far in. Actually prefer to mount it in a location a bit easier to get to "just in case".Checkswrecks said:You want to get above the fuse blocks. Pull the big right side panel again, then the panel above it. (The one with the Yamaha emblem.)
There's a perfect spot where the voltage regulator screws come through.
As for pics, we're working on the WeeStrom today to get my son ready for a big ride. It'll be a couple of days before I get to my own switched power installation.
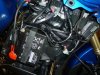
Here is a pic of mine in the spot just above the tool kit.
Attachments
-
 56.7 KB Views: 477
I like that, had not thought of putting it in sideways... Do you have it so it will slide out or is it on velcro?ColoRider said:Okay - did not go that far in. Actually prefer to mount it in a location a bit easier to get to "just in case".
Here is a pic of mine in the spot just above the tool kit.
I do like the spot by the voltage regulator. I just wish the top panel had quick release buttons like the bottom.
Also I don't know who thought up the wind wing position. Just covers the one screw for the top panel.. lol
SpeedStar
XT12 and DL650
Founding Member
2011 Site Supporter
2012 Site Supporter
2013 Site Supporter
Vendor
Looks good Rod. What did you tap for the relay?ColoRider said:Okay - did not go that far in. Actually prefer to mount it in a location a bit easier to get to "just in case".
Here is a pic of mine in the spot just above the tool kit.
colorider
Moderator
Global Moderator
Founding Member
2011 Site Supporter
2012 Site Supporter
2013 Site Supporter
It just sits in there fine - no velcro - easy in and out.japako said:I like that, had not thought of putting it in sideways... Do you have it so it will slide out or is it on velcro?
I do like the spot by the voltage regulator. I just wish the top panel had quick release buttons like the bottom.
Also I don't know who thought up the wind wing position. Just covers the one screw for the top panel.. lol
colorider
Moderator
Global Moderator
Founding Member
2011 Site Supporter
2012 Site Supporter
2013 Site Supporter
I tapped into the grip heater plug (the 4-position). IIRC, the wire was blue/black.SpeedStar said:Looks good Rod. What did you tap for the relay?
Electrical is my weak area and I have been poking around the fuse boxes and looking at the 2010 Euro service manual wiring diagram and the bikes'owners manual. There is a 20 amp curcuit in the right fuse block labled O/P (options) (right fuse block, bottom fuse). Coming out of it is a heavy gauge red wire with a white stripe. I see that same wire at the three pole plug which on the Euro wiring schematic is the Accessory Light plug. The four pole plug shows as the grip warmer plug which is running through the "Signaling System" fuse (15A) (right fuse block, second from the top) I am planning on tapping the right fuse block at the 20A O/P location to run my FZ-1 Fuze block. Can anybody with more electrical knowledge than me verify that is the place to get the highest amp cuircuit with the lowest existing (connected) load that is a switched circuit.ColoRider said:I tapped into the grip heater plug (the 4-position). IIRC, the wire was blue/black.
SpeedStar
XT12 and DL650
Founding Member
2011 Site Supporter
2012 Site Supporter
2013 Site Supporter
Vendor
Thanks for the help Rod.ColoRider said:I tapped into the grip heater plug (the 4-position). IIRC, the wire was blue/black.
If you are looking for power to the Fz1, use the battery as your supply. Next, any switched + voltage will work as the trigger.
As an example, you could use a tap into the running lights. The fuse block has a relay that will do the rest. All you need to do, is move the fuses for switched or unswitched power to your accessory.
As an example, you could use a tap into the running lights. The fuse block has a relay that will do the rest. All you need to do, is move the fuses for switched or unswitched power to your accessory.
tomatocity
Active Member
2011 Site Supporter
2012 Site Supporter
2013 Site Supporter
2014 Site Supporter
toompine, I am unsure how to add the FZ-1 and would like to see what you do to install it. Let me know if it would be alright to stop by and watch.toompine said:Electrical is my weak area and I have been poking around the fuse boxes and looking at the 2010 Euro service manual wiring diagram and the bikes'owners manual. There is a 20 amp curcuit in the right fuse block labled O/P (options) (right fuse block, bottom fuse). Coming out of it is a heavy gauge red wire with a white stripe. I see that same wire at the three pole plug which on the Euro wiring schematic is the Accessory Light plug. The four pole plug shows as the grip warmer plug which is running through the "Signaling System" fuse (15A) (right fuse block, second from the top) I am planning on tapping the right fuse block at the 20A O/P location to run my FZ-1 Fuze block. Can anybody with more electrical knowledge than me verify that is the place to get the highest amp cuircuit with the lowest existing (connected) load that is a switched circuit.
colorider
Moderator
Global Moderator
Founding Member
2011 Site Supporter
2012 Site Supporter
2013 Site Supporter
Exactly. Just make sure you fuse-protect the line from the battery to the FZ-1.japako said:If you are looking for power to the Fz1, use the battery as your supply. Next, any switched + voltage will work as the trigger.
As an example, you could use a tap into the running lights. The fuse block has a relay that will do the rest. All you need to do, is move the fuses for switched or unswitched power to your accessory.
Koinz
Active Member
Founding Member
2011 Site Supporter
2012 Site Supporter
2013 Site Supporter
2014 Site Supporter
You know, that's a great Idea, too bad i didn't do that. :-[ I guess I should run an inline fuse to my heated Jacket plug and Battery tender Plug that I connected to the battery too so if the wire rubs through and grounds out, It won't fry my electrical system. Just when I thought I was done.ColoRider said:Exactly. Just make sure you fuse-protect the line from the battery to the FZ-1.
 ;D
;DThe Trigger I used was a green/white stripe that looked like it goes to those pilot bulbs in the headlights. You need to take the upper cowling off to get to it. I soldered the trigger wire to that and brought it down to the FZ1 -
Sorry, but I don' have pictures - I had a harder time installing my VisionX Solo Lights than the FZ1 but's it's pretty much done now
colorider
Moderator
Global Moderator
Founding Member
2011 Site Supporter
2012 Site Supporter
2013 Site Supporter
All-in-all, the FZ1 was a snap to install I felt. I had an in-line fuse from an old unused battery tender battery connection cable that I used for my feed to the FZ-1. The 4-pin heated grip connector was nearby so simply tapped into the switched power on it for my trigger and then ran my wires for my Powerlet and my Symtec heated grips. The Powerlet is fuzed always on and the grip heaters are fuzed switched. Works great and still have 4 more circuits available for future use!!!Koinz said:You know, that's a great Idea, too bad i didn't do that. :-[ I guess I should run an inline fuse to my heated Jacket plug and Battery tender Plug that I connected to the battery too so if the wire rubs through and grounds out, It won't fry my electrical system. Just when I thought I was done.
The Trigger I used was a green/white stripe that looked like it goes to those pilot bulbs in the headlights. You need to take the upper cowling off to get to it. I soldered the trigger wire to that and brought it down to the FZ1 -
Sorry, but I don' have pictures - I had a harder time installing my VisionX Solo Lights than the FZ1 but's it's pretty much done now
Rod, thanks for your help. I'm gonna put the FZ-1 on tomorrow, and this thread has really helped me as to the switched power supply and inline fuze for 12 volt power (got several in line fuse units from posi connects).
doctorj
doctorj
colorider
Moderator
Global Moderator
Founding Member
2011 Site Supporter
2012 Site Supporter
2013 Site Supporter
No problem - glad I could help!!!doctorj said:Rod, thanks for your help. I'm gonna put the FZ-1 on tomorrow, and this thread has really helped me as to the switched power supply and inline fuze for 12 volt power (got several in line fuse units from posi connects).
doctorj
Rod
Rod's set up is the nuts for the FZ1. I put mine in today and everything went smooth.
If you are near a Yamaha shop, the tech may give you a pin for the connector and that makes it really easy to hook up the trigger.
If you are near a Yamaha shop, the tech may give you a pin for the connector and that makes it really easy to hook up the trigger.
Jim,japako said:Rod's set up is the nuts for the FZ1. I put mine in today and everything went smooth.
If you are near a Yamaha shop, the tech may give you a pin for the connector and that makes it really easy to hook up the trigger.
Any chance you could help me install my FZ1 when I receive it?
Judd
P.S. We met at the Burleson Yamaha Demo Day. I was the one on the V-Strom 650 that couldn't decide on jumping in on the PDP.