3D printed satnav mounts = own one !

Bryn

New Member
Joined
Sep 4, 2011
Messages
595
Location
Leicester UK
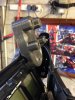
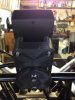
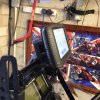
Following on from my previous thread.... after a few weeks of emails and fine tuning, I now have the MK2 3D printed Satnav mount on the bike, specifically designed for the Super Tenere.

It fits the 12mm accessory bar, has captive nyloc nuts and all fittings required to mount to the bike.

It is rock solid, as light as a feather, and super cool 8)

It fits cradles for the Garmin 590, 660 and also the TomTom V5 and 400, in fact any cradle with the 4 bolt holes as follows - 38mm side to side distance, 30mm top to bottom .

Lindsay, the creator if this little 21st Century marvel, is willing to supply more of these, and will print to order ( it takes nearly 4 hours to make ???)

He is willing to post world wide, but as far as the UK is concerned they will be £30 posted will all fittings.. he's not out to make money, just to create a good product and cover his costs ::012::

USA and the rest of the world at cost.

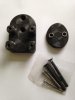
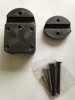
Here's what you get ::012::

Contact Lindsay direct at lindsay.elms@gmail.com
 

Attachments

iClint

Member
Joined
Mar 20, 2015
Messages
220
Location
Sydney
Any chance of sharing the .STL file for others with there own 3D Printers, like myself?
 

barkingllizard

Well-Known Member
Joined
Jul 3, 2011
Messages
15,190
Location
@ The Party @ The End Of The World
I suggest all to give this one a pass,
the price is right, if you don't count shipping,
but it is nowhere near durable enough...

the backing piece ripped apart on hand tightening with an allen key, rendering it useless...
I replaced the backing piece with a simple piece of steel plate and although solid and tight,
I have noticed two small separations, one on each side, of the main mount...

hopefully it will last through this season, and I will be replacing it with a more solid, probably aluminum, one over winter.

really quite disappointing as it was one of the nicest designs for a simple gps mount.....


Bryn

New Member
Joined
Sep 4, 2011
Messages
595
Location
Leicester UK
I think the problem is with the recessed nuts, the casing is not strong enough to prevent the nuts from rounding the recesses ( if you get my meaning)

I've had the same problem with mine, and put an aluminium plate on the back (over the rear cover) with longer bolts , and now it seems secure. ( Also put larger washers on the bolt head end to stop it being recessed)

I suppose until something is tried and tested you don't know how durable it is going to be. ::)
 

Havok

Member
Joined
Jul 23, 2012
Messages
76
Location
SoCal
barkingllizard said:
I suggest all to give this one a pass,
the price is right, if you don't count shipping,
but it is nowhere near durable enough...

the backing piece ripped apart on hand tightening with an allen key, rendering it useless...
I replaced the backing piece with a simple piece of steel plate and although solid and tight,
I have noticed two small separations, one on each side, of the main mount...

hopefully it will last through this season, and I will be replacing it with a more solid, probably aluminum, one over winter.

really quite disappointing as it was one of the nicest designs for a simple gps mount.....

---------------------------------------------

Or could be simply poor adhesion of the layes as it is build. 3D printed parts are stronger against the "grain" vs with it. As the material is deposited layer by layer, the adhesion of each layer is very critical. You can compensate by adding layers and adjusting temps. So you (the person making the part) really needs to pay attention to the orientation of the stress and how the parts is mounted.

The other issue is stress induced fractures. If you use too much heat or and/or trying to make the part without using a heated bed. You end up with different amount of shrinkage in between each layer. This ads stress that is now build into the part and can fail over time.


I am currently experimenting with new materials that are specifically designed to handle the stress. Using a post-secondary "annealing" process. Its a PLA, with long molecular strains mixed with carbon fiber and as an added thermoset bounding agent that is cured at 285F for 6 hours (in your wive oven). The post secondary treatment reduces the build in stress, and allows the part to become thermoset (as oppose to thermoplastic).

The stuff is not cheap (4X price of regular PLA), and so far its weight to strength ratio is vastly superior to standard PLA or even ABS. And can now stand up to 248F before hitting its glass transition temperature*


https://www.proto-pasta.com/products/high-temp-carbon-fiber-pla-composite

Food for fought. Hate for you to have a bad taste in your mouth over 3D printed parts.

* yes this means you can 3D print a custom air box with servo control velocity stack.

https://youtu.be/a3ZOBYMoA8M
 
Top