Harry Dresden PI
New Member
Just did a re key on my side and top box and want to share the details ...
Rekey Motorcycle Cases
For Givi
Givi E36NJ / Givi E45 Monokey
For KAPPA
KGR52
Kit Needed
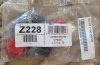
Givi Z228 3-Case Lock Sets Givi Z228 3-Case Lock Sets
(About $30 from Revzilla)
Tools Needed
Philips Screw Driver ~ No 2 (To remove the screws)
Jewelers Screwdriver with ~ 1 mm flat blade
(used To pry the C clip off the square lock shaft and push it back on)
A small bowl to hold all the parts
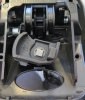
Caution: The Kappa KGR52 has two screws to remove to access the lock and the Givi E36 / E45 has only one screw.
Also the Kappa KGR52 top case has a ball bearing under spring pressure and takes a little care to reassemble.
Takes about and hour to rekey 3 cases.
A few photos are included
========
White the Givi kit comes with no instructions the following instructions were posted on the Revzilla web site.
Givi 3 Case Lock set.
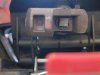
1 First, open the Givi case and look at the bottom of the lock cylinder. Note how the key is oriented and how the locking tab is positioned. Making a sketch is helpful, because it is important that you reassemble it the same way.
2 Remove the old lock cylinder by removing the small circlip ("C" shaped clip) that is on the small square end of the lock cylinder. Using a small screwdriver or scribe (pick) is helpful. Be careful because it's easy to apply too much pressure and send the circlip flying across the room.
3 The lock cylinder core will now fall out. Typically, you can reuse the outer cylinder shell and the circlip (if it didn't get lost when it flew across the room), even though new ones may be provided with your new lock set.
4 Replace the new lock set and the old locking tab in the same position as the old unit. Use the sketch you made in step #1. If you didn't make a sketch, put it back together as best you remember and hope it works (it's easy to reassemble later). Use a small screwdriver to slide the circlip (gently!) back into place while holding the cylinder core and locking tab in position. This is all tough to do with big meaty fingers, so you may want to enlist the help of a lovely assistant with small, diminutive hands and steady nerves.
5 Once it's all together, test the lock to make sure it works by closing the case, locking and unlocking it, and actuating the red case release button. Don't force anything! You could break the lock. If it doesn't feel right, disassemble it, study your sketch (don't you wish you'd made one?) and try it again. It is possible to assemble the lock in several wrong configurations, however, the case will not close properly if you do so.
6 Repeat for remaining cases. Save all your spare parts in case you need them for replacements one day. Now go ride!
Rekey Motorcycle Cases
For Givi
Givi E36NJ / Givi E45 Monokey
For KAPPA
KGR52
Kit Needed
Givi Z228 3-Case Lock Sets Givi Z228 3-Case Lock Sets
(About $30 from Revzilla)
Tools Needed
Philips Screw Driver ~ No 2 (To remove the screws)
Jewelers Screwdriver with ~ 1 mm flat blade
(used To pry the C clip off the square lock shaft and push it back on)
A small bowl to hold all the parts
Caution: The Kappa KGR52 has two screws to remove to access the lock and the Givi E36 / E45 has only one screw.
Also the Kappa KGR52 top case has a ball bearing under spring pressure and takes a little care to reassemble.
Takes about and hour to rekey 3 cases.
A few photos are included
========
White the Givi kit comes with no instructions the following instructions were posted on the Revzilla web site.
Givi 3 Case Lock set.
1 First, open the Givi case and look at the bottom of the lock cylinder. Note how the key is oriented and how the locking tab is positioned. Making a sketch is helpful, because it is important that you reassemble it the same way.
2 Remove the old lock cylinder by removing the small circlip ("C" shaped clip) that is on the small square end of the lock cylinder. Using a small screwdriver or scribe (pick) is helpful. Be careful because it's easy to apply too much pressure and send the circlip flying across the room.
3 The lock cylinder core will now fall out. Typically, you can reuse the outer cylinder shell and the circlip (if it didn't get lost when it flew across the room), even though new ones may be provided with your new lock set.
4 Replace the new lock set and the old locking tab in the same position as the old unit. Use the sketch you made in step #1. If you didn't make a sketch, put it back together as best you remember and hope it works (it's easy to reassemble later). Use a small screwdriver to slide the circlip (gently!) back into place while holding the cylinder core and locking tab in position. This is all tough to do with big meaty fingers, so you may want to enlist the help of a lovely assistant with small, diminutive hands and steady nerves.
5 Once it's all together, test the lock to make sure it works by closing the case, locking and unlocking it, and actuating the red case release button. Don't force anything! You could break the lock. If it doesn't feel right, disassemble it, study your sketch (don't you wish you'd made one?) and try it again. It is possible to assemble the lock in several wrong configurations, however, the case will not close properly if you do so.
6 Repeat for remaining cases. Save all your spare parts in case you need them for replacements one day. Now go ride!
Attachments
-
 40.5 KB Views: 13
 -
 22.6 KB Views: 14
 -
 42.3 KB Views: 15