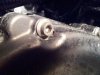
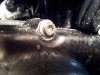
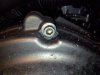
Crankcase cover replacement

jajpko

New Member
Founding Member
2011 Site Supporter
2012 Site Supporter
Joined
Nov 26, 2010
Messages
2,776
Location
North Texas
You should drain the oil. Also a new gasket and take note of where the dowel pins come out from, They may be a different size.
If you have not done jobs like this before you may want to have a good friend help you. just sayin..
 

3putt

2012 Yukon Rally attendee
Founding Member
2012 Site Supporter
2014 Site Supporter
Joined
Oct 17, 2010
Messages
1,126
Location
Bossier City, La.
Loosen each bolt in 1/4 turn stages and criss cross pattern till all are loose, then remove the bolts and the cover.

On install. Start with top bolt then bottom bolt right under the oil fill hole and work around clockwise, when you get back to the bottom one, tighten the 2 inside the outside pattern then go around agin clockwise starting with the next bolt at the bottom. Torque is 12nm or 8.7 ft/lbs.

Service manual has a picture which explains better than my less than 1000 words.
 

Bigbore4

Active Member
Founding Member
Joined
Oct 20, 2010
Messages
845
Location
Andover Minnesota USA
Steal a trick from the race pits. Lean the bike well over and restrain it with a tie down to a sturdy bench, truck, whatever. The race guys do it to save a couple minutes. I do it because I am cheap. I change the oil AFTER I am done with the job. Helps get out any gasket shavings etc that might have fallen in.
 

dcstrom

Well-Known Member
Founding Member
2011 Site Supporter
Joined
Dec 16, 2010
Messages
2,035
Did I miss the obvious question - WHY? Crash damage?
 

s-flow

Member
Joined
Apr 23, 2011
Messages
93
Location
Sweden
Thanks! Good input.

What happens is that probably the salt on our roads speeds up some corrosion, eating into the material..
I will take a photo later tonight if I have time.
Not sure if this should be happening this fast.
???
 

Tremor38

All roads fair game...all game outta the way!
2011 Site Supporter
2012 Site Supporter
Joined
Apr 28, 2011
Messages
2,562
Location
Aomori, Japan
s-flow said:
Thanks! Good input.

What happens is that probably the salt on our roads speeds up some corrosion, eating into the material..
I will take a photo later tonight if I have time.
Not sure if this should be happening this fast.
???
That salt is some wicked stuff. Just a suggestion, but you might want to spray some under-coating on the pan once it is installed.
 

s-flow

Member
Joined
Apr 23, 2011
Messages
93
Location
Sweden
Just around/under the bolt the material is attacked. The bike looks messy but this is from just my last recent ride.
Othervise I clean the bike carefully and has been using transparent rust-protection spray all vinter. I will try to find
some heavier/thicker stuff to put at the worst attacked spots.

The bike in the whole seems to look fine but around two of these bolts things getting bad.. As shown in a photo in another
thread I also get rust under my throttle tube.
 

Attachments

Tremor38

All roads fair game...all game outta the way!
2011 Site Supporter
2012 Site Supporter
Joined
Apr 28, 2011
Messages
2,562
Location
Aomori, Japan
s-flow said:
Just around/under the bolt the material is attacked. The bike looks messy but this is from just my last recent ride.
Othervise I clean the bike carefully and has been using transparent rust-protection spray all vinter. I will try to find
some heavier/thicker stuff to put at the worst attacked spots.

The bike in the whole seems to look fine but around two of these bolts things getting bad.. As shown in a photo in another
thread I also get rust under my throttle tube.
Wow, I see what you mean. Might take something pretty thick next time, as you said. At least you know the areas to concentrate on. Let us know what you come-up with.
 

biting_point

New Member
Joined
Jan 29, 2011
Messages
161
Location
Singapore
looks nasty, this is how nature works its way on the smallest thing..

maybe try cleaning it frequently to stop deposits from working on those areas in future..
 

Tremor38

All roads fair game...all game outta the way!
2011 Site Supporter
2012 Site Supporter
Joined
Apr 28, 2011
Messages
2,562
Location
Aomori, Japan
biting_point said:
looks nasty, this is how nature works its way on the smallest thing..

maybe try cleaning it frequently to stop deposits from working on those areas in future..
Yeah, I think hitting the area around those bolts at the end of a ride with something that is water-displacing is a very good first step. We used to follow that up with some stuff we called 'grade 4' that we brushed onto and around the fastener/screws on military aircraft. That seemed to stand-up to the element pretty well, but need periodic cleaning and re-application.
 

Checkswrecks

Ungenear to broked stuff
Staff member
Global Moderator
2011 Site Supporter
Joined
Mar 7, 2011
Messages
11,525
Location
Damascus, MD
Sorry for you to be the guinea pig who we learn from and that this is taking place.


As a preventive for next time, this is exactly what the ACF-50 and similar products are meant for. Re-spray after washes.
 

s-flow

Member
Joined
Apr 23, 2011
Messages
93
Location
Sweden
No problem! I love the bike a lot, so I really want to ride all year even though it might be hard on the bike.. It has to be worth it.

Thanks for the recommendations.. I will try them out. I will report later on how things work out 8)
 
Top