So I did my 1st valve adjustment at 22K since some folks are finding tight exhaust valves and I'm heading off on a trip next month.
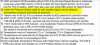
1) cam chain tensioner reset. I had to do it twice and it only took a few minutes each time using a bench vise, piece of tin, and piece of heavy duty rubber. Tin between vise and main body of tensioner on one side, rubber between vise and piston on the other side. This let me slowly close vise with one hand while I spun the tensioner body with the other to let the piston compress. The rubber kept the piston from spinning and protected it from damage. Use a small screwdriver to hold the spring in place while you start to loosen the vise. You can see the spring catch the groove on the piston and loosen the vise ever so slightly more (not enough for the whole tensioner to fall on the floor).
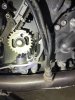
2) follow the service manual to loosen three hydraulic lines near left corner of valve cover. This involves three mount points (one bolt at each location) all at the head stem of the bike. A fourth (allen head screw) is near the key for the seat lock. A fifth 'holder' for the three lines is near the left corner of the valve cover, the lines just pop out of the holder. Zip tied them back as much as possible when I was ready to remove the cover. The cover then came out relatively easy and went back in without much fuss.
3) right side of valve cover, zip tie the large wire loom up and out as much as possible. Between this and getting the hydraulic lines out of the way it helps a lot in getting the valve cover in and out.
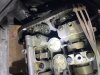
4) Valve cover gasket, what a pain. I think someone else recommended setting it with some gasket maker or something to hold it in place. My method was to put it on the cylinder head with the four round sections holding it in place. The long sections didn't stay in place well, so I used a small point awl with a short 90degree tip to juggle it in place while hold the valve cover. I did put the 4 round spark plug hole gaskets on the cover and they stayed in place ok (I did verify by using a flashlight and mirror on a stick to get a good look down the spark plug holes once the cover was tightened down).
Be sure to get a good visual all the way around once it's mounted, I found a hidden pinch in the hardest to see place behind the electrical tray. Loosening the four bolts on the tray allows it to move out really well and you can see all the valve cover gasket with a good flashlight. I quadrupled checked to ensure that thing was in properly.
5) DON'T do the shim math late at night when you are tired and sweaty!! I blew this and ended up with so much gap I'm sure it would not have run. I'm not even sure the valves were opening when I hand rotated the engine! Good news is I removed/reinstalled the cam's and corrected my math in about 30 minutes. I'm now at between .26-.27 so I'm good to go for a while. Maybe I won't need an adjustment at the next check.
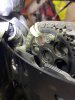
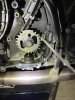
6) cam bucket removal. The engine oil film makes these guys want to stay in place, I noticed this since the second time I pulled them they came out easily. I used a large forceps with a good bend at the jaws to grab them. I think a small forceps or needle nose pliers with a 90 degree bend at the jaws would be great and I plan to get one next time.
7) per the service manual, you need to loosen the intake cam to get the exhaust cam back into place. I did not need to adjust the intake shims, so I zip tied the timing chain to the intake cam gear in two places before removing the cam holders. To install the exhaust cam, I tilted the intake cam slightly to give the chain enough slack to get it onto the exhaust cam gear (using two paint marks on cam gear/chain to line everything back up). Then tighten the exhaust cam holder first, tighten intake cam caps last. I think the service manual indicates this is the proper procedure.
I'm confident I could do an adjustment in 8 hours now that I've done it once. It takes me a little longer as I like to clean up things as I go.
I'll post up pictures of my tensioner re-set this evening.
 169.2 KB Views: 42
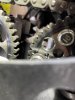 91.4 KB Views: 41