As with other Yamaha models, riders will occasionally think that the transmission is broken because they can not shift. Sometimes the shifter will go up but not down. As with the other Yamaha models, the maintenance schedule calls for disassembly, cleaning, and lubricating the shifter and brake pivot at the same time as oil changes.
Yamaha calls for for the use of lithium soap grease and in the photos is a tube of molybdenum grease, which is what I prefer and use. I use the moly because lithium greases tend to emulsify (break down) in the presence of moisture and in a sliding surface like pivots, the moly stays better and is capable of a higher bearing load. The Honda brand is relatively inexpensive, can be bought at most Honda dealers, and is much higher in how much moly it contains when compared to generic moly greases from a car parts store. Molykote is another well-known brand with high moly content. More info is on the web and use whichever you are most comfortable with. These are the pieces and tools. Note which washer goes where.
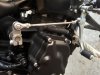
This easiest way to remove the shifter is to remove the pivot bolt and the input shaft clamp bolt (10mm head). This bolt is next to the socket on the ratchet in the above photo. Do this AFTER using a marker to show where the input shift arm originally was on the spline. You can see the blue mark on the shaft in this photo at the split of the arm:
The shifter pivot takes a 6mm allan and some style foot pegs may need to be removed first to get access. If the footage is removed, make absolutely sure to apply thread locker before re-assembly.

As you slide the bolt out and remove the shifter assembly, do NOT lose the three washers. The old grease makes it easy for the inner one to stick to the frame and later fall off. Thoroughly clean the washers, the hole, and the shifter bolt. Fill the grooves in the bolt with grease and re-assemble. It is important that the washers be assembled in the order shown in this photo. The wavy spring washer presses the assembly together to keep the grease in and moisture out.

Now move to the other side of the bike to disassemble, clean, and re-assemble the brake pivot. Note that you must first remove the safety pin and washer which are on the hidden end of the bolt. The safety pin can be hard to remove. A cotton swab (Q-tip) can be used to get grease into the hole.
The tightening torques are:
Shifter pivot: 22 ft-lb / 30 Nm
Shifter input shaft clamping bolt: 7.2 ft-lb / 10 Nm
Brake pivot: 19 ft-lb / 26 Nm
Yamaha calls for for the use of lithium soap grease and in the photos is a tube of molybdenum grease, which is what I prefer and use. I use the moly because lithium greases tend to emulsify (break down) in the presence of moisture and in a sliding surface like pivots, the moly stays better and is capable of a higher bearing load. The Honda brand is relatively inexpensive, can be bought at most Honda dealers, and is much higher in how much moly it contains when compared to generic moly greases from a car parts store. Molykote is another well-known brand with high moly content. More info is on the web and use whichever you are most comfortable with. These are the pieces and tools. Note which washer goes where.
This easiest way to remove the shifter is to remove the pivot bolt and the input shaft clamp bolt (10mm head). This bolt is next to the socket on the ratchet in the above photo. Do this AFTER using a marker to show where the input shift arm originally was on the spline. You can see the blue mark on the shaft in this photo at the split of the arm:
The shifter pivot takes a 6mm allan and some style foot pegs may need to be removed first to get access. If the footage is removed, make absolutely sure to apply thread locker before re-assembly.
As you slide the bolt out and remove the shifter assembly, do NOT lose the three washers. The old grease makes it easy for the inner one to stick to the frame and later fall off. Thoroughly clean the washers, the hole, and the shifter bolt. Fill the grooves in the bolt with grease and re-assemble. It is important that the washers be assembled in the order shown in this photo. The wavy spring washer presses the assembly together to keep the grease in and moisture out.
Now move to the other side of the bike to disassemble, clean, and re-assemble the brake pivot. Note that you must first remove the safety pin and washer which are on the hidden end of the bolt. The safety pin can be hard to remove. A cotton swab (Q-tip) can be used to get grease into the hole.
The tightening torques are:
Shifter pivot: 22 ft-lb / 30 Nm
Shifter input shaft clamping bolt: 7.2 ft-lb / 10 Nm
Brake pivot: 19 ft-lb / 26 Nm
")