Gigitt
Active Member
I just installed a Off-The-Road clutch slave cylinder on my 2015 XT1200ZE S10
I chose the Titan-grey colour.
link: http://www.off-the-road.de/en/XT-1200Z/Bodywork/Clutch-slave-cylinder-XT-1200Z-Super-Tenere.html
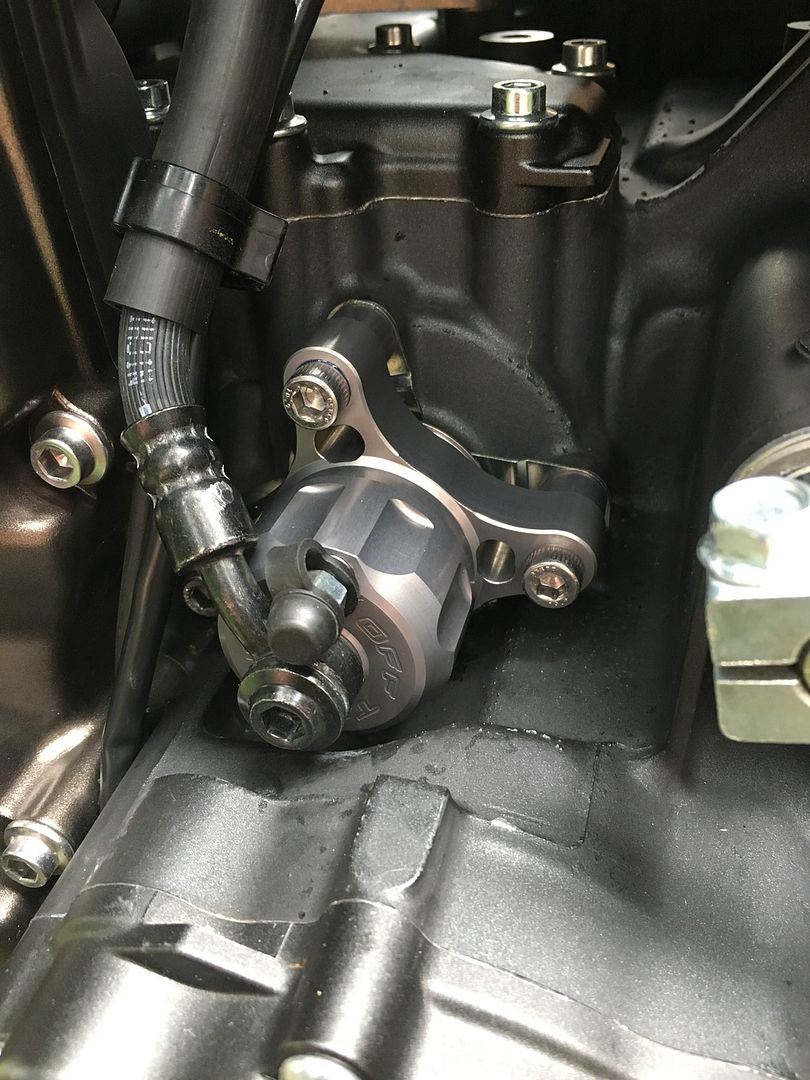
Installed:
All I can say is WOW. ::014::
Clutch is much lighter.
Have not gone on a ride yet as it has started raining.
Took just over 1 hour as i had some issues. You should be able to do it in 30-45 min.
Have all you bits and bobs close by.
Hex for 3 retaining bolts
Hex for Banjo Bolt
Torque wrench - 10Nm for 3 retaining hex held bolts, 30Nm for Banjo Bolt
Locktite Blue
Grease
Rags/ paper towel
Newspaper
2 litres of water to neutralize spilt brake fluid.
Small bottle with wide opening to put the clutch hose/banjo in - I used a 300ml juice bottle
Level bike - I put it on the center stand.
Stick it in 1st gear
Removing the factory slave cylinder:
- Undo the little clip that holds the 2 wires to the clutch hose 2in above the slave cylinder
- Get some paper towel fold it over and feed it under the slave cylinder. pour some water on it to soak up and this is used to help protect the gearbox paint from spills.
- Crack the 3 slave retaining bolts - but keep them tight as this just makes it easier to undo later.
- Undo the banjo bolt and place the banjo into the small bottle to catch any brake fluid drips. Secure the bottle and hose somehow, mine just sat in the factory crash bars.
- Undo the 3 retaining bolts.
- remove the slave cylinder by slipping it towards Left side of of engine, then tilt it up a bit to clear the gearbox case as it slips of the pin.
- Put slave cylinder it to one side - it will leak brake fluid so maybe on newspaper
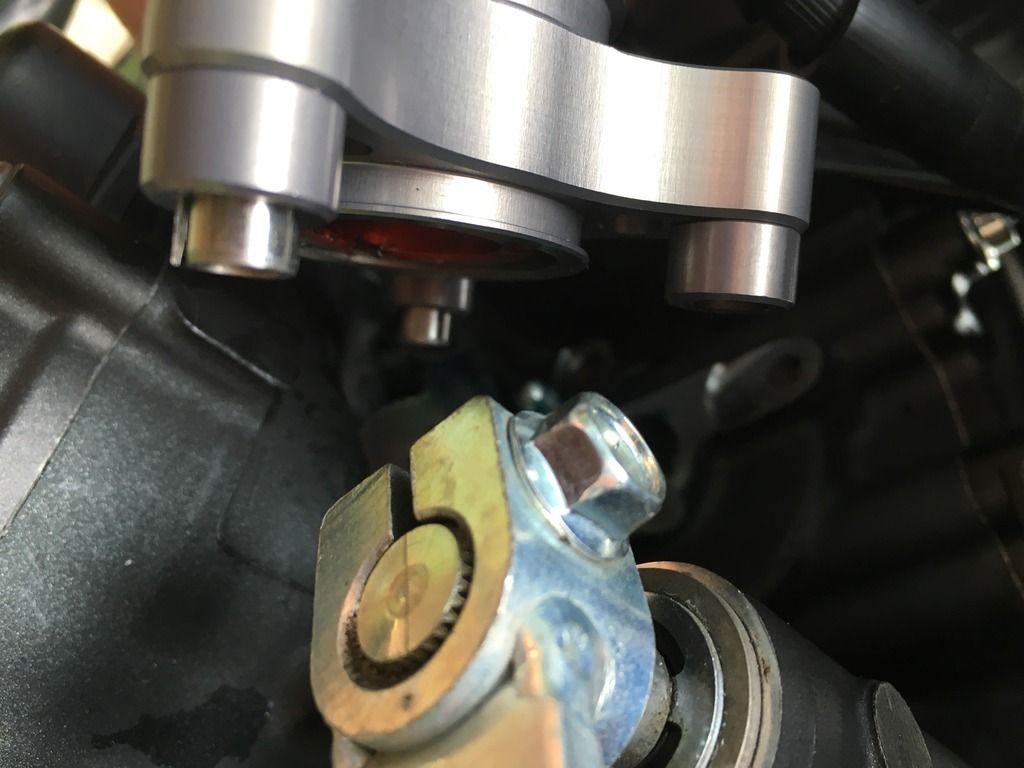
- there are 2 alignment tube sleeves in the 2 lower mounts that slip in behind and then into the engine case - do no loose these! I did loose one but found it and hence my extra time. There was no mention in the service manual of these nor in the instructions from Off-The-Road.
- Remove the metal mounting plate (called clutch release cylinder plate)
- remove the wet paper towel
- cleans the surfaces
Installing the Off-The-Road slave cylinder:
- the alignment pins would not slip into the space at the back of the new slave cylinder mounts, like they do in the factory cylinder. the holes were just a tad too small and the pins would have needed a vice or press to press them in - I had no instruction if these are needed or not. The sleeves have a split so I took a chance and using pliers pressed one side in so that the ends now overlap and reshaped the sleeve round with the pliers - this reduced the diameter enough for them to fit. YMMV so be careful.
- dab a bit of greese on the clutch pin
- Replace the metal mounting plate (called clutch release cylinder plate) with the words OUT facing you and not the engine.
- slip the slave cylinder into place - you may need to depress the slave cylinder to get it in place and onto the clutch pin
- put some Locktit blue on the retaining bolts, tighten and torque them to 10Nm
- Take the old bleed nipple from the factory cylinder and put it on new cylinder.
- put new crush washer on banjo bolt then hose banjo then put other new crush washer on and hand tighten the bolt into into the slave cylinder.
- now there is NO banjo alignment stop peg on new cylinder... so here is a tip to get good spacing for the bleed nipple
- put your 8mm ring spanner onto the bleed nipple an then use one of the old crush washed as a spacer between the bango arm and ring spanner. As you tighten the banjo bolt the arm will move against the crush washer. Tighten banjo bolt to 30Nm torque. Remove the crush washer spacer and now you have space to still get the wrench on and off the bleed nipple.
- replace clip that hold the 2 wires to the clutch hose.
- follow service manual and bleed you clutch as normal.
- check for leaks
- wash down bike
Enjoy the light clutch")
Here are the sleeves installed:
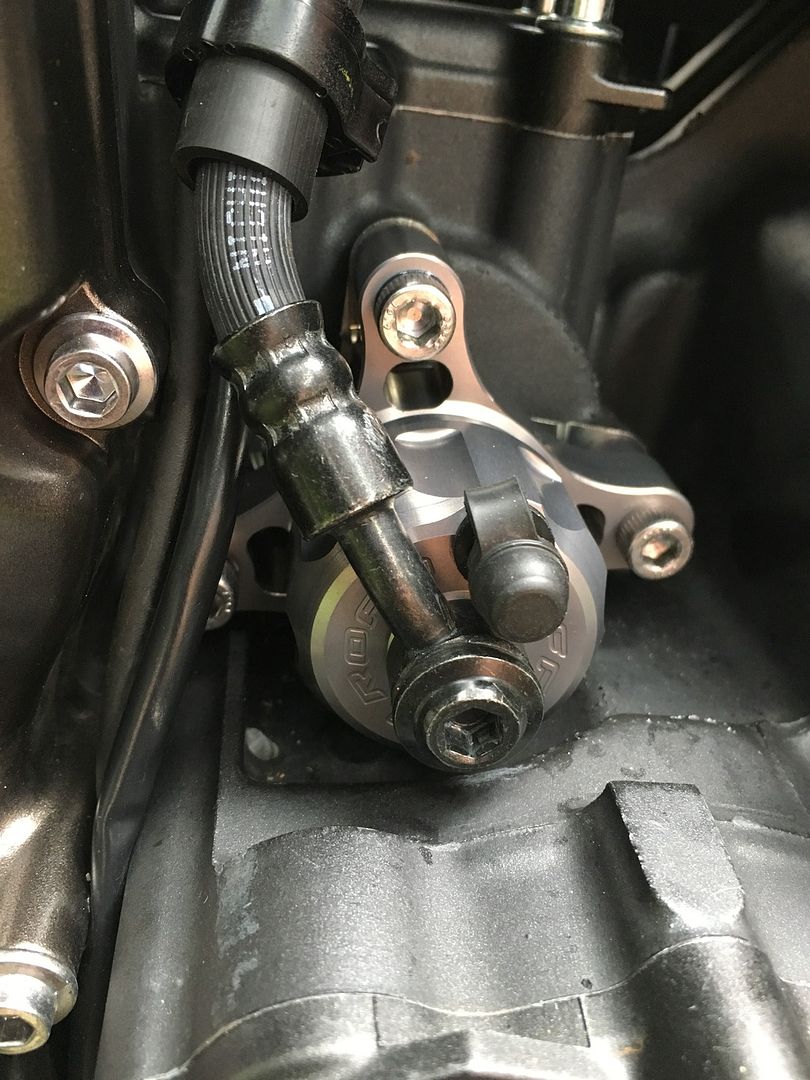
Hers is the bleed screw gap:
___
EDIT: 13 APRIL 2017 : included in install instructions the replacement of metal plate (called clutch release cylinder plate)
---
I chose the Titan-grey colour.
link: http://www.off-the-road.de/en/XT-1200Z/Bodywork/Clutch-slave-cylinder-XT-1200Z-Super-Tenere.html
Installed:
All I can say is WOW. ::014::
Clutch is much lighter.
Have not gone on a ride yet as it has started raining.
Took just over 1 hour as i had some issues. You should be able to do it in 30-45 min.
Have all you bits and bobs close by.
Hex for 3 retaining bolts
Hex for Banjo Bolt
Torque wrench - 10Nm for 3 retaining hex held bolts, 30Nm for Banjo Bolt
Locktite Blue
Grease
Rags/ paper towel
Newspaper
2 litres of water to neutralize spilt brake fluid.
Small bottle with wide opening to put the clutch hose/banjo in - I used a 300ml juice bottle
Level bike - I put it on the center stand.
Stick it in 1st gear
Removing the factory slave cylinder:
- Undo the little clip that holds the 2 wires to the clutch hose 2in above the slave cylinder
- Get some paper towel fold it over and feed it under the slave cylinder. pour some water on it to soak up and this is used to help protect the gearbox paint from spills.
- Crack the 3 slave retaining bolts - but keep them tight as this just makes it easier to undo later.
- Undo the banjo bolt and place the banjo into the small bottle to catch any brake fluid drips. Secure the bottle and hose somehow, mine just sat in the factory crash bars.
- Undo the 3 retaining bolts.
- remove the slave cylinder by slipping it towards Left side of of engine, then tilt it up a bit to clear the gearbox case as it slips of the pin.
- Put slave cylinder it to one side - it will leak brake fluid so maybe on newspaper
- there are 2 alignment tube sleeves in the 2 lower mounts that slip in behind and then into the engine case - do no loose these! I did loose one but found it and hence my extra time. There was no mention in the service manual of these nor in the instructions from Off-The-Road.
- Remove the metal mounting plate (called clutch release cylinder plate)
- remove the wet paper towel
- cleans the surfaces
Installing the Off-The-Road slave cylinder:
- the alignment pins would not slip into the space at the back of the new slave cylinder mounts, like they do in the factory cylinder. the holes were just a tad too small and the pins would have needed a vice or press to press them in - I had no instruction if these are needed or not. The sleeves have a split so I took a chance and using pliers pressed one side in so that the ends now overlap and reshaped the sleeve round with the pliers - this reduced the diameter enough for them to fit. YMMV so be careful.
- dab a bit of greese on the clutch pin
- Replace the metal mounting plate (called clutch release cylinder plate) with the words OUT facing you and not the engine.
- slip the slave cylinder into place - you may need to depress the slave cylinder to get it in place and onto the clutch pin
- put some Locktit blue on the retaining bolts, tighten and torque them to 10Nm
- Take the old bleed nipple from the factory cylinder and put it on new cylinder.
- put new crush washer on banjo bolt then hose banjo then put other new crush washer on and hand tighten the bolt into into the slave cylinder.
- now there is NO banjo alignment stop peg on new cylinder... so here is a tip to get good spacing for the bleed nipple
- put your 8mm ring spanner onto the bleed nipple an then use one of the old crush washed as a spacer between the bango arm and ring spanner. As you tighten the banjo bolt the arm will move against the crush washer. Tighten banjo bolt to 30Nm torque. Remove the crush washer spacer and now you have space to still get the wrench on and off the bleed nipple.
- replace clip that hold the 2 wires to the clutch hose.
- follow service manual and bleed you clutch as normal.
- check for leaks
- wash down bike
Enjoy the light clutch
Here are the sleeves installed:
Hers is the bleed screw gap:
___
EDIT: 13 APRIL 2017 : included in install instructions the replacement of metal plate (called clutch release cylinder plate)
---