I think the double metal cover of the coil is for something. Either to protect the coil from heat from the motor, or to prevent spark from escaping into the motor, causing not only low spark voltage, but the spark may end up drilling the motor. When the coil's metal cover is rusted, the spark tends to jump into the engine and not the spark plug.Thanks for video,, so should I d o what the Spanish chaps done or just get rid of steel sleeves? His looks a good solution. Thanks again
What you did to your Tenere today??!!
- Thread starter biting_point
- Start date
Nice RSAF Tornado in your Avatar pic.Thought I'd change the plugs... supposedly been changed 2,000 miles ago... Bollox!
View attachment 69157
I think someone was telling me porkies....
Perhaps a Saudi air base and apparently you have a security clearance ID on your coveralls.

Hope I can help with a traduction of the video::This in Spanish. if you don't understand, put ear plugs on, and imagine what it says
First he talks very good of the Yamaha SuperTenere, being a great bike. and he comments that it is better to have the bike running with the original coils so he procedes to do some maintenance and that is what the video is about.
He says that the coil my have some spark problems at the bottom where the coil conects to the spark plug so what he does is he says that the Yamaha coil is very good and he recomends to do a cleaning process so that is what he shows in the video.
After the coil is removed from the engine prepair to disassembly
He starts removing the top and bottom rubber.
Then he removes the two metalic sleves (be carefull on how he dose it, he uses some kind of knives, so be carefull because you do not want to cut your self) , he says that you might see some rust in the interior, he recomends to use a 360 sand paper in the interior to get rid of the rust.
Affter it is being done he suggests to paint them with paint spray.
He says that due to the rust you might have a spark in the wrong place and not through the spark plug, reason to have misfire!
Then you clean the rubber portion of the coil very well and/ or rust left from the tubes being previously removed.
As a next step you use dielectric grease to cover the tubes interior, and put back the tubes to the coil.
Then put the rubber parts back in to the coil and remove the 4 points as shown to cover the coil with electric tape to assure there is a complete seal in the coil body and giving an 2 or 3 extra tape turns at the top to cover and assure is complete seal, bcause water intrusion is what causes the problem so water intrussion needs to be avoided..
Finally you put the top seal to assure there is a complete seal in the engine when the coil is located in the engineby having the extra electric tape covers at the top you will assure a better seal to avoig getting water in to the coil body.
Doing this process is a recomendation when you experience some spark issues with your engine, and he says that it shoul last for some extra miles and the coil life can be extended.
Hope is understandable and helps some of you to see what kind of maintenance can be done to the coils.
(I hope the spelling and wording will be good enogh to understand the video)
Have a great day to all!
I hingk you shoul consider looking in to the video due to the amount of rust you found in the spark plugs!!Thought I'd change the plugs... supposedly been changed 2,000 miles ago... Bollox!
View attachment 69157
I think someone was telling me porkies....
Regards.
Tommy Tickle
Member
Thanks very much for in depth reply, very helpful, I only checked shims 3k miles ago so hopefully everything will go well. I will let you all know when I've done as chap on video has and if it sorts my problem out. Ta Tommy TickleHope I can help with a traduction of the video::
First he talks very good of the Yamaha SuperTenere, being a great bike. and he comments that it is better to have the bike running with the original coils so he procedes to do some maintenance and that is what the video is about.
He says that the coil my have some spark problems at the bottom where the coil conects to the spark plug so what he does is he says that the Yamaha coil is very good and he recomends to do a cleaning process so that is what he shows in the video.
After the coil is removed from the engine prepair to disassembly
He starts removing the top and bottom rubber.
Then he removes the two metalic sleves (be carefull on how he dose it, he uses some kind of knives, so be carefull because you do not want to cut your self) , he says that you might see some rust in the interior, he recomends to use a 360 sand paper in the interior to get rid of the rust.
Affter it is being done he suggests to paint them with paint spray.
He says that due to the rust you might have a spark in the wrong place and not through the spark plug, reason to have misfire!
Then you clean the rubber portion of the coil very well and/ or rust left from the tubes being previously removed.
As a next step you use dielectric grease to cover the tubes interior, and put back the tubes to the coil.
Then put the rubber parts back in to the coil and remove the 4 points as shown to cover the coil with electric tape to assure there is a complete seal in the coil body and giving an 2 or 3 extra tape turns at the top to cover and assure is complete seal, bcause water intrusion is what causes the problem so water intrussion needs to be avoided..
Finally you put the top seal to assure there is a complete seal in the engine when the coil is located in the engineby having the extra electric tape covers at the top you will assure a better seal to avoig getting water in to the coil body.
Doing this process is a recomendation when you experience some spark issues with your engine, and he says that it shoul last for some extra miles and the coil life can be extended.
Hope is understandable and helps some of you to see what kind of maintenance can be done to the coils.
(I hope the spelling and wording will be good enogh to understand the video)
Have a great day to all!
stutrump,I think the double metal cover of the coil is for something. Either to protect the coil from heat from the motor, or to prevent spark from escaping into the motor, causing not only low spark voltage, but the spark may end up drilling the motor. When the coil's metal cover is rusted, the spark tends to jump into the engine and not the spark plug.
has done 60,000 miles with those metal sleeves removed with no issue found
rob
Rush2112tenere
Member
I’m changing mine on Thursday, we can compare plugs.Thought I'd change the plugs... supposedly been changed 2,000 miles ago... Bollox!
View attachment 69157
I think someone was telling me porkies....
Rush2112tenere
Member
Looking at your avatar I also spent some time over there with the blue coverall outfit.Thought I'd change the plugs... supposedly been changed 2,000 miles ago... Bollox!
View attachment 69157
I think someone was telling me porkies....
WJBertrand
Ventura Highway
Agree. I'm thinking to suppress electrical interference? I wonder if it affects the driver's car radio next to you at the traffic light with those covers removed?I think the double metal cover of the coil is for something. Either to protect the coil from heat from the motor, or to prevent spark from escaping into the motor, causing not only low spark voltage, but the spark may end up drilling the motor. When the coil's metal cover is rusted, the spark tends to jump into the engine and not the spark plug.
If that were the case, a slick of dielectric grease would do the exact same thing once they've been removed. Personally, I'm going to do the "fix" - which is just a cleaning, greasing and sealing.Agree. I'm thinking to suppress electrical interference? I wonder if it affects the driver's car radio next to you at the traffic light with those covers removed?
Jlq1969
As Rob said, I've done stacks of miles on mine since removing the metal sleeves and no probs at all.
Each to their own of course but if you ride in the wet alot I would remove them.
They'll never get stuck/rusted in if the metal sleeves are removed
As Rob said, I've done stacks of miles on mine since removing the metal sleeves and no probs at all.
Each to their own of course but if you ride in the wet alot I would remove them.
They'll never get stuck/rusted in if the metal sleeves are removed
WJBertrand
Ventura Highway
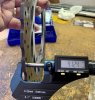
Today I fitted my new rear disk. The new rear is a whole mm thicker than the worn out rear one. It's strange how the old one wore in a way that produced broad grooves, where I suspect the metal is even thinner. I noticed the pads had worn to match that, so I'm going to replace those too.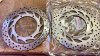

Kurgan
Well-Known Member
I must be tired..Today I fitted my new rear disk. The new rear is a whole mm thicker than the worn out rear one. It's strange how the old one wore in a way that produced broad grooves, where I suspect the metal is even thinner. I noticed the pads had worn to match that, so I'm going to replace those too.View attachment 69197View attachment 69198View attachment 69199
FIrst thought, only 1mm less, that's nothing... and then remembered, this isn't a 14mm thick car rotor, it's a bike rotor that's a tick over 5mm when new! 1mm is 20%!
WJBertrand
Ventura Highway
72,000+ milesWow, that's a crazy difference. How many miles?
Sent from my iPhone using Tapatalk Pro
WJBertrand
Ventura Highway
The wear limit according to the service manual is 4.5mmI must be tired..
FIrst thought, only 1mm less, that's nothing... and then remembered, this isn't a 14mm thick car rotor, it's a bike rotor that's a tick over 5mm when new! 1mm is 20%!
Sent from my iPhone using Tapatalk Pro
WJBertrand
Ventura Highway
Yeah, I noticed that it had been superseded when I ordered it. Hopefully it’s a little more durable than before? Partzilla had it for about $75. I was thinking to go aftermarket but they were all a lot more expensive.When I look up the part # for the rear disk it says it’s been superseded. Hopefully he new one is better? How much is a new disk?

Sent from my iPhone using Tapatalk Pro
Last edited:
OE or aftermarket pads?72,000+ miles